Outdoor smokers cook meat low and slow with smoke, and the fuel you choose shapes the whole experience. Charcoal and wood give the most classic flavor but need attention. Pellet and electric smokers hold temperature on their own, which is why many beginners start there.
The six models below cover charcoal, pellet, gravity-fed and electric designs from well-known makers. We have not used these smokers ourselves, so please confirm the cooking area, the fuel type and any included accessories on the current listing before you buy.
As an Amazon Associate we earn from qualifying purchases. Links below are affiliate links, and they do not change the product information we give.
What to Look For
| Feature | Why it matters |
|---|---|
| Fuel | Charcoal, pellets, electricity and gas each change flavor and effort |
| Capacity | Check rack space against how much meat you cook |
| Temperature control | Digital controllers hold steady heat with less watching |
| Build | Thicker steel and tight seals hold heat and smoke |
| Running needs | Pellets and charcoal are ongoing supplies; electric needs only outlet power |
In this guide
Specs at a Glance
| Smoker | Fuel | Style | Notes |
|---|---|---|---|
| Weber Smokey Mountain Cooker 18 | Charcoal | Vertical bullet | Water pan; classic design |
| Masterbuilt Gravity Series 560 | Charcoal, gravity-fed | Digital control | Wi-Fi and app features; check listing |
| Traeger Pro 575 | Wood pellets | Horizontal pellet grill | Wi-Fi controller; check listing |
| Pit Boss Pro Series Vertical Pellet Smoker | Wood pellets | Vertical | Multiple racks |
| Masterbuilt Digital Electric Smoker | Electric | Vertical cabinet | Plug-in; hands-off |
| Camp Chef Smoke Vault 24 | Gas | Vertical cabinet | Propane; adjustable racks |
The 6 Best Outdoor Smokers
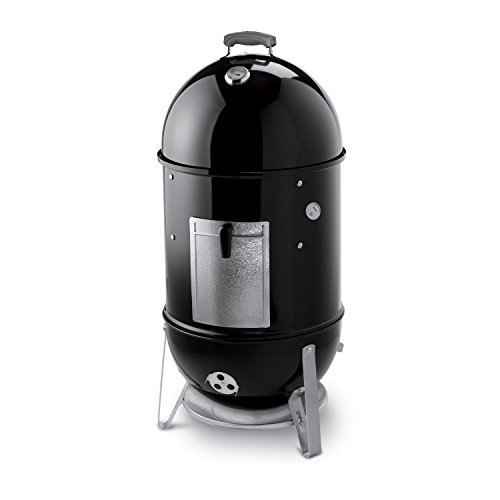
Top pickBest for beginners and traditionalists
1. Weber Smokey Mountain Cooker 18
A long-running vertical charcoal smoker with a water pan, built from porcelain-enameled steel. Many pitmasters learn the basics of low and slow cooking on this style of smoker.
Suits: beginners and traditionalists. Strengths: simple, classic, and well-regarded. Weaknesses: manual temperature management. Skip it if you want a hands-off smoker.
Best for cooks who want charcoal flavor with control
2. Masterbuilt Gravity Series 560
A charcoal smoker that feeds fuel by gravity into a firebox and uses a digital controller to hold steady heat. It also sears and grills, so it does double duty.
Suits: cooks who want charcoal flavor with control. Strengths: digital control with real charcoal. Weaknesses: bulky and heavy. Skip it if you want a compact smoker.
View Masterbuilt Gravity Series 560 on Amazon
Best for first-time smoker owners
3. Traeger Pro 575
A pellet grill from a pioneer of the category, with a digital controller and Wi-Fi features. Pellets feed automatically, which makes long cooks easier.
Suits: first-time smoker owners. Strengths: steady heat and easy fuel feeding. Weaknesses: needs electricity and pellets. Skip it if you want a charcoal-only smoker.
View Traeger Pro 575 on Amazon
Best for small patios
4. Pit Boss Pro Series Vertical Pellet Smoker
A vertical pellet smoker with several racks and a digital controller. The upright design saves floor space compared with a horizontal pellet grill.
Suits: small patios. Strengths: multiple racks in a tall cabinet. Weaknesses: no sear grate in most designs. Skip it if you want to grill burgers.
View Pit Boss Pro Series Vertical Pellet Smoker on Amazon

Best for beginners and apartment patios
5. Masterbuilt Digital Electric Smoker
A cabinet-style electric smoker with a digital panel. You load wood chips, set the temperature and let it run, which makes it easy for beginners.
Suits: beginners and apartment patios. Strengths: set-it-and-forget-it operation. Weaknesses: milder smoke flavor than charcoal. Skip it if you want a heavy smoke ring.
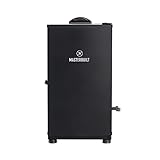
Best for gas fans
6. Camp Chef Smoke Vault 24
A vertical gas smoker from Camp Chef with removable racks and a wood chip box. Propane runs the burner, so there is no ash to clean up.
Suits: gas fans. Strengths: easy heat control. Weaknesses: needs propane. Skip it if you prefer charcoal.
View Camp Chef Smoke Vault 24 on Amazon
Care and Setup
- Clean grease and ash from the cook chamber after every few cooks.
- Keep pellets dry in a sealed container.
- Cover the smoker once it is cool.
- Season a new smoker as the maker advises before the first cook.
- Empty the grease tray before it fills so it cannot catch fire.
- Wipe the exterior with mild soap once it is cool.
Mistakes to Avoid
- Opening the lid too often during a long cook.
- Using too much smoke wood, which can taste bitter.
- Skipping a meat thermometer.
- Cooking before reading the maker’s seasoning steps.
- Smoking at too high a temperature and drying out the meat.
- Using wet, unseasoned wood that gives off harsh smoke.
Matching a Smoker to Your Schedule and Skill
Before comparing models, think about how and when you cook. A smoker that needs constant attention suits a lazy weekend but not a busy weekday, while a set-temperature smoker suits people who want to start a cook and get on with other things. Be honest about how often you will use it. A simple smoker you use monthly is better than a complex one that stays covered.
Consider your experience. Beginners often do well with designs that hold temperature for them, because they can focus on seasoning, timing and doneness. Experienced cooks may prefer a manual smoker for control and flavor. If you enjoy tinkering, a charcoal smoker teaches airflow and fire management. If you cook for others and need consistent results, an automated smoker removes variables.
- Limited time: pellet, gravity-fed, electric or gas designs.
- Hands-on enthusiasm: charcoal or wood-fired designs.
- Small patio: vertical cabinets and compact bullets.
- Entertaining: more rack area and a design that holds heat steady.
Also think about the types of food. Brisket, ribs, pork shoulder, sausage, fish and poultry all work, but some need higher temperatures or shorter times. Check that the smoker you choose can hold the range you need, including low temperatures for cold-smoking items if that interests you.
Siting, Wind and Weather Planning
Where you set up the smoker affects safety and performance. Place it outdoors on a stable, level, non-combustible surface, away from walls, fences, overhanging branches and anything flammable. Keep a safe distance from windows, doors and vents so smoke does not drift into the house. Never use a smoker in a garage, shed, or any enclosed or partly enclosed space, because smoke and carbon monoxide can build up.
Wind pulls heat and smoke away, changes airflow and can make temperature control harder. A sheltered spot, such as beside a wall at a safe distance or behind a windbreak, helps. Cold weather increases fuel use and extends cook times, while hot weather can push temperatures up. Rain and snow can cool the cooker and soak fuel, so a cover or shelter is useful. Electric models need protection from moisture at the plug and controller.
Plan the route from kitchen to smoker. Carrying hot trays across a slippery patio is risky, so keep the path clear. Have a heat-resistant surface nearby for pans and tools, and a place for the fuel. Keep a fire extinguisher or bucket of sand nearby, and keep children and pets away from the hot cooker. Check local rules on open fires and smoke, since some neighborhoods restrict them.
Fuel Supply, Storage and Ongoing Costs
The purchase price is only part of the cost; fuel is the ongoing one. Charcoal and wood are consumed during each cook, and long cooks can use a lot. Pellets are also consumed steadily, and some pellet blends are more expensive than others. Electric smokers use electricity and small amounts of wood chips. Gas models use propane, and you will need to keep a tank filled.
Think about availability. Can you easily buy the fuel your smoker uses? Are the pellets or charcoal sold at stores near you? Do you have space to store bags of fuel somewhere dry? Damp fuel burns poorly and can ruin a cook. Pellets swell and crumble in moisture, and charcoal absorbs humidity.
- Keep pellets in a sealed bin off the ground.
- Store charcoal in a dry container with a lid.
- Keep propane tanks upright outdoors, away from heat sources.
- Season wood and keep it dry before use.
Fuel affects flavor, so test different woods and blends. Keep notes about which combinations you like. Also consider how much fuel a long cook uses compared with your budget, and whether a more efficient, well-sealed smoker might save money over time.
Build, Materials, Seals and Heat Retention
A smoker holds heat and smoke inside, so construction quality matters. Thicker steel holds temperature more steadily than thin sheet metal, which loses heat faster in wind and cold. Tight seals around doors and lids reduce leaks, helping control temperature and smoke flow. Check for gaskets, door latches and hinges that close firmly without gaps.
Porcelain-enameled and powder-coated finishes resist rust and are easier to clean, but they can chip, exposing bare steel. Stainless steel resists corrosion but costs more. Check that the grates are sturdy and the racks slide smoothly. Look at the handle material to be sure it stays cool enough to touch, and confirm that feet or wheels support the weight of the unit.
Insulated or double-walled designs hold heat well, especially in cold weather, though they can weigh more. Vents and dampers give control over airflow in charcoal and wood smokers, so look for smooth-moving dampers that stay where you set them. Digital controllers and probes should be easy to read and replaceable if they fail.
Ask what replacement parts are available. Over years of use, gaskets, igniters, probes and grates can wear out. A maker that sells parts and offers clear documentation helps extend the smoker’s life. Read the warranty to see what parts are covered and for how long.
Maintenance Routine and When to Retire a Smoker
A simple routine keeps a smoker working. After each cook, let it cool and remove ash and grease. Scrape grates with a brush, wipe the interior as the manual suggests, and empty drip pans. Grease buildup can cause flare-ups and unpleasant flavors. Deep clean periodically, following the maker’s instructions, and inspect seals, hoses and electrical connections.
Protect the smoker from the elements with a cover once it has fully cooled. Keep the cover breathable if moisture could be trapped, and do not store the smoker in a place where it sits in standing water. Touch up chipped paint with high-heat paint rated for the purpose if the manual allows.
Learn the warning signs of trouble:
- Rust that has weakened the body or firebox.
- Doors or lids that no longer seal.
- Ignition or fan failures in pellet and electric designs.
- Controllers or probes giving readings that do not match a separate thermometer.
- Gas leaks or damaged hoses in propane models, which require immediate shutdown and repair.
Replace small parts first, but retire the smoker when structural damage or repair costs outweigh its value. Recycle or dispose of old units according to local rules.
Picking a Fuel Type That Matches Your Patience
Outdoor smokers burn different fuels, and the fuel decides how much attention the cook needs. Before looking at models, think about how involved you want to be. Some people love tending a fire for hours, while others want to load the smoker and walk away.
| Fuel | Effort | Flavor | Good to know |
|---|---|---|---|
| Charcoal | Moderate to high, with vents and refueling | Classic smoky taste | Needs ash cleanup and a learning curve |
| Wood pellets | Low, with an electric auger and controller | Mild to medium smoke | Needs power and dry pellets |
| Electric | Low, with thermostat control | Lighter smoke | Needs an outlet and wood chips or pucks |
| Gas | Low to moderate | Depends on the wood used | Needs a gas supply and careful ventilation outdoors |
| Offset firebox | High, with active fire tending | Traditional barbecue flavor | Takes the most practice and space |
None of these is universally best. Choose the one that matches your time, space and enthusiasm, and expect to grow into it.
Thermometers and Why You Need More Than One
The thermometer on a smoker lid can be inaccurate or read at a different height from your food. Many experienced cooks use at least two additional probes: one for the cooking chamber at grate level and one for the meat. A probe that clips to the grate shows the real temperature near the food.
- Check each probe in ice water and in boiling water, as the instructions describe, to see how accurate it is.
- Place the meat probe in the thickest part, away from bone and fat.
- Watch the trend of the temperature, not just a single reading.
- Replace probes that drift or fail.
- Follow official food safety guidance for final temperatures.
Wireless probes make long cooks easier, but a simple wired model works fine if you keep it clean and secure.
Managing Fuel and Airflow Over a Long Cook
Steady temperatures come from steady airflow and fuel. Vents allow oxygen into the fire, and adjusting them changes the heat. Small changes make a big difference, so move them slowly and wait before adjusting again. Keep a supply of fuel nearby so you are not caught short in the middle of a cook.
- Light fuel in an open, ventilated outdoor area according to the maker’s instructions.
- Avoid opening the lid too often, because heat and smoke escape.
- Keep a log of vent settings and temperatures for future cooks.
- Have a plan for refueling that does not require moving hot parts with bare hands.
- Keep the area around the smoker clear of dry grass and flammable material.
Cleaning, Seasoning and Rust Protection
Many smokers need seasoning before first use, which burns off manufacturing residue and coats the metal. Follow the maker’s steps. After each cook, remove ashes and grease, and scrape the racks. Deep clean on a regular schedule, and watch for grease buildup that can ignite.
Keep the smoker under a cover when cool, and check for rust at seams and hinges. Touch up paint with heat-safe products that the maker approves. If you see rust holes or warped parts, consult the maker.
Fire Safety and Local Rules
Smokers produce heat, sparks and smoke, so place them on non-combustible ground at a safe distance from structures. Keep a fire extinguisher or a water source close by. Check local rules about open flames, smoke and fire bans, especially during dry seasons. Never leave a smoker unattended for long periods, and dispose of ashes only when fully cold.
A Short Glossary of Smoker Terms
- Bark: the dark, flavorful crust that forms on the outside of slow-smoked meat.
- Stall: a period during a long cook when the internal temperature seems to pause.
- Low and slow: cooking at modest temperatures over many hours.
- Rub: a dry blend of spices applied to meat before cooking.
- Offset: a design where the firebox sits to the side of the cooking chamber.
- Baffle: a plate that guides heat and smoke through the chamber.
- Clean smoke: thin, light-colored smoke that comes from a well-managed fire.
These words show up in product descriptions and recipes alike. Knowing them helps you read both with confidence.
Planning a First Weekend Cook
A first long cook goes better with a plan. Pick a forgiving cut such as chicken thighs or a pork shoulder, and check the weather forecast. Gather fuel, a thermometer, a drip pan, gloves and foil. Write down a rough timeline that works backward from when you want to eat, adding extra time for resting and for surprises.
- Prepare the meat the night before, following a trusted recipe.
- Light the smoker early and let the temperature settle.
- Place the meat and insert the probe.
- Keep the lid closed as much as possible.
- Rest the meat before carving.
Take notes, including temperatures, timing and what you would change. Over a few cooks, those notes become your own reference guide.
Before You Decide: The Ownership View
Owning a smoker is mostly a matter of patience and routine: managing fire or fuel over hours, reading the meat rather than the clock, and keeping the cooker clean enough to behave the same way next weekend. The sections below build on the picks above with the working knowledge that turns a first brisket into a repeatable habit.
How the Picks Above Compare When You Line Them Up
With six options on the table, the fastest way to a good decision is to compare the picks above in pairs rather than as a crowd. Start with the two that caught your eye and read their reviews back to back, asking the same three questions of each: what is it best at, what is its honest limitation, and whose home does it suit? The reviews above answer those questions in the same pattern for every pick, which makes the comparison fair. Cross off the one that loses on the question you care about most, then bring the next pick into the ring against the survivor.
The opening pair sets the tone for the list. The Weber Smokey Mountain Cooker 18 and the Masterbuilt Gravity Series 560 represent two of the clearest approaches in this category, and the difference between them — in style, in priorities and in the kind of owner they suit — is the difference that matters for most buyers. If one of them feels immediately right, that instinct is worth noting, because it usually reflects your real habits rather than the headline features. If neither appeals, the middle of the list is where your answer probably lives.
The Traeger Pro 575 and the Pit Boss Pro Series Vertical Pellet Smoker occupy that middle ground, and they reward close reading. Picks in the middle of a list like this tend to balance competing virtues rather than maximise one, which makes them the safest choice for households whose needs are mixed: two cooks with different priorities, a space that must serve several jobs, or a buyer who simply wants no drama. Compare their stated strengths against your own week and see which set of compromises you would rather live with daily.
At the end of the list, the Masterbuilt Digital Electric Smoker and the Camp Chef Smoke Vault 24 are the specialists and the reminders that there is more than one way to solve the same problem. A specialist pick is the wrong choice for most people and the perfect choice for a few, and only an honest account of your own situation tells you which group you are in. Do not dismiss them for being different, and do not choose them for being interesting; choose them if their particular strength is the exact thing your current setup lacks.
Finish the comparison with a short written exercise. On paper, list your three non-negotiables — the size limit, the job it must do brilliantly, the habit you refuse to change — and score each surviving pick against them in a sentence each. The exercise takes ten minutes and it converts a fog of impressions into a decision you can explain. Owners who choose this way rarely look back, because the choice was made against their own criteria rather than against a stranger’s enthusiasm.
Cleaning a Smoker Without Ruining Its Seasoning
A smoker should be clean where food and airflow are concerned and left alone where its seasoned character lives. Grates get brushed and scraped, ash is removed once fully cold, grease paths are kept clear so fat does not pool where it can flare or turn rancid, and the outside is wiped down so you can spot leaks and rust early. The interior walls of a well-used smoker carry a coating built over many cooks; aggressive scrubbing back to bare metal throws away flavour and invites rust, so clean for hygiene and function, not for shine.
Grease management deserves its own habit. Check drip trays, pans and any grease channel before a long cook, not during it, and dispose of collected fat once it has cooled and solidified where your local rules allow. After wet weather, open the cooker and look inside even if you are not cooking: a smoker stored damp can grow mould on old residue, and a short burn-off and clean, following the maker’s guidance, sorts it before it reaches food.
Weather, Wind and the Cook Who Plans Around Them
Wind is the smoker owner’s tax. It steals heat, pushes temperatures around and can turn a settled cooker restless. Site the smoker with shelter from the prevailing wind while keeping every clearance the maker requires, and learn how your cooker behaves on a breezy day so you can allow extra fuel and time. Rain cools surfaces and tempts owners to crowd the cooker under cover that is too close; keep the clearances, dress for the weather yourself, and let the cooker stay where it is safe.
Cold weather lengthens cooks and increases fuel use, while hot still days can make low temperatures harder to hold. None of this is a reason to cancel a cook; it is a reason to start earlier, keep the log and serve when the meat is ready. The owners who enjoy smoking year-round are not the ones with the most equipment but the ones whose expectations bend with the forecast.
Running a Long Cook Without Hovering
The secret of a calm long cook is preparation, not vigilance. Set the smoker up the day before where possible: fuel ready, water pan or drip arrangements in place, thermometers checked, and the meat seasoned and resting as your method requires. On the day, light early, let the cooker settle at temperature before the meat goes on, and resist chasing every small swing on the gauge. Smokers breathe; temperatures wander within a band and return, and constant adjustment usually makes the wandering worse.
Plan your checks at sensible intervals and use them well: fuel state, water level where relevant, the look of the meat and the temperature trend, noted briefly each time. Between checks, leave the lid closed. Every look costs heat and time, and the cook who lifts the lid every few minutes is cooking the neighbourhood as much as the meat. Trust the setup, keep the log, and save your attention for the moments that matter: wrapping if you wrap, judging tenderness, and resting the meat properly at the end.
Reading Doneness Beyond the Thermometer
A thermometer tells you temperature; it does not tell you tenderness. Learn the supporting signs for the cuts you cook most: how a brisket probe slides, how ribs bend and crack when lifted, how a pork shoulder bone wiggles when the meat is ready to pull. These signs develop with practice, and keeping notes on each cook — weight, fuel, weather, times and the result — turns scattered attempts into a personal reference book that no generic chart can match.
Resting is part of doneness, not an afterthought. Meat rushed from smoker to knife loses juice on the board; meat rested in a sensible way arrives tender and moist. Build the rest into your schedule when you plan the cook, working backwards from the serving time, and hold the meat safely if the timing drifts. Guests remember the texture of what they ate, not whether it arrived at the minute first promised, so choose tenderness over punctuality every time.
Fuel, Wood and Honest Smoke Flavour
Smoke flavour comes from clean combustion, not from volume. Thick, dirty smoke from a struggling fire coats meat with harsh flavours, while a clean-running fire gives the gentle sweetness people mean when they praise smoked food. Whatever fuel your chosen pick uses, learn its clean-running signs: the look of the smoke, the sound and smell of the fire, and the temperature behaviour that tells you the cooker is settled. Add wood in the quantity your method calls for and let it burn properly rather than smouldering it for effect.
Store fuel dry and off the ground, keep different woods labelled if you use more than one, and buy in quantities you will use while it is fresh. Keep a simple record of which wood you paired with which meat and what the table thought of it. Over a season those notes become your own flavour guide, far more useful than generic pairing charts because they reflect your cooker, your fuel supply and your family’s tastes.
When Something Seems Wrong: A Calm Troubleshooting Order
When an outdoor smoker stops behaving as it should, work through the boring causes before you assume the worst. Confirm the basics first: power or fuel connected and switched on where relevant, doors, lids or covers fully closed, settings where you think you left them, and nothing blocking vents, intakes, burners, sensors or moving parts. Many faults that feel like breakdowns are a tripped safety feature, a blocked path or a control left in an odd state after cleaning. The manual for most products has a troubleshooting table written for exactly this moment, and it is worth following in order rather than skipping to the expensive conclusion.
Change one thing at a time and note what you changed, so you can tell the maker or a repairer a clear story if you need help. If the product involves gas, mains electricity, refrigerant or anything the manual reserves for qualified service, stop at the checks the manual allows an owner to do and call a professional for the rest. Keep a simple log of the symptom, the date and what fixed it. Patterns in that log are gold: a fault that follows a particular weather spell, a heavy load or a long gap between uses is telling you something about how the product wants to be run, and the next occurrence becomes a five-minute fix instead of a ruined evening.
Getting More Years Out of What You Buy
Longevity with an outdoor smoker is mostly decided by small, unglamorous choices. Protect the product from the conditions it was not built for: standing water, relentless weather, corrosive cleaners, knocks during moves and long neglect between seasons. Where the maker offers a cover, a storage position or a winter routine, use it; those recommendations are written from warranty claims, not from theory. Handle the parts that move, seal or bear weight with a little care, because those are the parts that wear first and are often the hardest to replace once a model is discontinued.
Keep a small kit for the product: the cleaner the maker approves, any specialist tool it shipped with, and the spare consumables you know you will need, stored together rather than scattered around the house. When you move house or rearrange the space, treat the product like the appliance it is: empty it, secure moving parts, lift with help and re-check it sits level in the new spot. Owners who think of an outdoor smoker as equipment to be kept, rather than a purchase to be consumed, routinely get years more service from the same product, and they spend the money they save on better ingredients, better gatherings and better weekends.
Delivery Day, Unboxing and the First Hour
When an outdoor smoker arrives, slow down for the first hour even if you are keen to use it. Check the box and the product for transit damage before you sign anything you cannot unsign, and photograph anything that looks wrong while the packaging is still around it. Keep every bag of small parts together in one labelled container until the setup is finished, because the screw or bracket you set down casually is the one that vanishes. Read the first pages of the manual before you remove protective film or packing from working surfaces, since some products have transport locks, shipping braces or first-use steps that are easy to miss.
Set the product in place, check it sits level and stable, and run whatever first-use step the manual describes before you rely on it for real cooking, cooling or storage. This is also the moment to register the warranty if the maker offers registration, and to store the manual, the receipt and a photo of the model label somewhere you can find them in a year. Owners who do this dull admin on day one are the ones who get quick help later; everyone else ends up hunting for a model number on their knees with a torch. Finish by putting the packaging somewhere dry for a short while, in case a fault shows up in the first days and the product has to travel back.
Repair or Replace: Judging the End of a Product’s Run
Every outdoor smoker eventually reaches the point where money spent keeping it going would be better spent on its replacement, and the honest signals are usually clear if you look for them. Performance that no longer recovers after a proper clean and the maker’s own troubleshooting steps is one signal. Repeated faults in the same system, parts that the maker no longer lists, and damage to the main body, frame or cooking or cooling chamber are others. Cosmetic wear, by contrast, is a poor reason to replace a product that still does its job safely and well; a faded finish or a scuffed handle costs nothing to live with.
When you do judge a product finished, use what it taught you. Your notes about what annoyed you, what you cleaned most and which feature you never touched are a better buying guide than any advertisement, because they describe your household rather than an average one. Carry those lessons back to the picks above: the right replacement is usually the one that fixes your old product’s specific weakness, not the one with the longest feature list. Dispose of the old product through the route your area provides for appliances or metal goods, remove anything the maker says to remove first, and keep the manual until the replacement is settled in, since measurements and habits often transfer.
More Questions Before You Buy
How often should I clean out ash?
After every cook, once everything is completely cold. Ash left in a cooker draws moisture, encourages rust and can affect airflow on the next cook. Dispose of it safely in a metal container, since ash can hide live embers for a long time.
Can I leave a smoker running while I go out?
Follow the maker’s guidance for your model and never leave a live fire somewhere a problem would go unnoticed for hours. Many owners stay within earshot, check at intervals and keep the area around the cooker clear, rather than treating any smoker as fully set-and-forget.
What is the best first cook on a new smoker?
Something forgiving and not too long, such as chicken pieces or a small pork cut, so you learn the cooker’s settling behaviour, hot spots and fuel appetite without the pressure of an all-day brisket for a crowd.
How do I keep a smoker from rusting outdoors?
Keep it covered once cold if the maker allows, empty ash promptly, touch up damaged exterior paint with a suitable high-heat product, and store it where water does not pool around its feet. A quick look inside after wet weather catches problems early.
How do I stop smoked meat tasting bitter?
Bitter flavours usually come from dirty smoke: a fire that is smouldering rather than burning cleanly, or too much wood for the cook. Let the fire settle until the smoke runs clean before the meat goes on, and use wood in the amount your method specifies rather than adding more for effect.
Why does my smoker’s temperature keep swinging?
Some swing is normal as fuel burns and air moves. Large swings often trace to wind, frequent lid opening, fuel running low or vents being adjusted too often. Set the cooker, let it settle, and adjust in small steps with time to respond between them.
Final Practical Notes Before You Decide
It is also worth setting a simple review date. A few months after an outdoor smoker arrives, once the novelty has worn off, look at it with fresh eyes: is it positioned where it works best, are the accessories you actually use the ones within reach, and is there one small change — a moved shelf, a different routine, a better storage spot — that would make daily use smoother? Products settle into a household over time, and a short review catches the improvements that were invisible on day one.
If you share the outdoor smoker with other people, share the knowledge too. The person who read the manual should not be the only person who knows the quirks: which setting behaves how, what the warning signs of a problem look like, and where the shut-off or the spare supplies live. Five minutes of showing beats a season of each person learning the same lessons separately, and it prevents the well-meant mistake made by someone who was never told.
Budget a little patience for the learning curve, whatever you choose from the list above. Almost every product in this category rewards its owner more in the third month than in the first week, because technique, placement and routine have had time to settle. Judging a purchase too early — or abandoning a sound product for a different one before learning it — is the most expensive habit in any kitchen. Give the choice a fair season before you grade it.
Finally, buy for the household you have, not the one in the advertisement. The right outdoor smoker is the one sized for your real gatherings, suited to your real space and matched to the maintenance you will honestly do. The picks above differ precisely because households differ, and the most satisfied owners are the ones who chose against their own habits and rooms rather than against a headline. Choose honestly, set it up carefully, keep the simple routines, and the product will repay you quietly for years.
Accessories deserve a cooler head than they usually get. Live with the outdoor smoker for a while before adding extras, and let real use tell you what is missing: the tool you reach for and do not have is a genuine need, while the gadget bought in the first flush of enthusiasm usually ends up in a drawer. When you do add something, choose the version made or approved for your model where the maker offers one, and keep the same discipline as the main purchase — it should solve a problem you actually have.
Seasonal changes are a useful prompt for a walk-around check of any outdoor smoker. At the turn of the year, look over the product and its surroundings: clearances still respected, surfaces clean, moving parts free, supplies stocked and nothing stored where it should not be. Households drift, and objects migrate into the spaces around appliances. A short seasonal reset keeps the setup you planned from quietly becoming the setup you would never have chosen.
One more habit separates satisfied owners from frustrated ones: keep the paperwork. The manual, the receipt and a note of the model details belong together, whether that means a folder, a drawer or a photograph stored with your other house documents. When a question arises in a year — a part, a setting, a warranty query — the answer is usually in those pages, and finding them in two minutes instead of twenty changes a small problem back into a small problem.
It is also worth setting a simple review date. A few months after an outdoor smoker arrives, once the novelty has worn off, look at it with fresh eyes: is it positioned where it works best, are the accessories you actually use the ones within reach, and is there one small change — a moved shelf, a different routine, a better storage spot — that would make daily use smoother? Products settle into a household over time, and a short review catches the improvements that were invisible on day one.
If you share the outdoor smoker with other people, share the knowledge too. The person who read the manual should not be the only person who knows the quirks: which setting behaves how, what the warning signs of a problem look like, and where the shut-off or the spare supplies live. Five minutes of showing beats a season of each person learning the same lessons separately, and it prevents the well-meant mistake made by someone who was never told.
Outdoor Smoker FAQ
What is the easiest smoker for a beginner?
Electric and pellet smokers are generally the easiest, because they hold temperature for you.
Do I need a thermometer?
Yes. A good probe thermometer is the best way to know when meat is done, regardless of the smoker you choose.
Which gives the best flavor?
Charcoal and wood tend to give the strongest smoke flavor. Pellet and electric models give milder results, with less effort.
How long should I smoke a brisket?
Time varies with size, temperature and the smoker. Most pitmasters cook to internal temperature and tenderness rather than to the clock, so plan extra time and use a probe.
Can I use a smoker in the rain?
Many people do with a cover or shelter, but electric models need extra care. Check the maker’s guidance, and never run a smoker in a closed garage.
Can I use a smoker on a covered patio?
It is generally unsafe to use one under a low roof or in an enclosed space, because smoke and carbon monoxide can build up. Follow the manual and keep it well away from structures.
How do I protect an electric smoker from rain?
Keep the plug, controller and cord out of wet areas, and use a cover or shelter that allows ventilation. Follow the maker's guidance on weather use.
What wood should I use?
Common choices include hickory, oak and fruit woods such as apple. Start with a small amount, and match the smoke strength to the meat.
How do I stop my smoker from running out of fuel mid-cook?
Check the fuel level before you start and keep a backup supply nearby. For long cooks, plan refills and keep notes on how much your smoker uses.
Is a water pan necessary?
Some designs include one to help steady temperature and add moisture, while others do not need it. Follow the manual for your model.
How can I tell whether my smoker's thermometer is accurate?
Compare it with a separate probe at grate level. If they differ, trust the separate probe and adjust your settings.
How often should I do a deep clean?
Clean ash and grease after each cook or two, and do a deeper clean periodically as the manual suggests. Heavy use calls for more frequent cleaning.
The Short Version
For a classic charcoal smoker, the Weber Smokey Mountain. For gravity-fed charcoal, the Masterbuilt Gravity 560. For pellets, the Traeger Pro 575. For a vertical pellet, the Pit Boss. For electric, the Masterbuilt Digital. For gas, the Camp Chef Smoke Vault.


