An indoor smokeless grill is an electric countertop appliance that cooks meat and vegetables on a hot grate while limiting the smoke you would get from searing in a pan. Designs use a drip tray, a fan or controlled heat to keep the kitchen clearer.
The six models below range from a fan-assisted smoke-control grill to simple contact grills, and a few add air frying so one appliance does more work. Compare the grate size and the cleanup steps before choosing, since those two details decide how often you will actually reach for it. We have not used these products ourselves, so please confirm details on the current listing before buying.
As an Amazon Associate we earn from qualifying purchases. Links below are affiliate links, and they do not change the product information we give.
What to Look For
| Feature | Why it matters |
|---|---|
| Smoke control | Fans, drip trays and lower fat contact all reduce smoke |
| Grill surface | A larger plate feeds more people at once |
| Temperature range | A high sear setting matters for steak |
| Cleanup | Removable nonstick plates and trays are easier to wash |
| Extra functions | Air fry and bake modes add use beyond grilling |
In this guide
Specs at a Glance
| Grill | Type | Smoke approach | Notes |
|---|---|---|---|
| Ninja Foodi Smart XL | Lidded electric | Lid and fan control | Probe and air crisp |
| Ninja Foodi Grill | Lidded electric | Cyclonic airflow | Five functions |
| Philips Smoke-Less Grill | Open electric | Angled grid and tray | Easy to wipe |
| Cuisinart Griddler | Contact grill | Reversible plates | Opens flat |
| George Foreman Grill | Electric with stand | Nonstick surface | Indoor or outdoor |
| Hamilton Beach Searing Grill | Lidded electric | Nonstick grate | Removable parts |
The 6 Best Indoor Smokeless Grills
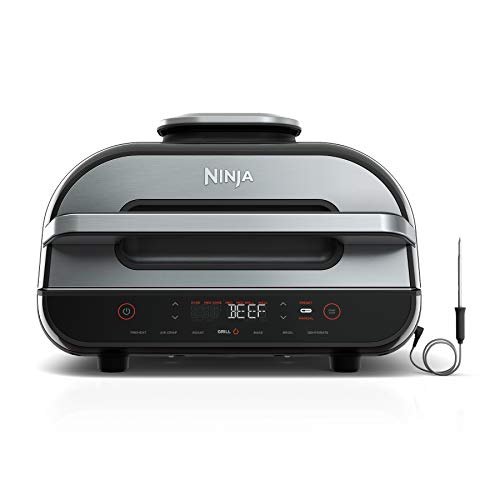
Top pickBest for families and meal prep
1. Ninja Foodi Smart XL Grill
A lidded indoor grill with a cooking thermometer and air crisp mode. A cooling fan and splatter shield limit smoke, and the large grate serves a family.
Suits: families and meal prep. Strengths: a built-in probe and big grate. Weaknesses: bulky to store. Skip it if you want a small compact grill.


Best for couples and small households
2. Ninja Foodi Indoor Grill
A well-known five-in-one indoor grill that grills, air crisps, bakes and roasts. Its cyclonic airflow and lid keep smoke down compared with an open pan.
Suits: couples and small households. Strengths: versatile modes and a proven design. Weaknesses: grate size is modest. Skip it if you grill for a large group.

Best for low-smoke open grilling
3. Philips Smoke-Less Indoor Grill
An open electric grill with an angled grid and a water-filled tray beneath that is meant to catch fat and cut down smoke. The grill is made to cook steak and vegetables with little splatter.
Suits: low-smoke open grilling. Strengths: a drip tray that cuts smoke. Weaknesses: not a lidded cooker. Skip it if you want air frying too.
View Philips Smoke-Less Indoor Grill on Amazon
Best for mixed grill and griddle cooking
4. Cuisinart Griddler Elite
A contact grill that opens flat to act as a griddle, with removable plates and a temperature dial. It suits sandwiches, burgers and breakfast foods.
Suits: mixed grill and griddle cooking. Strengths: flat opening and removable plates. Weaknesses: less smoke control than fan designs. Skip it if you want deep sear marks.
View Cuisinart Griddler Elite on Amazon
Best for apartments with a balcony
5. George Foreman Indoor/Outdoor Grill
An electric grill on a stand, built for use indoors or on a patio, with a large nonstick surface and a drip-friendly design meant to reduce splatter.
Suits: apartments with a balcony. Strengths: indoor and outdoor use. Weaknesses: a large frame. Skip it if you have little counter space.
View George Foreman Indoor/Outdoor Grill on Amazon

Best for simple, everyday grilling
6. Hamilton Beach Indoor Searing Grill
A countertop electric grill with a lid, a nonstick grate and a heat range meant to sear steak. The removable parts rinse clean in a sink.
Suits: simple, everyday grilling. Strengths: easy cleanup and a straightforward lid. Weaknesses: fewer modes than premium models. Skip it if you want smart features.

Care and Setup
- Wash removable plates once they cool.
- Empty the drip tray after each cook.
- Use a nonstick-safe utensil on coated grates.
- Dry parts fully before reassembling.
Mistakes to Avoid
- Skipping preheat and getting weak sear marks.
- Overloading the grate so food steams.
- Leaving fat in the tray to smoke next time.
- Using metal tools on nonstick plates.
How Smoke Reduction Designs Actually Work
Smoke indoors comes mostly from fat and juices hitting a very hot surface and burning. A smokeless grill tries to prevent that in one of a few ways, and knowing which approach your model uses helps set realistic expectations. Some designs use a drip tray below an angled grid, so fat runs off and lands in a tray, sometimes with water in it, where it cannot reach a hot surface. Others use a lid and a fan that move air through a filter or a cooler path, trapping or dispersing smoke before it enters the room. Contact grills clamp food between two plates, so fat flows away into a tray and less of it scorches.
No design removes smoke completely. Heavily marbled steaks, bacon, sausages and fatty chicken skin produce more smoke than lean cuts and vegetables. Very high temperatures also create more smoke, as does a dirty surface. Marketing terms like smokeless generally describe a reduction compared with a normal pan, so read the listing for how the maker describes its approach and treat any claim as the maker’s own.
Open grills let you see and reach the food but allow more smoke to rise, while lidded models contain it but can steam food if you overload them. Neither type is universally better. Choose the style that matches how you cook and how sensitive your smoke detector is.
- Drip tray designs: reduce flare-ups by catching fat below the heat.
- Fan and lid designs: manage airflow and splatter in a closed chamber.
- Contact plates: press food and drain fat, best for thin cuts and sandwiches.
Cooking Habits That Keep the Kitchen Clear
How you cook affects smoke as much as which grill you own. Start by preparing the food. Pat meat dry so surface moisture does not spit, and trim excess fat. Sugary marinades and sauces burn quickly at high heat, so brush them on near the end of cooking or use them sparingly. Oils with a high smoke point, applied in a thin coat, are less likely to burn than oils with a low smoke point.
Preheat as the manual directs, since food placed on a cold grate sticks, steams and releases fat unevenly. Do not overcrowd the plate, because crowding traps steam and lowers the temperature, which leads to gray food and more fat dripping at once. Cook in batches if needed, and leave a little space between pieces for airflow.
Manage the fat that collects. Empty the drip tray after each cook so old grease does not smoke on the next run, and if your model uses water in the tray, follow the maker’s guidance on filling it. Do not let the tray run dry if water is part of the design. Wipe plates while they are warm but not hot, because baked-on residue is a common source of odor and smoke.
- Pat food dry, trim excess fat and use thin coats of oil.
- Add sugary sauces late in the cook.
- Preheat fully and avoid overcrowding the plate.
- Run the kitchen fan or open a window anyway.
Plate Size, Shape and Grill Style
Countertop grills come in several shapes, and the cooking plate drives what you can make. A large rectangular plate fits several steaks or a family’s worth of vegetables, while a small round or square plate suits one or two people. Compare the listed dimensions with the foods you cook most. Check also how much space is left around the plate once the lid or splash guard is considered, since that reduces the usable area.
The type of plate matters. Ridged plates leave grill marks and let fat drain into grooves, while flat plates suit pancakes, eggs and sandwiches. Some grills offer reversible or swappable plates, which add versatility but also add pieces to store and clean. Nonstick coatings make cleanup easier and need gentler utensils, while uncoated surfaces may sear harder but need more scrubbing and oil.
Think about the cooking style you prefer. A lidded grill cooks from both sides in some cases, which speeds up thicker items. An open grill gives you control and a good view, which helps when searing. Check the adjustable temperature range and whether the grill gets hot enough for the browning you want. If you also want to air fry or bake, check how the lid and fan function work, and whether those modes are supported on the model you choose.
- Count the people you feed and check the plate dimensions.
- Decide between ridged, flat or reversible plates.
- Check the temperature range and how searing is achieved.
Power, Placement and Ventilation
Electric grills draw a lot of power for a countertop appliance, so where you plug them in matters. Check the power rating on the listing and use a wall outlet that is not shared with other high-draw appliances like a toaster oven or a kettle. Avoid extension cords and power strips unless the maker says they are safe for this appliance, because a cord that is too light can overheat. Keep the cord away from the hot surface and from the sink.
Place the grill on a stable, heat-resistant counter with clear space around it. Leave room above so steam and warm air can rise, and keep it away from cabinets, curtains, paper towels and anything flammable. Do not set it on a surface that could scorch, and keep the grill clear of the wall as the manual advises. Use the range hood if you have one, and open a window if possible, since even low-smoke grilling releases grease vapor.
Smoke detectors are sensitive. A grill that reduces smoke may still set off a detector placed close to the kitchen, particularly with fatty foods. Moving the grill farther from the detector or opening a window can help, but do not disable a detector.
- Plug directly into a wall outlet that can support the load.
- Leave space around and above the grill.
- Use a hood or an open window for ventilation.
- Keep children and pets away from hot plates.
Cleaning, Nonstick Care and Longevity
The easiest grill to own is the one you will clean. Look at how the model comes apart and whether the removable parts are labeled dishwasher-safe or hand-wash only. Let the grill cool before washing, and never immerse the base or any part with electrical components. Soak removable plates in warm, soapy water to loosen stuck-on food, and use a soft sponge or a nylon brush on coated surfaces. Avoid steel wool and harsh scrapers, which can scratch nonstick coatings.
Take care of the coating. Nonstick surfaces wear over time, particularly if you use metal utensils, scrub hard or heat an empty plate for a long time. Follow the maker’s heat guidance, and use silicone or wood tools. If the coating starts to flake or peel, stop using that plate and check whether a replacement is available.
Wipe the lid, the splash guard and the exterior with a damp cloth. Clean the drip tray every time, and check the fan intake or vent areas for grease buildup, as the manual describes. Store the grill dry, with the cord loosely wrapped.
Signs it may be time for a new one include a worn or peeling coating, a heating element that works unevenly, a damaged cord, a lid that no longer closes, or persistent smoke despite a clean surface and a normal cook. Do not use an electric grill with a damaged cord or plug.
A Quick Checklist Before You Order an Indoor Grill
Indoor grills promise less smoke, but they still make heat, steam and grease, and they need space and power. Run through these points for any of the six above before you decide.
- Measure the counter area, including the height under cabinets, so the lid can open fully.
- Check how close an outlet is, and avoid using a long extension cord unless the maker allows it.
- Think about the number of people you cook for and the size of the cooking surface.
- Decide whether you want a flat plate, a ridged grate, a combination, or interchangeable plates.
- Look at whether the plates and drip tray can be removed for cleaning.
- Consider storage, since a bulky grill left on the counter all week takes up valuable space.
- Check the length of the cord and the position of the controls.
A short list like this keeps the focus on how you cook rather than on the number of preset buttons.
Open Plate, Lid and Air-Circulation Models Compared
| Design | Typical strength | Trade-off |
|---|---|---|
| Open grate with a drip tray | Simple, easy to see the food | Can splatter and produce more smoke if fat builds up |
| Contact grill with two plates | Cooks both sides at once, quick | Less room for thick or unevenly shaped food |
| Lidded grill with a fan | Circulates hot air, can broil or roast | Larger, more parts to clean |
| Griddle combo | Flexible for breakfast foods | May need more counter space |
None of these designs removes smoke completely. How much you see depends on the food, the fat content, the temperature and how clean the surface is.
A Short Glossary of Indoor Grill Terms
- Drip tray: the removable pan under the plate that collects fat and juices.
- Preheat: bringing the plate to temperature before food goes on.
- Nonstick coating: a slick surface that helps food release and makes cleaning easier.
- Floating hinge: a lid hinge that adjusts to the thickness of the food.
- Temperature probe: a sensor that reads the inside of the food, offered on some models.
- Wattage: the electrical power the grill draws, which affects heating speed.
Terms like smokeless are marketing descriptions rather than technical ones. Read the maker explanation and look for specifics such as an angled plate, a water tray or a fan design.
How to Read a Listing Without Being Misled
Look at the cooking area rather than the overall footprint. A large body may hide a small plate. Check the weight and the cord length, which affect where you can use and store it. Photos of the underside or the plates help show whether parts are removable.
Check what the product comes with, including a spatula, a cleaning brush or extra plates. Some accessories are sold separately. If the listing lists a preset such as burger or fish, note that these are guides and that cooking times still depend on thickness and your preferences. For food doneness, use a thermometer and follow official food safety guidance.
Follow the Maker Instructions and Watch for Warning Signs
The manual describes preheating, oil use, cleaning and which utensils are safe for the coating. Use only the tools and cleaners that the maker allows. Keep the grill on a stable heat-tolerant surface, away from curtains, paper and the edge of the counter, and never leave it unattended while hot.
If you notice a burning smell with no food, flickering power, a damaged cord or a plate with peeling coating, stop using it and contact the maker. Persistent smoke often means grease on the heating area or the drip tray, so clean it according to the manual before the next use.
Smokeless, Honestly: What the Word Can and Cannot Mean
No grill that sears meat indoors is literally smokeless, and the honest way to read this category is as smoke-reduced: designs that catch fat before it burns, circulate and filter air, cook under lids, or keep temperatures in a range where vapour is minimised. The difference between a well-designed smoke-reduced grill used well and a conventional grill used carelessly is dramatic, easily the difference between a pleasant kitchen and a flat full of haze and a complaining alarm. But the word on the box is a direction, not a guarantee, and your habits complete what the design begins.
Judge the picks in this guide by the mechanism, not the label. Ask where the fat goes: onto a hot surface where it will smoke, or into a tray, ideally with water, where it cannot. Ask how the air moves: whether vapour is drawn away from the room or simply blown around it. Ask how hot the plate truly gets, because some designs buy their calm air with gentler heat and a paler sear, which is a fair trade for some cooks and a deal-breaker for others. The reviews above describe each pick’s approach; match the approach to your kitchen’s ventilation and your own priorities between crust and calm.
Your kitchen is half the system. A smoke-reduced grill under a decent extractor, in a room where a window can open, cooking food that has been dried and lightly oiled, will behave beautifully. The same grill in a sealed studio flat, cooking a fatty, marinated load with the door closed, will still haze the room. This is not a flaw in the category; it is the physics of hot fat, and the guide’s routine and mistakes sections exist to help you stack the physics in your favour on whichever pick you choose.
Set expectations by your most sensitive constraint. If it is a smoke alarm above the kitchen door, test the grill first with a modest load and learn its behaviour before a full session with guests. If it is a landlord’s rules or a household member’s breathing, weight the calmest designs and the gentlest cooking styles more heavily. Smokeless grilling done honestly is a genuine pleasure: real seared food, indoors, without paying for it in air. It simply asks to be chosen and used with eyes open.
Choosing an Indoor Grill Around Smoke, Space and Cleanup
Every indoor grill is a negotiation between three things: how well it sears, how much smoke and smell it makes, and how easily it cleans. Designs differ mainly in where they stand on that triangle. Open grills give the closest feel to outdoor grilling and take larger items, but release the most vapour into the room. Contact grills cook from both sides at once, fast and tidy, and suit sandwiches and thinner cuts. Grills that circulate air or use a lid and water tray aim to cut visible smoke, trading a little of the open-grill character for a calmer kitchen. Decide which corner of the triangle matters most in your home before comparing anything else.
Plate size should be matched to real meals, not ambitions. Count the portions you cook most often and check they fit in one batch with space between them, because crowding drops the plate temperature and steams food instead of searing it. A grill that handles your Tuesday dinner in one round beats a larger one that lives in a cupboard because it dominates the counter. Storage is part of size: check the height with the lid open, whether it stands upright for storage, and where the cord and any drip tray go. The grill you can leave out, or reach in seconds, is the grill that gets used.
Power and heat recovery decide how the second batch cooks. Indoor grills heat plates that lose temperature the moment cold food lands on them; a grill that recovers quickly keeps searing rather than sliding into steaming. Adjustable temperature control widens what you can cook, from delicate vegetables and fish to thick burgers, while a single-setting grill asks you to manage doneness by timing alone. None of this can be read from a photograph, so weigh the control range, plate material and the experiences described in the guide above more heavily than styling or extra accessories you may never fit.
Cleanup is a design feature, not an afterthought. Removable plates that go in the sink or dishwasher, a drip tray that actually catches what the plates shed, and surfaces without grease-trapping seams decide whether weeknight grilling feels easy or like a project. Nonstick coatings ask for gentle utensils and no metal scourers, and they wear over time whatever you do; heavier plates, including cast iron, ask for seasoning and drying care but can be restored. Choose the maintenance style you will genuinely keep up, because a grill that is annoying to clean quietly stops being used.
A Cooking Routine That Gets a Real Sear Indoors
Preheat fully before food goes on. Indoor plates need time to reach a stable temperature, and food added early steams in its own juices while the plate climbs. Pat food dry with kitchen paper, because surface moisture is the enemy of browning, and season before cooking rather than after. Oil the food lightly rather than flooding the plate; excess oil is the main source of smoke and of the greasy film that settles on nearby surfaces. Set up the extractor or a window before you start, not once the room has already filled.
Cook in uncrowded batches and resist moving food too soon. Items release from the plate when a crust has formed; forcing them earlier tears the surface and leaves the best part stuck to the grill. Turn once where the recipe allows, and use the cooler edges of the plate, if your grill has them, to hold finished items while the next batch cooks. For thicker cuts, remember that carryover heat keeps cooking after removal, so rest meat on a warm plate under loose foil while you finish vegetables or bread on the still-hot grill.
Manage smoke with habits rather than hope. Trim excess fat where the dish allows, choose oils suited to high heat, and keep sugary marinades for the final minutes, because sugar burns and smokes faster than the food cooks. If your grill has a drip tray that takes water, keep it filled to the level the manual sets; if it has a lid, use it, since a lid contains vapour and speeds cooking. Should the room still haze, lower the temperature slightly and cook a little longer rather than opening and closing the lid repeatedly, which only spreads the vapour around.
Food safety indoors is the same as outdoors: separate utensils for raw and cooked items, a clean plate for finished food, and a thermometer for thick cuts and poultry rather than guesswork by colour. Juices should run clear is a rough guide at best; temperature is the reliable check. Let the grill cool before cleaning, but scrape and empty the drip tray once it is safe to handle, because grease left overnight hardens into the part of cleanup everyone dreads.
Cleaning and Care That Keep Plates Performing
Clean while the memory of the meal is fresh, once the plates are cool enough to touch safely. Removable plates should be washed in warm soapy water with a soft sponge; burnt residue softens with a soak far better than it yields to force, and abrasive pads shorten a nonstick coating’s life every time they touch it. The drip tray needs emptying and washing each session, not when it is full, and the channel that feeds it should be wiped so old grease does not bake into a permanent obstruction.
The body and lid collect a fine grease film even when the plates are spotless. Wipe them with a damp cloth and a little washing-up liquid, working into hinges and edges where film builds, and dry before storing. Check the cord and plug for grease and damage, and never immerse a part the manual says to keep dry. If plates are cast iron or uncoated, dry them thoroughly and apply the lightest film of oil before storage to hold rust at bay, following the maker’s seasoning guidance.
Over months, judge the grill by its behaviour: longer preheats, uneven browning, sticking where food once released, or a thermostat that overshoots are signs of wear in plates, coating or controls. Replacement plates, where the maker sells them, can give a sound grill a second life. Store the grill clean and dry, with plates fitted and the cord loosely coiled, ideally where it does not need moving other appliances to reach. A grill that is easy to reach, quick to clean and honestly maintained will still be searing well long after a neglected one has been replaced.
Mistakes That Make Indoor Grilling Disappoint
The first mistake is crowding the plate to finish sooner, which drops the temperature and produces grey, steamed food that no sauce rescues. The second is skipping the preheat or adding wet, fridge-cold food straight from a marinade, both of which guarantee steaming. The third is using the wrong oil or too much of it and then blaming the grill for smoke that the oil created. The fourth is pressing food flat with a spatula throughout cooking, squeezing out juice in exchange for a moment of satisfying sizzle.
Owners also neglect the drip tray until it smokes on its own, clean nonstick plates with metal tools that strip the coating in patches, or store the grill dirty because the meal ran late. Each lapse is small; together they turn a capable grill into a smoky, sticking chore. Dry food, a full preheat, honest batch sizes, ventilation ready before the first item lands and cleaning the same evening are the whole secret, and they cost nothing but attention.
Putting the Picks Side by Side
With six options in this guide, the fastest way to narrow the field is to match each pick to the job described in its review above, rather than chasing the longest feature list. Every pick here earned its place for a different kind of buyer, and the review sections spell out who each one suits, what it does well and where its limits sit. The notes below simply restate that positioning in one place, so you can compare the indoor smokeless grill options without scrolling back and forth. Nothing here adds new claims about any model; it is a map of what the guide already says, organised around the decision you are actually making.
The Ninja Foodi Smart XL Grill is positioned in this guide for families and meal prep. If that description sounds like your household, it deserves a close look; if it does not, its strengths are unlikely to matter much in daily use, however appealing they look on a listing. Re-check its review above for the stated strengths and the honest limitation, and confirm the current details on the listing itself, because included accessories and exact configurations can change over time.
The Ninja Foodi Indoor Grill is positioned in this guide for couples and small households. If that description sounds like your household, it deserves a close look; if it does not, its strengths are unlikely to matter much in daily use, however appealing they look on a listing. Re-check its review above for the stated strengths and the honest limitation, and confirm the current details on the listing itself, because included accessories and exact configurations can change over time.
The Philips Smoke-Less Indoor Grill is positioned in this guide for low-smoke open grilling. If that description sounds like your household, it deserves a close look; if it does not, its strengths are unlikely to matter much in daily use, however appealing they look on a listing. Re-check its review above for the stated strengths and the honest limitation, and confirm the current details on the listing itself, because included accessories and exact configurations can change over time.
The Cuisinart Griddler Elite is positioned in this guide for mixed grill and griddle cooking. If that description sounds like your household, it deserves a close look; if it does not, its strengths are unlikely to matter much in daily use, however appealing they look on a listing. Re-check its review above for the stated strengths and the honest limitation, and confirm the current details on the listing itself, because included accessories and exact configurations can change over time.
The George Foreman Indoor/Outdoor Grill is positioned in this guide for apartments with a balcony. If that description sounds like your household, it deserves a close look; if it does not, its strengths are unlikely to matter much in daily use, however appealing they look on a listing. Re-check its review above for the stated strengths and the honest limitation, and confirm the current details on the listing itself, because included accessories and exact configurations can change over time.
The Hamilton Beach Indoor Searing Grill is positioned in this guide for simple, everyday grilling. If that description sounds like your household, it deserves a close look; if it does not, its strengths are unlikely to matter much in daily use, however appealing they look on a listing. Re-check its review above for the stated strengths and the honest limitation, and confirm the current details on the listing itself, because included accessories and exact configurations can change over time.
Two habits help when you compare the indoor smokeless grill picks. First, decide your non-negotiables before you compare anything else: the space you have, the people you cook for and the one job this appliance must do well. Second, treat every other feature as a bonus rather than a reason to buy. A pick that fits your space, your habits and your cleaning tolerance will serve you better than a more elaborate model that fights your routine. When two picks both fit, choose the one whose stated limitation bothers you least, because limitations are what you live with every day, while strengths are what you notice in the first week.
More Practical Notes Before You Decide
Think about the grill’s second jobs before you buy, because a good indoor grill rarely stays in its lane. The same plates that sear burgers will toast sandwiches, cook breakfast, char vegetables for salads and reheat pizza with a crisper base than a microwave ever gives. A design whose temperature range and plate style cover your household’s second jobs will be used several times a week, while a single-purpose specialist may be better at one meal and idle for the rest. Versatility is not a compromise here; it is how counter space earns its keep.
Households with mixed diets get particular value from a grill with room to zone: meat at the hot end, vegetables and halloumi at the gentler end, everything finishing together without sharing more contact than the cooks intend. If that is your table, plate area and temperature control deserve extra weight in the choice, and a lid that lets you melt and warm without drying is worth having. Plan one mixed meal in your head against each pick in this guide and the practical differences appear at once.
Finally, let the grill’s storage answer be honest. Measure the cupboard or counter corner it will truly occupy, with its cord and drip tray, and check the weight you will move if it lives away from its cooking spot. The most capable grill in this guide is worth nothing to the household that finds it heavy, awkward and buried, while a modest one that lives within arm’s reach will cook hundreds of meals. In this category more than most, the best grill is the one that is out, hot and cooking.
Whatever you choose from this guide, give the unboxing and first setup the same care as the purchase. Check the appliance over before anything is plugged in, read the manual’s safety and setup pages properly rather than skimming for the quick-start, and keep the packaging until the first successful uses are behind you, in case a return is needed. Register the product if the maker offers it, and keep the receipt and the model details together in one place. These small acts take minutes and are the difference between a smooth first week and an avoidable argument with a retailer.
Measure your space one final time before ordering, and measure the route as well as the destination: doorways, cupboard openings, the turn into the kitchen and the shelf or counter where the appliance will live. More good purchases are defeated by a centimetre at a doorway than by any flaw in the product. If the appliance will share a circuit with other heavy loads, note that too, and plan which appliances will take turns. A purchase that arrives to a prepared home starts its life being used; one that arrives to surprises starts its life in a corner.
Build the appliance’s care into an existing routine rather than inventing a new one. The wipe that happens while the kettle boils, the check that happens when the bins go out, the descale or filter change tied to a date you already mark: habits attached to habits survive, while special rituals fade by the second month. Decide now which existing moment will carry this appliance’s small regular tasks, and write the first occurrence on the calendar before the appliance arrives. Ownership is mostly this: tiny attentions, reliably repeated.
Keep expectations in their proper order across the first month. The first uses teach you the appliance; the next uses teach you your own routine with it; only after that does it become the effortless background help you bought. Judging any appliance in this guide by its first outing is like judging a pan by its first egg. Give the learning curve its few sessions, keep notes where the cooking has variables, and let the verdict form over weeks. Most disappointments in this category are premature verdicts, not poor products.
Indoor Smokeless Grill FAQ
Are indoor grills truly smokeless?
They reduce smoke but do not remove it, especially with fatty meat. Run the kitchen fan anyway.
Do these grills sear like charcoal?
They brown well but do not copy charcoal flavor.
Is nonstick safe at high heat?
Follow each maker’s heat guidance and avoid overheating empty plates.
Which size grill should I pick?
Count the people you usually feed. Check the plate dimensions on the listing too. A larger grate suits families, while a smaller one saves counter space and heats faster.
Why does my indoor grill still smoke a little?
Fat hitting a hot surface always creates some smoke, and fatty foods produce more. Clean the plate and tray, trim fat and use less oil to cut it down.
Should I put water in the drip tray?
Only if the maker's instructions say so. Some designs use water in the tray to catch fat, and others do not, so follow your manual.
Can I cook frozen meat on an indoor grill?
Some models allow it with extra time, but results are often better with thawed food. Check the manual and make sure the food reaches a safe temperature before eating.
Which is better for steak, open or lidded?
Open grills offer more control and visibility for searing, while lidded ones cook both sides and contain splatter. Your preference and the plate's heat range matter most.
Can I use a metal spatula on nonstick plates?
Usually not. Metal can scratch the coating, so use silicone, wood or nylon tools unless the maker says otherwise.
Do I need to oil the plates?
A light coat of oil helps with sticking on many plates, but too much can smoke. Check the manual and use a high smoke point oil sparingly.
Is a smokeless grill safe for small kitchens?
It can be if you leave space around it, use a good outlet and ventilate. Keep it away from cabinets and flammable items.
Why does my food stick even on a nonstick grill?
Sticking usually means the plate was not fully preheated, the food was wet, or it was moved before a crust formed and released it. Preheat until the grill signals ready and then give it a moment more, pat food dry, and leave it undisturbed until it lifts easily. If sticking persists on an older grill, the coating may be worn, especially if metal tools or abrasive cleaning have been used on it; at that point the plate, not your technique, is the problem.
How do I get better grill marks indoors?
Marks come from a properly hot plate, dry food and patience. Preheat fully, dry the surface of the food, lay it down and do not move it until the first side has taken its colour, then turn once. Crowding the plate drops the temperature and erases marks, so cook in batches with space between items. A light oil on the food rather than a flooded plate helps the surface sear cleanly without filling the room with smoke.
Can I cook frozen food on an indoor grill?
Some foods cope, many do not. Thin items may cook through acceptably from frozen on a moderate setting, but thick or uneven items tend to burn outside before the centre is safe. The reliable approach is to thaw in the fridge first, which also lets you dry and season the surface properly. If you do cook from frozen, use a thermometer to verify the centre, lower the heat to buy time, and accept that the sear will not match a fresh item’s.
Why does the grill keep tripping or cutting out?
A grill that cuts out may be reaching its thermostat’s limit, which is normal cycling, or it may be overheating because vents are blocked, the drip tray is full of smoking fat, or the plate is heavily fouled. Let it cool, clean the plates and tray, check its clearances and try again on a circuit that is not carrying other heavy appliances. A grill that trips the house supply repeatedly, or cuts out and will not restart, should be checked by the maker.
How do I reduce the smell that lingers after grilling?
Start the extractor before the food goes on and run it for a while after, open a window if the room allows, and keep the grill and its drip tray clean, because old fat reheating is the main source of lingering smell. Wipe nearby surfaces, since a fine film settles close to the grill and keeps releasing odour. Cooking with the lid down where the design allows, and trimming excess fat, reduces what escapes in the first place.
The Short Version
For a large capacity indoor grill, the Ninja Foodi Smart XL. For a smaller air fry grill, the Ninja Foodi Grill. For a drip-tray designed grill, the Philips Smoke-Less Grill. For a contact grill and griddle, the Cuisinart Griddler. For a standing grill with a stand, the George Foreman Grill. For an easy-to-use countertop grill, the Hamilton Beach Searing Grill.
Related Guides
- 6 Best Indoor Electric Grills: Smokeless and Contact (2026)
- 6 Best Indoor Korean BBQ Grills: Electric and Smokeless (2026)
- 6 Best Smokeless Indoor Grills for Apartments and Winter
- 6 Best Indoor Smokeless Grills: Plates and Smoke Control (2026)
- 6 Best Indoor Grills for Steaks: Electric and Cast Iron (2026)


