RV life means small counters, shared power and long stretches where a bag of ice is hard to find. A portable ice maker for an RV should be compact, simple to wipe down and easy to tuck away before you hit the road.
The six machines below are known for being sold for camper, boat and small-space use, and they differ in size and ice style. We have not used these products ourselves, so verify the current size, power needs and what comes in the box on each listing before you decide, especially if you run on a small inverter or a generator.
As an Amazon Associate we earn from qualifying purchases. Links below are affiliate links, and they do not change the product information we give.
What to Look For
| Feature | Why it matters |
|---|---|
| Size | Measure your counter and cabinet before ordering; RV space is tight |
| Power use | Check the plug-in power rating if you rely on a generator or inverter |
| Travel fit | A lid latch or a flat top helps when you stow the unit |
| Draining | A simple drain plug lets you empty the tank before a move |
| Level ground | Many machines work best when level, which can be tricky when parked on a slope |
In this guide
Specs at a Glance
| Machine | Ice style | Fit | Notes |
|---|---|---|---|
| Magic Chef MCIM22 | Bullet | Camper counters | Stainless-style finish; check size |
| Luma Comfort IM200SS | Bullet | RV galleys | Clear lid; check for extras |
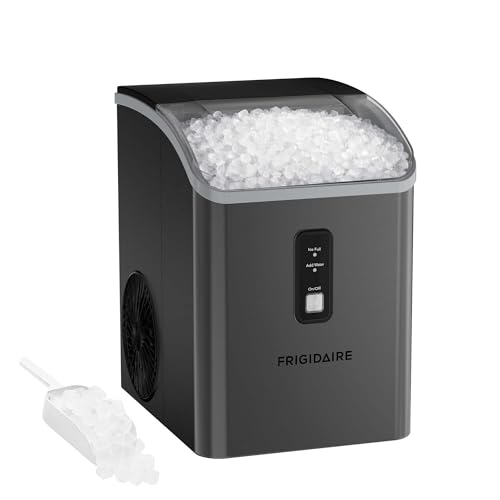
| Frigidaire EFIC108 | Bullet | Tiny galleys | Compact body; check color options |
| Costway Countertop Ice Maker | Bullet | Weekend trips | Scoop included; check dimensions |
| VEVOR Portable Ice Maker | Bullet | Campsite parties | Check listing for the exact size |
| Whynter IMC-490SS | Cube/bullet | Large RVs | Compressor-based; check weight |
The 6 Best Portable Ice Makers for RVs
Top pickBest for simple camper kitchens
1. Magic Chef MCIM22 Portable Countertop Ice Maker
A long-sold, compact stainless-look machine made for countertop use. It is a common pick for dorms and campers and keeps the controls basic.
Suits: simple camper kitchens. Strengths: a compact look and basic controls. Weaknesses: a tank that is on the smaller side. Skip it if you want big batches.
View Magic Chef MCIM22 on Amazon

Best for trailers and RVs
2. Luma Comfort IM200SS Portable Ice Maker
A stainless-finished countertop ice maker with a see-through lid. It is popular for its straightforward use and its modest size.
Suits: trailers and RVs. Strengths: a stainless look that suits an RV kitchen. Weaknesses: the basket is not a freezer. Skip it if you want nugget ice.


Best for tiny galleys
3. Frigidaire EFIC108 Compact Ice Maker
An older and widely known Frigidaire compact model with a lid you can see through. It is known for being easy to set up and fits the idea of a smaller body.
Suits: tiny galleys. Strengths: a recognized brand and an easy setup. Weaknesses: an older design with fewer extras. Skip it if you want app control.


Best for weekend campers
4. Costway Portable Countertop Ice Maker
A widely sold bullet-ice machine with a control panel and a scoop. It targets small spaces and quick batches for a bar or a camper.
Suits: weekend campers. Strengths: wide availability and quick batches. Weaknesses: a basic plastic body. Skip it if you need heavy-duty build.


Best for big camp gatherings
5. VEVOR Portable Ice Maker
A countertop machine from a brand known for equipment, available in sizes aimed at bars and homes. It is a choice when you want a larger tank for a party at the campsite.
Suits: big camp gatherings. Strengths: higher capacity options. Weaknesses: a bigger footprint. Skip it if you have a very small counter.

Best for larger rigs
6. Whynter IMC-490SS Portable Ice Maker
A heavier, stainless portable machine with a built-in compressor for larger daily output, per the maker. It is more of a full appliance and suits an RV with room to spare.
Suits: larger rigs. Strengths: a stainless build and a stronger output. Weaknesses: a heavy and bulky body. Skip it if you travel light.
View Whynter IMC-490SS on Amazon
Care and Setup
- Drain the tank fully before driving so water does not slosh inside.
- Wipe the interior and the lid so no stale water lingers.
- Run the machine only when the RV is level and the power source is stable.
- Let the unit dry with the lid open before you store it.
Mistakes to Avoid
- Running it on a weak inverter without checking the power rating.
- Storing the unit with water still in the reservoir.
- Forgetting that ice melts in the basket on a hot day.
- Packing it loose where it can slide around during travel.
Planning Your Power Budget Before You Buy
An ice maker contains a compressor, a pump and a fan, so it draws noticeable power while it runs, and most also draw a surge at startup. In an RV the power source decides what you can run. Shore power at a campground usually has room for a small appliance, but it still shares capacity with the air conditioner, microwave and water heater. A generator has its own limit, and an inverter running off batteries has a smaller one.
Find the rated wattage or amperage on the listing or the nameplate, and compare it with your inverter’s continuous rating and surge rating. A unit that nearly equals the inverter’s capacity may trip it when the compressor starts. Check what else you will run at once. If you run an ice maker overnight on batteries, estimate how long it will draw power, and whether your battery bank can cover it without dropping too low. Many people run the machine only while connected to shore power or a generator, then store the ice in a cooler.
Look at the plug and cord as well. A short cord may not reach your outlet, and extension cords add resistance. Avoid thin cords, because compressors need steady voltage. If your RV has low voltage at some campgrounds, a protective device for the RV can guard sensitive appliances. Always check the manual for any limits on operating voltage and ambient temperature.
Ice Style, Output and Storage Basket Behavior
Portable ice makers produce a bullet or cylinder shape of ice in short cycles, and some make nugget-style ice. The shape affects how drinks feel and how fast ice melts. Bullet ice is common and works for most drinks. Check the listing for the shapes available and whether the unit offers different sizes.
Output is stated as a daily rate, but real output depends on room temperature, water temperature and how often you remove the ice. A hot RV interior makes the machine work slower. Think about how much ice you need at a time. A family cookout needs more ice than a couple’s evening drinks. Because portable machines do not freeze ice in storage, the basket holds ice only briefly. Most ice melts back into the reservoir, which then recycles the water to make new ice.
This means ice will not stay frozen in the basket for long, so scoop it into a cooler or bags for storage. Some machines also have a self-clean cycle, which helps keep the interior fresh. Others have an indicator for when the basket is full or water is low. Consider noise levels, especially in a small RV, where the machine will sit near your living area. Fan and pump noise vary, and owner reviews are a useful clue.
Water Supply, Quality and Draining
Most portable ice makers are filled by hand with a jug or cup, rather than a water line. That is convenient in an RV because no plumbing is needed, but it means you need to keep an eye on the reservoir. Use clean drinking water. If your campground water tastes strong, consider filtered or bottled water, since the machine concentrates minerals over repeated cycles.
Hard water can leave scale inside the machine and affect ice clarity and taste. Clean the unit as the manual advises, often with a mild descaling solution made for appliances. Stale water left in the reservoir can grow bacteria or develop odors, so don’t leave it sitting for days. Empty and dry the reservoir after use.
Know how the machine drains. Many have a drain plug, and some melt water collects in the reservoir for reuse. Plan where the water will go, because a small spill can damage RV flooring or wiring. Keep a towel and a small container close. Use a level surface during operation, as a tilted machine can misread water levels. Check whether the machine has an auto shutoff when water runs low, which protects the pump.
Travel, Securing and Storage on the Road
Driving shakes everything, and an ice maker is no exception. Before you leave, empty the reservoir and the basket, wipe the interior and let it dry. Leaving the lid open for a while helps stop musty smells. Water left inside will slosh and may leak out through seams.
Secure the machine so it cannot slide or tip. Wedge it into a cabinet with padding, use straps or place it in a bin with dividers. Keep it upright during transport, as the manual may require, because tilting a compressor unit can move oil in the compressor. Many manuals say to wait a period after moving the machine before turning it on, so check yours.
Think about where the machine will live when you are parked. A level spot on a counter with airflow around the vents works best. Don’t place it near a stove or in direct sun. Leave room at the back and sides, because the machine releases heat. Store the scoop and spare parts in a labeled bag. If your RV has limited cabinet space, measure the unit’s outside dimensions, including the lid when open, and compare with the space you have.
Cleaning, Reliability and Signs to Replace
A portable ice maker rewards regular cleaning. At the start of a trip, run a cleaning cycle if the unit has one, or wipe the interior with a mild solution as the manual describes. Clean the basket and scoop with soap and water. Dry the parts, and keep the lid open between uses. Never use harsh chemicals or abrasive pads that could damage the interior.
Dust can collect around the vents and slow cooling, so wipe them. Check the power cord for kinks and damage. If the machine is loud, vibrates or leaks, check that it is level and the reservoir is seated properly. Many problems come from small things, such as a loose lid, a clogged drain or low water.
Signs it is time to replace include ice that comes out slowly or not at all after cleaning, a compressor that runs constantly with little output, strange smells that persist, leaks from the body, a damaged cord, or a pump that is noisy or fails. Check the warranty and the return period on the listing, since travel use is hard on appliances. Keep the box and padding if you can; they make safe transport easier and may be needed for warranty service.
A Quick Checklist for RV Ice Maker Shoppers
A portable ice maker can make camping feel more comfortable, but small spaces and limited power make the details matter. Run through this list before you commit to a model.
- Where will it sit, and is the surface level, stable and free from vibration on the road?
- How much counter space can you spare, and does the lid open fully with cabinets above?
- What power source will it use: shore power, a generator or an inverter?
- How will you fill it with water, and where will melted water drain?
- How will you carry or secure it while the RV is moving?
- Where will ice be stored, and is there a freezer or cooler for it?
- Do you plan to use it only at campgrounds, or also off grid?
An ice maker that works well in a home kitchen may need extra thought in an RV, so write down your answers and check each one against the maker’s specifications and manual.
Counter Models Compared by Setup Style
| Setup style | How it works | Fits when |
|---|---|---|
| Manual-fill countertop unit | You pour water into a reservoir | You have no plumbed water in the camper |
| Self-draining model | Drains melted ice through a hose or plug | You can route a drain safely to a sink or tub |
| Compact bullet-ice style | Makes small rounded pieces in minutes | You want a quick drink supply |
| Nugget or chewable style | Softer, textured ice | Counter and noise tolerance allow it |
Check the exact ice shape and whether the maker states output per day. Output numbers are usually given under specific conditions, so real output can change with room temperature and water temperature.
Mistakes That Cause Trouble on the Road
- Leaving water in the reservoir during travel, where it can slosh and leak.
- Skipping a level check, which can confuse the sensors in some models.
- Plugging into a circuit that is already near its limit, tripping the breaker.
- Forgetting to empty and dry the unit between trips, which encourages odors and growth in the water tank.
- Blocking the vents on the sides or rear that the unit uses to shed heat.
- Using the machine with unfiltered water that leaves mineral buildup, contrary to the manual’s advice.
Follow the maker’s instructions for how long to let the unit rest after moving it, because many compressor-based machines need to settle before turning on.
Power Planning for Campgrounds and Off-Grid Stays
Ice makers draw real power, and RV circuits are limited. Check the wattage or amperage on the specification label, and compare it with the circuit and the generator or inverter you plan to use. Avoid running it at the same moment as an air conditioner, microwave or other heavy loads unless your system can handle the total. If you are unsure about RV electrical capacity, ask a qualified RV technician or electrician, and follow your RV maker’s instructions.
When boondocking, think about whether ice is worth its power cost. Making a batch while the engine runs or when you already have strong sun and a charged battery bank may be more practical than running it all day. Extension cords and adapters not made for the load can overheat, so use only items the maker recommends.
Cleaning, Storage and Keeping Ice Fresh
A little housekeeping keeps ice tasting clean. Empty the reservoir after each trip, wipe the interior with a soft cloth, and let the unit air dry with the lid open. Use the cleaning method described in the manual, since some plastics and coatings do not tolerate certain cleaners.
Store ice in a clean container or insulated bag, and only if the maker recommends it, as many portable machines are not designed to hold ice for long periods. Use drinking-quality water, and follow official guidance on water safety for campgrounds, including advice on treating or filtering water when its source is uncertain. Before putting the unit away for the season, drain it completely and store it in a dry place.
Securing the Machine for Travel
Treat the ice maker like any other loose object in a moving vehicle. Empty it, dry it, and secure it in a padded space where it cannot slide or tip. If the original box is available, it is often the best protection. Otherwise, wedge it in a cabinet or on the floor with towels or foam around it, and make sure it does not rest against anything sharp.
Matching Ice Style to Your Camping Habits
Ice is not only for drinks. Travelers use it for coolers, food storage and sometimes first aid, so think about what you actually need before choosing a shape or output level.
If you mainly cool beverages at the campsite, small bullet-style pieces made quickly may be enough. If you fill a cooler for a day trip, you may care more about how much ice the unit can produce across a few hours than about the shape.
- Check the batch time stated by the maker and how many batches you could run in an afternoon.
- Look at the basket capacity, as a full basket often stops the machine from making more.
- Consider whether melted ice is recycled back into the tank, according to the product description.
- Think about how much noise you can tolerate at a quiet campground.
Be realistic about hot weather. High outside temperatures reduce output in most machines, so a unit that performs well in a cool kitchen may produce less in a sun-warmed RV. The maker’s manual often lists the ambient temperature range it is designed for, and following it protects the machine and gets the best from it.
Ice Styles, Output Claims and What They Mean at the Counter
Portable ice makers promise speed, and the honest way to read their numbers is as a rhythm rather than a warehouse: small batches, produced continuously, that need somewhere to go. The basket inside the machine is a staging area, not a freezer — ice there melts steadily, which is why the ownership habit that matters is transferring finished ice to a freezer or a good cooler on a rhythm. Owners who internalise that single fact love these machines; owners who expect the basket to behave like a freezer compartment conclude, wrongly, that the machine is broken.
Ice style shapes what the machine is for. Bullet ice is fast, hollow and kind to blender blades and teeth; it suits drinks that will be consumed soon. Clearer, denser cube styles melt slower and suit drinks that sit. Nugget ice — where a machine offers it — is soft, chewable and absorbs flavour, which is why its fans are loyal. Match the style to the drinking you actually do, and remember that the first batch from any machine is the slowest and the least pretty: the system is still cooling itself before it can chill your water.
Size, Placement and the Noise Question
A countertop ice maker is a working appliance with a fan, a compressor and a water reservoir, and it wants what those things want: level footing, clearance at its vents, and a spot where its hum is acceptable. In an open-plan space or a vehicle, that hum is part of the purchase, so place the machine where it can be heard least and switched off at night without drama. Measure the space with the lid open — the machine needs headroom to fill and to empty the basket — because a unit that fits under a cabinet only while closed is a unit that will be dragged out for every use.
A Calm Diagnostic Order for Cooling Problems
When a portable cooling unit disappoints, work from the outside in and the cheap to the expensive. First, environment: is it in sun, in a hot vehicle, against a wall with its vents breathing its own exhaust? Second, airflow and seal: vents clear, lid closing fully, seal clean and unobstructed, nothing trapped in the door line. Third, power: lead fully seated, plug and socket sound, voltage where it should be, cut-off settings sensible for the battery it is drawing from. Fourth, load: was warm food loaded in bulk, is the unit so full that air cannot circulate, has the lid been opened twenty times in an hour? Only after those four should the unit itself be suspected — and in practice, one of the four explains the overwhelming majority of warm loads and flat batteries.
Keep notes when something goes wrong: the weather, the load, the power source, what fixed it. Cooling problems repeat with conditions, and a note from last summer’s heatwave is next summer’s instant diagnosis. Owners who keep that small log stop experiencing their unit as temperamental and start experiencing it as a system they understand — which, in the middle of nowhere with a load of food depending on it, is worth more than any single feature on the box.
Extending the Working Life of the Unit
These units die from neglect patterns, not from use: vents choked with dust, seals left dirty until they perish, interiors stored damp, cables chafed through at the same rub point for a year. The counter-habits are all in this guide — brush the vents, wipe the seal, dry before storage, route cables kindly — and they cost minutes per trip. Set against the price of the unit and the food it protects, those minutes are the best-value maintenance in the whole vehicle or kitchen, and they compound: a unit cared for this way does not merely last longer, it performs like new for most of that longer life.
First Use and the Daily Rhythm
Before the first drink, clean the machine as the manual directs and run and discard the first batches of ice. New machines carry the taste of their packaging and their plumbing, and two sacrificial batches clear it. Use clean, fresh drinking water, and if your tap water is hard or strongly flavoured, filtered water improves both the ice and the machine’s internal life. Position the unit, let it settle after moving it — compressor machines like to stand upright and still before running — and give the first cycle time to be slow.
The daily rhythm that works: fill in the morning, move ice to the freezer as the basket fills, and let the machine rest when demand stops rather than running it all day against a melting basket. In a vehicle or at a gathering, run it while power is plentiful and bank the ice in a cooler. At night, many owners switch off, empty and dry the reservoir if the machine will sit, because standing water in a warm machine is where stale tastes are born. Treat the ice maker like a small, keen employee: give it work in batches, and do not leave it idling.
Water Quality and Taste
Ice is frozen water, so every flavour in the supply is preserved in the cube. If your ice tastes of the machine rather than the water, the machine needs cleaning; if it tastes of the tap, filter the water. Mineral-heavy water also leaves scale on the evaporator and in the pump, which slowly slows production and can seize small moving parts — descaling on the maker’s schedule, with the maker’s method, is the difference between a machine that lasts years and one that fades in a season of heavy use.
Cleaning an Ice Maker So the Ice Stays Tasteless
Ice makers reward a cleaning routine that is boring in its regularity. Wipe the basket and interior, run the maker’s cleaning cycle or solution through the system at the recommended interval, and always finish with plain-water batches that you discard. The reservoir, the water lines and the evaporator surfaces are all places where a thin biofilm can establish itself invisibly and then announce itself in the flavour of every cube. Because the machine’s whole product is something you put in your mouth, ‘looks clean’ is not the standard — ‘tastes of nothing’ is.
Between trips or seasons, drain the machine completely, dry it with the lid open, and store it somewhere air moves. A machine stored wet is a machine that will need deep cleaning before its next use, and deep cleaning an ice maker under time pressure, with guests arriving, is a special kind of misery. Check the plug, cable and vents at the same time, brush dust from the fan area, and store the scoop and basket with the unit so the kit is complete when it comes out again.
When Production Slows Down
Slow ice is a symptom with a short list of causes: the room or vehicle is hot and the machine is fighting it; the vents are blocked by their neighbours on the counter; the water is warm; or scale has built up inside. Work the list in that order — shade and space the machine, feed it cool water, descale as directed — before concluding anything has failed. Most ‘broken’ ice makers are hot, crowded or scaled, and all three are owner-fixable in an afternoon.
Ice Maker Mistakes Everyone Makes Once
Leaving finished ice in the basket and expecting it to keep is the universal first mistake — the basket is not refrigerated storage, and the meltwater simply gets recycled into smaller, wetter ice. The second is running the machine in a hot, sealed space — a closed vehicle in sun, a cupboard — where its own exhaust heat becomes its intake air. The third is neglecting the water: topping up a stale reservoir for weeks instead of emptying and refilling. And the fourth is moving the machine and running it immediately, tilted and sloshed, when a short rest upright would let the compressor’s oil settle back where it belongs.
Living With a Portable Ice Maker: Real Routines
In an RV, a portable ice maker solves the specific arithmetic of small freezers and warm evenings: the freezer is too small to store ice, the nearest bag of ice is a drive away, and drinks at the end of a driving day are a ritual worth protecting. The machine’s place in that system is as a producer feeding a store — ice made during the day, when solar or hookup power is plentiful, and banked in the freezer or cooler for the evening. Run it while power is abundant and it stops competing with the fridge and the lights when power is scarce.
Space and motion shape the RV routine. The machine wants a level, ventilated home where it can stay put — moving it for every use, with water sloshing and a compressor that hates being tilted, is how units die young. Secure it for travel, empty or secure the reservoir before driving days, and let it stand and settle at the new site before the first batch. Treated as a fixed appliance that happens to be portable, rather than a gadget that happens to be in the van, it will behave like one.
How the Picks Above Compare, Side by Side
The picks in this guide differ less in whether they work than in the kind of trip and user they are shaped for. The comparison below restates each one in the review’s own terms — who it suits, its stated strength and its flagged limitation — so the choice becomes a matter of matching your load, your power and your space to the role each model is already described as filling.
Magic Chef MCIM22 Portable Countertop Ice Maker. In the review above, this pick is matched to simple camper kitchens. Its stated strength is a compact look and basic controls. The honest limitation flagged there is a tank that is on the smaller side. And the skip condition still applies: skip it if you want big batches. Read in isolation, a strength can sound like a reason to buy; read against the other five picks, it is really a statement about fit. If the situation described matches your own, this is the pick to shortlist first. If the limitation touches something you deal with every day, one of the other picks will serve you better, even if its headline strength sounds less exciting.
Luma Comfort IM200SS Portable Ice Maker. In the review above, this pick is matched to trailers and RVs. Its stated strength is a stainless look that suits an RV kitchen. The honest limitation flagged there is the basket is not a freezer. And the skip condition still applies: skip it if you want nugget ice. Read in isolation, a strength can sound like a reason to buy; read against the other five picks, it is really a statement about fit. If the situation described matches your own, this is the pick to shortlist first. If the limitation touches something you deal with every day, one of the other picks will serve you better, even if its headline strength sounds less exciting.
Frigidaire EFIC108 Compact Ice Maker. In the review above, this pick is matched to tiny galleys. Its stated strength is a recognized brand and an easy setup. The honest limitation flagged there is an older design with fewer extras. And the skip condition still applies: skip it if you want app control. Read in isolation, a strength can sound like a reason to buy; read against the other five picks, it is really a statement about fit. If the situation described matches your own, this is the pick to shortlist first. If the limitation touches something you deal with every day, one of the other picks will serve you better, even if its headline strength sounds less exciting.
Costway Portable Countertop Ice Maker. In the review above, this pick is matched to weekend campers. Its stated strength is wide availability and quick batches. The honest limitation flagged there is a basic plastic body. And the skip condition still applies: skip it if you need heavy-duty build. Read in isolation, a strength can sound like a reason to buy; read against the other five picks, it is really a statement about fit. If the situation described matches your own, this is the pick to shortlist first. If the limitation touches something you deal with every day, one of the other picks will serve you better, even if its headline strength sounds less exciting.
VEVOR Portable Ice Maker. In the review above, this pick is matched to big camp gatherings. Its stated strength is higher capacity options. The honest limitation flagged there is a bigger footprint. And the skip condition still applies: skip it if you have a very small counter. Read in isolation, a strength can sound like a reason to buy; read against the other five picks, it is really a statement about fit. If the situation described matches your own, this is the pick to shortlist first. If the limitation touches something you deal with every day, one of the other picks will serve you better, even if its headline strength sounds less exciting.
Whynter IMC-490SS Portable Ice Maker. In the review above, this pick is matched to larger rigs. Its stated strength is a stainless build and a stronger output. The honest limitation flagged there is a heavy and bulky body. And the skip condition still applies: skip it if you travel light. Read in isolation, a strength can sound like a reason to buy; read against the other five picks, it is really a statement about fit. If the situation described matches your own, this is the pick to shortlist first. If the limitation touches something you deal with every day, one of the other picks will serve you better, even if its headline strength sounds less exciting.
Keep a small kit with the unit: the manual, a spare fuse or lead if the maker supplies one, a soft brush for the vents, a cloth that lives with the machine, and a simple thermometer. Cooling equipment fails in small ways far more often than big ones, and the kit turns most small ways into five-minute fixes at a rest stop instead of a warm load and a ruined menu at the destination.
Label your loads by day when a trip is long. It sounds like catering-college fussiness until the third evening, when the lid has been opened twenty times ‘just to see what there is’. A meal-order load with a rough plan taped inside a cupboard door means the lid opens for a reason, cold air stays where it belongs, and the power budget you calculated at home survives contact with reality.
Do one honest rehearsal trip. A single overnight with the full setup — power, loading, securing, cleaning — teaches more than a month of reading, and it teaches it where failure costs a picnic rather than a holiday. Note what ran short, what rattled, what was unreachable, and fix the list while the memory is fresh. Every experienced road cook and overlander has a setup that looks effortless precisely because it was rehearsed when it was not.
RV Ice Maker FAQ
Can I run one off a generator?
Many can, but you should compare the machine’s power rating with what your generator or inverter can supply. Check the listing and the manual.
Do RV ice makers need a water line?
These countertop models do not. You fill the reservoir by hand, which suits a camper without a dedicated line.
Where should I store it while driving?
Drain it, dry it and wedge it in a secure spot so it cannot shift. Never leave water inside.
How much power does a portable ice maker use?
Check the rated wattage or amperage on the listing or nameplate. Compare it with your inverter or generator ratings, including startup surge.
Can I run an ice maker while driving?
It depends on your RV's power setup and the maker's guidance. Many people run it only when parked, and always secure the unit in transit.
Why does the ice melt in the basket?
Portable machines do not keep ice frozen in storage. Move the ice to a cooler or bag so it lasts.
What water should I use?
Clean drinking water works best. Filtered or bottled water can help if local water is hard or has a strong taste.
How often should I clean it?
Follow the manual. Many owners clean it at the start of each trip and wipe it down after use, and they empty and dry the reservoir when not in use.
Do I need to let it sit after moving it?
Some manuals ask you to let a compressor unit stand upright for a while before use. Check yours to be sure.
Can I run an ice maker while the RV is moving?
It is not a good idea. The machine needs to sit level, its water sits in an open reservoir that will slosh, and the compressor prefers stillness. Make ice while parked — ideally while connected to power or running the generator for other reasons — and bank it in the freezer for the road. The ice travels better than the machine works, so let it.
How do I keep ice production going at a dry camp?
Budget the two resources honestly: water and power. Carry the water the machine will drink as part of your fresh supply planning, run it during the hours your batteries are charging — driving or solar peak — and store the output in the freezer so the machine can rest when power tightens. Dry camping with ice is entirely possible; it is just planned rather than assumed.
How should I prepare the ice before a long trip?
Start days, not hours, ahead: clean and dry the unit, check the seal and cables, and run it at home long enough to prove it holds temperature with a real load inside. Pre-cool before departure, load food already cold, and plan the power — which battery, which charging source, what the cut-off is set to. A long trip should contain no experiments; everything about the setup should already have survived a short one.
Can I run an ice maker while the RV is moving?
It is not a good idea. The machine needs to sit level, its water sits in an open reservoir that will slosh, and the compressor prefers stillness. Make ice while parked — ideally while connected to power or running the generator for other reasons — and bank it in the freezer for the road. The ice travels better than the machine works, so let it.
How do I keep ice production going at a dry camp?
Budget the two resources honestly: water and power. Carry the water the machine will drink as part of your fresh supply planning, run it during the hours your batteries are charging — driving or solar peak — and store the output in the freezer so the machine can rest when power tightens. Dry camping with ice is entirely possible; it is just planned rather than assumed.
How should I prepare the ice before a long trip?
Start days, not hours, ahead: clean and dry the unit, check the seal and cables, and run it at home long enough to prove it holds temperature with a real load inside. Pre-cool before departure, load food already cold, and plan the power — which battery, which charging source, what the cut-off is set to. A long trip should contain no experiments; everything about the setup should already have survived a short one.
What is the first thing to check if cooling seems weak?
The unglamorous trio: vents blocked, seal obstructed or dirty, and power supply sagging. Most weak cooling is one of those three wearing a disguise. Clear space around the unit, wipe and inspect the seal, confirm the lead is fully seated and the voltage is what the unit expects, and give it an hour before judging again. Compressors and controls fail far less often than airflow and connections do.
Can I run it continuously for weeks at a time?
These units are built for continuous running, and many live that way as overflow cooling at home or through a long season on the road. Continuous duty asks for the maintenance to keep pace: vents kept clear, the interior dried and cleaned periodically rather than never, and an occasional check that temperatures are truly where the display claims. Treated that way, continuous use is normal life, not abuse.
How do I keep smells out of the unit?
Smells come from spills left to dry, food stored unwrapped, and interiors closed while damp. Seal strong-smelling food in proper containers, wipe spills when they happen rather than at the end of the trip, and always store the unit clean, dry and ajar. A unit that already smells wants a thorough wash with a mild, food-safe cleaner, a full drying with the lid open, and then a day standing open before it is loaded again.
The Short Version
For a simple small pick, the Magic Chef MCIM22. For a stainless look, the Luma Comfort. For a trusted name, the Frigidaire EFIC108. For wide availability, the Costway. For bigger batches, the VEVOR. For a full-size build, the Whynter IMC-490SS.