Shoppers searching for over-the-range microwave reviews usually want to know which models are well established and easy to fit. This guide focuses on widely sold designs from known brands, which are the ones you will see recommended most often. The details below are drawn from our own product knowledge, not hands-on testing.
We have not used these microwaves ourselves, so please confirm the exact model number, the dimensions, the venting options and the current features on the listing before you buy. Read recent customer reviews on each listing as well, since they can reveal real-world issues that specifications do not.
As an Amazon Associate we earn from qualifying purchases. Links below are affiliate links, and they do not change the product information we give.
What to Look For
| Feature | Why it matters |
|---|---|
| Track record | A long-running series is easier to find parts for |
| Fit | Measure the opening before you order |
| Venting | Check for ducted and recirculating support |
| Reviews | Recent buyer feedback highlights common issues |
| Warranty | Read the maker’s warranty terms before you decide |
| Returns | Check the seller’s return policy for heavy items |
In this guide
Specs at a Glance
| Microwave | Width class | Finish | Notes |
|---|---|---|---|
| GE JVM3160RFSS | 30 inch | Stainless steel | Long-running series |
| Whirlpool WMH31017HS | 30 inch | Stainless steel | Common replacement |
| Samsung ME21M706BAS | 30 inch | Stainless steel | Ceramic enamel interior |
| LG LMV2031ST | 30 inch | Stainless steel | Sensor features |
| Frigidaire FFMV1846VS | 30 inch | Stainless steel | Common replacement |
| Cosmo COS-3012ORM1SS | 30 inch | Stainless steel | Check details on listing |
The 6 Best Over-the-Range Microwaves

Top pickBest for replacing an older GE
1. GE JVM3160RFSS Over-the-Range Microwave
A GE over-the-range model that has been sold for many years. It has a stainless exterior, a venting fan and a cooktop light, and it is a frequent pick for replacements.
Suits: replacing an older GE. Strengths: a familiar and widely sold design. Weaknesses: the styling is plain. Skip it if you want convection.

Best for replacement projects
2. Whirlpool WMH31017HS Over-the-Range Microwave
A Whirlpool microwave that appears often in replacement projects. It has a stainless exterior and a venting fan, with simple preset modes.
Suits: replacement projects. Strengths: a familiar fit and simple controls. Weaknesses: few extras. Skip it if you want advanced features.
View Whirlpool WMH31017HS Over-the-Range Microwave on Amazon
Best for easy cleaning
3. Samsung ME21M706BAS Over-the-Range Microwave
A Samsung microwave with a ceramic enamel interior that is meant to wipe clean easily. Check the listing for the venting options and the exact features.
Suits: easy cleaning. Strengths: ceramic interior. Weaknesses: check the current availability. Skip it if you want a different style.
View Samsung ME21M706BAS Over-the-Range Microwave on Amazon
Best for modern kitchens
4. LG LMV2031ST Over-the-Range Microwave
An LG over-the-range microwave with a stainless finish and sensor features. Read the listing for capacity and fan details.
Suits: modern kitchens. Strengths: sleek design and sensor features. Weaknesses: details vary. Skip it if you want convection.
View LG LMV2031ST Over-the-Range Microwave on Amazon
Best for standard openings
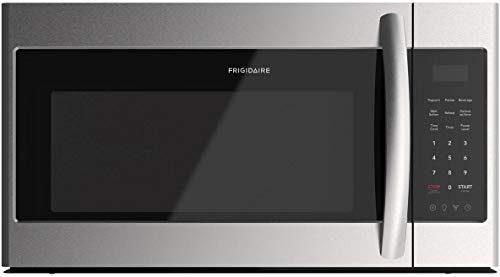
5. Frigidaire FFMV1846VS Over-the-Range Microwave
A stainless Frigidaire over-the-range microwave with a venting fan and a cooktop light. A straightforward replacement for a typical 30 inch space.
Suits: standard openings. Strengths: a common fit. Weaknesses: check the dimensions. Skip it if you need an unusual size.
View Frigidaire FFMV1846VS Over-the-Range Microwave on Amazon
Best for stainless kitchens
6. Cosmo COS-3012ORM1SS Over-the-Range Microwave
A Cosmo over-the-range microwave with a stainless exterior. It comes from a smaller brand than some others on this list, so check the warranty and support details.
Suits: stainless kitchens. Strengths: a modern look. Weaknesses: a smaller brand with less history. Skip it if you want a legacy brand.
View Cosmo COS-3012ORM1SS Over-the-Range Microwave on Amazon
Care and Setup
- Clean the grease filter on the maker’s schedule.
- Wipe the interior after each use.
- Check the vent opening for blockage.
- Test the light and fan from time to time.
- Wipe the stainless exterior with a soft cloth to limit streaks.
- Keep the manual and the model number somewhere easy to find.
Mistakes to Avoid
- Trusting a single review without checking the specs.
- Ordering without measuring the opening.
- Ignoring the ventilation type.
- Assuming the old mounting plate will fit.
- Ignoring the return policy on a large appliance.
- Buying an older model without checking that it is still sold.
Swapping an Existing Unit: A Fit Checklist
Many people who search for over-the-range microwave reviews are replacing an old unit, and a swap goes smoothly only when the new microwave matches what is already on your wall. Start with the old unit. Find its model number, which is usually on a label inside the door frame or on the side, and look up its width, height and depth. Then compare these with the candidate. A match in width is the minimum, but a difference of even an inch in depth or height can change how the unit sits under the cabinet.
Next, look at the mounting plate. This is the metal bracket on the wall that holds the back of the microwave, and the hole pattern differs between models. Some replacements come with a plate that is meant to line up with the previous one, but many do not. Check the new model’s installation guide and the mounting template to see whether the old plate will work or whether you will have to remove it and drill new holes. Fill or patch old holes if needed.
Check the venting. Note whether the old unit vented through the top, the rear or recirculated into the room, and confirm that the new model supports the same method. If the duct opening does not line up, you may need an adapter or some modifications to the ductwork. Take photographs of the existing setup before you remove it, because they are a useful reference during installation.
Finally, check the electrical connection. The outlet should be in a position that the new unit’s cord can reach without a stretch, and it should meet the electrical requirements in the manual. Find out whether the new model’s cord is longer or shorter than the old one. Make a list of the items you need, such as the mounting screws, the toggle bolts and the filters, and confirm what is included in the box on the listing.
Reading the Spec Sheet Beside the Reviews
Reviews are most useful when you read them alongside the specification sheet, because each tells you something the other cannot. The spec sheet gives facts such as the dimensions, the capacity, the power level, the fan rating and the venting options. Reviews tell you how those facts play out in daily use. A good habit is to write down the specs that matter to you, and then scan recent reviews to see whether buyers confirm them.
For example, if the spec sheet lists a fan rating that sounds suitable, read what owners say about how well the fan clears smoke and how loud it is. If the listing says the unit fits a standard opening, look for buyers who mention the actual fit, especially anyone who replaced the same brand or the same model. If the listing mentions a sensor feature, see whether owners find it reliable.
Pay attention to patterns across many reviews, and discount one-off complaints that seem to be about shipping, packaging or personal preference. Look at the date of reviews as well. A model that has been sold for years may have changed over time, with newer units differing from older ones even with the same model number. If many recent reviews mention the same problem, take it seriously.
Look for reviews that mention the same kind of installation as yours, such as replacing an older unit, installing without a duct or fitting into a narrow gap. Check whether buyers mention missing parts, such as a template, filters or a mounting plate, and whether customer support helped. Remember that reviews are opinions and can be affected by unusual circumstances. Use them as one input, together with the manual, the warranty and your own measurements.
Warranty, Parts and Service Access
An over-the-range microwave is a heavy, built-in appliance that is awkward to remove and ship, so the support behind it matters. Start with the warranty terms. Read how long the coverage lasts, which parts it covers, whether it covers labor and whether it applies if the unit was installed by someone other than a professional. Some makers have separate terms for the magnetron, the main cooking component, or for the cabinet. Note anything that could void the warranty, such as using the unit in a way the manual does not allow.
Look at how service works. Does the maker have service providers in your area, or do you have to ship the unit away? Ask the seller or the maker how repairs are arranged. A well-known brand with a wide service network may be easier to repair, while a smaller brand may require more effort. The Cosmo model in this guide comes from a smaller brand, so checking warranty and support details before buying is wise.
Think about parts you will need over the years. Grease filters, charcoal filters, light bulbs, turntable plates and roller rings, and door handles are common replacement items. Check whether the maker sells these for your model and whether they are easy to find. A model that has been sold for a long time is more likely to have parts available, but confirm this for the specific model number.
Keep your records. Save the receipt, the model and serial numbers and the warranty card, and register the product if the maker offers it. Take a photo of the label inside the door. If a problem appears, contact the maker or the seller promptly and describe the issue clearly, and keep notes of your calls and emails. A little organization makes warranty claims much easier.
Delivery Day and Installation Day
Preparing for delivery and installation reduces stress. Before the microwave arrives, clear the area around the range and remove items from the cabinet above. Check the path from the door to the kitchen, since the box is large and heavy. Ask about the delivery terms, such as whether the carrier will bring the box inside, unpack it or remove the old unit.
Inspect the unit when it arrives. Look at the packaging for damage, and open the box in a safe place to check for dents, scratches, a cracked door or loose parts. If the carrier is still present, note any damage on the delivery receipt. Check that the box contains the manual, the template, the mounting plate, the filters, the turntable and the hardware. Report problems to the seller promptly, within the return window.
On installation day, turn off power to the circuit at the breaker. Remove the old unit carefully, with two people, because it is heavy. Use a stud finder to locate studs, and follow the template to mark the plate and the cabinet bolt holes. Attach the plate securely, hang the microwave on it and secure it with the cabinet bolts. Connect the duct or install the filter, depending on your setup. If any step seems beyond your skill, hire a professional.
After mounting, test the unit before relying on it. Check that the unit sits level and firmly, the door opens and closes smoothly, the light and fan work at every speed and the turntable rotates. Run a short test with a cup of water to confirm that it heats. Keep the packaging for the return window. Wipe the exterior and read the manual, so you know how to use the features.
Long-Term Ownership and When to Replace
A well-chosen over-the-range microwave can serve for years, and a few habits help it last. Clean the grease filters regularly according to the manual, wipe up spills inside the cabinet quickly and keep the vent clear. Do not run the microwave empty, and use only cookware that is microwave safe. Wipe the stainless exterior with a soft cloth and the cleaner the maker recommends, since harsh products can mar the finish.
Pay attention to the door. The latch, the hinges and the seal are the parts that wear with years of daily use. A door that does not close firmly, a seal that is cracked or dirty, or a latch that rattles all warrant attention. Clean the seal and the edges of the door, and stop using the microwave if the door looks damaged. A damaged door can allow microwave energy to escape, which is unsafe.
Notice changes in performance. If the microwave heats slowly, makes grinding noises, sparks with nothing metal inside, trips the breaker, or has a fan that has become noisy or weak, it needs attention. Some problems, such as a worn turntable roller, are simple. Others, such as magnetron or control board failure, can be expensive to fix relative to the value of the unit.
When deciding between repair and replacement, consider the age of the microwave, the repair quote and the availability of parts. Weigh the cost of a technician and potential downtime against the price of a new unit. If you do replace the microwave, use the same checklist as before: measure, check the venting and mount, read the specs next to recent reviews and check warranty and returns. Responsible disposal matters too, so ask your local waste service or retailer about recycling options for large appliances.
How to Read a Product Listing for an Over-the-Range Microwave
Listings for these microwaves cram a lot into a few lines. If you know what each part means, you can narrow your options quickly and avoid a nasty surprise at installation time.
| Listing detail | What to look for |
|---|---|
| Exterior dimensions | Width, height and depth, which must fit your cabinet gap and clear the cooktop. |
| Interior capacity | Cubic feet of cooking space. Check that a dinner plate turns without touching the walls. |
| Wattage | Cooking power. Higher watts often mean faster cooking, but times in recipes assume certain levels. |
| Vent type | Whether the exhaust can go outside, recirculate or both, and what kit is included. |
| Mounting hardware | Whether a mounting plate and template are included. |
| Voltage and plug | Matches the outlet in your cabinet. |
| Control style | Buttons, dials or a keypad. Think about daily use with wet or greasy hands. |
| Included accessories | Turntable, rack, grease filter and charcoal filter if relevant. |
If a number is missing from the listing, look for the specification sheet or installation manual on the maker’s website. Dimensions in particular should never be guessed.
Replacing an Old Unit: A Pre-Swap Checklist
Most buyers are replacing an existing over-the-range microwave rather than fitting one into a brand new kitchen. That can make the job easier, but only if the new model lines up with the old mounting.
- Photograph the existing setup. Take pictures of the unit, the wall plate, the top bolts and the venting.
- Measure the old unit. Note the width, height and depth, and compare with the new one.
- Check the hole pattern. The new mounting plate may use different holes than the old one, which can require new drilling.
- Check the vent direction. A change from top exhaust to rear exhaust, or the reverse, may need adjustments.
- Prepare for the lift. Clear the cooktop, protect it with a blanket and arrange for a helper.
- Dispose of the old unit properly. Check local recycling rules for large appliances.
Always disconnect power before removing or installing a unit, and do not attempt electrical changes unless you are qualified. A licensed installer can advise on cabinet strength, outlet location and local code. Keep the installation manual, the mounting template and the model number somewhere safe for later reference, and register the product with the maker if that is offered, so that any service notice reaches you. It also helps to ask a neighbor or friend who has the same layout how their installation went, since cabinet depth and venting choices are easier to picture when you can see a real kitchen.
Before You Decide: The Ownership View
An over-the-range microwave does two jobs in the busiest spot in the kitchen, cooking above and clearing the air below, so the sections below concentrate on living with that double duty: venting habits, grease management, lighting, and the installation decisions that echo for years.
How the Picks Above Compare When You Line Them Up
With six options on the table, the fastest way to a good decision is to compare the picks above in pairs rather than as a crowd. Start with the two that caught your eye and read their reviews back to back, asking the same three questions of each: what is it best at, what is its honest limitation, and whose home does it suit? The reviews above answer those questions in the same pattern for every pick, which makes the comparison fair. Cross off the one that loses on the question you care about most, then bring the next pick into the ring against the survivor.
The opening pair sets the tone for the list. The GE JVM3160RFSS Over-the-Range Microwave and the Whirlpool WMH31017HS Over-the-Range Microwave represent two of the clearest approaches in this category, and the difference between them — in style, in priorities and in the kind of owner they suit — is the difference that matters for most buyers. If one of them feels immediately right, that instinct is worth noting, because it usually reflects your real habits rather than the headline features. If neither appeals, the middle of the list is where your answer probably lives.
The Samsung ME21M706BAS Over-the-Range Microwave and the LG LMV2031ST Over-the-Range Microwave occupy that middle ground, and they reward close reading. Picks in the middle of a list like this tend to balance competing virtues rather than maximise one, which makes them the safest choice for households whose needs are mixed: two cooks with different priorities, a space that must serve several jobs, or a buyer who simply wants no drama. Compare their stated strengths against your own week and see which set of compromises you would rather live with daily.
At the end of the list, the Frigidaire FFMV1846VS Over-the-Range Microwave and the Cosmo COS-3012ORM1SS Over-the-Range Microwave are the specialists and the reminders that there is more than one way to solve the same problem. A specialist pick is the wrong choice for most people and the perfect choice for a few, and only an honest account of your own situation tells you which group you are in. Do not dismiss them for being different, and do not choose them for being interesting; choose them if their particular strength is the exact thing your current setup lacks.
Finish the comparison with a short written exercise. On paper, list your three non-negotiables — the size limit, the job it must do brilliantly, the habit you refuse to change — and score each surviving pick against them in a sentence each. The exercise takes ten minutes and it converts a fog of impressions into a decision you can explain. Owners who choose this way rarely look back, because the choice was made against their own criteria rather than against a stranger’s enthusiasm.
Sharing the Space: Steam, Splatter and the Cooktop Below
The microwave’s underside lives inches from your most energetic cooking. Vigorous boiling, frying and flambé-style moments send steam and fat exactly where the filters, lights and control panel sit. Use lids and splatter guards below not only for the cooktop’s sake but for the microwave’s, and be thoughtful with very tall pots, which bring boiling liquid closer to the unit and can crowd the space the maker intends to stay clear.
Inside the microwave, the same courtesy applies in reverse: cover food, especially sauces and fatty items, so the cavity stays clean enough that you are not cooking tonight’s meal in the aroma of last week’s. A small bowl of water heated and left to steam can loosen dried splashes before a wipe, where the manual allows it. Two appliances share this space — the range below and the microwave above — and the households that keep both pleasant are the ones that treat the boundary between them as shared territory to be kept clean from both sides.
Living With a Microwave That Is Also Your Hood
The dual role is the whole point of these models, and it asks for a small change in habit: start the fan before the cooking below gets serious, not after the kitchen has filled with steam. Running the vent from the beginning of a frying or boiling session captures far more moisture and grease than switching it on in rescue mode, and it protects the microwave’s underside and the cabinets around it. Let the fan run a little after you finish, too, so the last of the steam leaves instead of condensing on cool surfaces.
Remember that the microwave above is living in the exhaust path of everything you cook below. Grease that would have risen to a simple hood now coats filters and the underside of an appliance full of electronics. That is not a flaw in the concept; it is a maintenance fact. Owners who accept the filter-cleaning rhythm described in the guide above get years of good service, while owners who forget the filters entirely end up with a fan that roars, drips and barely draws.
Grease Filters, Charcoal Filters and the Calendar
There are usually two kinds of filter in play. The washable grease filter under the unit catches the fat from cooking below and wants regular washing in hot soapy water once it feels tacky or looks dull. The charcoal filter, fitted on recirculating installations, absorbs odours and cannot be washed back to life; it is replaced on the maker’s schedule. Confusing the two is a common and expensive little mistake, so identify which your installation has and write the dates on a card inside a nearby cabinet door.
Clean filters change how the whole kitchen feels. Steam clears faster, smells linger less, and the fan does its work on a lower, quieter setting. If cooking smells have started to hang around despite the fan running, treat the filters as the first suspects before blaming the fan itself. It is also worth wiping the underside surfaces around the filters while they are out, since that is where the grease that escaped settles, and it is far easier to remove monthly than yearly.
Cooktop Light and Cooking Light
The lights under an over-the-range microwave do more than any other light in the kitchen, because they are the ones you actually cook by. Keep the lenses or covers clean — a film of grease dims them gradually enough that you may not notice until a cleaning reveals how murky they had become. When a bulb or lamp needs replacing, use the type the maker specifies; the space is hot, greasy and enclosed, and it is not the place for an approximate substitute.
Think about how you use the light beyond cooking. Many households leave the low setting on as a night light or as background light for early mornings, which is gentle on the eyes and keeps the cooktop visible. If your model offers different levels, experiment in the first weeks and settle on habits, because the light you set up thoughtfully at the start becomes invisible routine — in the good sense — for the life of the appliance.
What the Installation Decides for the Next Decade
An over-the-range microwave is one of the least casually swapped appliances in the kitchen, because it is bolted to the wall and cabinet, wired in and ducted or configured to match the house. Decisions made on installation day — the venting route, the mounting height within the maker’s limits, the electrical supply — shape daily use for years. This is why the measuring guidance in the guide above deserves slow attention, and why reusing an old mounting position without checking it against the new model’s requirements is a false economy.
If you are replacing an older unit, photograph the existing arrangement before anything comes down: the bracket, the duct connection, the outlet position. Those photographs answer questions that arise mid-installation when the old unit is already at the kerb. Keep the new model’s installation template and manual with your house paperwork, because the next owner, or the next replacement in ten years, will be grateful for them. Good installations are boring, and boring is exactly what you want above a hot cooktop.
Repair or Replace: Judging the End of a Product’s Run
Every over-the-range microwave eventually reaches the point where money spent keeping it going would be better spent on its replacement, and the honest signals are usually clear if you look for them. Performance that no longer recovers after a proper clean and the maker’s own troubleshooting steps is one signal. Repeated faults in the same system, parts that the maker no longer lists, and damage to the main body, frame or cooking or cooling chamber are others. Cosmetic wear, by contrast, is a poor reason to replace a product that still does its job safely and well; a faded finish or a scuffed handle costs nothing to live with.
When you do judge a product finished, use what it taught you. Your notes about what annoyed you, what you cleaned most and which feature you never touched are a better buying guide than any advertisement, because they describe your household rather than an average one. Carry those lessons back to the picks above: the right replacement is usually the one that fixes your old product’s specific weakness, not the one with the longest feature list. Dispose of the old product through the route your area provides for appliances or metal goods, remove anything the maker says to remove first, and keep the manual until the replacement is settled in, since measurements and habits often transfer.
Getting More Years Out of What You Buy
Longevity with an over-the-range microwave is mostly decided by small, unglamorous choices. Protect the product from the conditions it was not built for: standing water, relentless weather, corrosive cleaners, knocks during moves and long neglect between seasons. Where the maker offers a cover, a storage position or a winter routine, use it; those recommendations are written from warranty claims, not from theory. Handle the parts that move, seal or bear weight with a little care, because those are the parts that wear first and are often the hardest to replace once a model is discontinued.
Keep a small kit for the product: the cleaner the maker approves, any specialist tool it shipped with, and the spare consumables you know you will need, stored together rather than scattered around the house. When you move house or rearrange the space, treat the product like the appliance it is: empty it, secure moving parts, lift with help and re-check it sits level in the new spot. Owners who think of an over-the-range microwave as equipment to be kept, rather than a purchase to be consumed, routinely get years more service from the same product, and they spend the money they save on better ingredients, better gatherings and better weekends.
Measuring and Planning the Space Before Anything Arrives
Most disappointment with an over-the-range microwave is really a measuring problem that showed up late. Measure the space where the product will live, then measure the path it travels to get there: doorways, gates, stairs, tight corners and the lift or hallway if you have one. A product that fits its final spot but cannot get through the door is a return waiting to happen. Allow room around the product for the way you actually work, not just the footprint on the page. You need space to open doors and lids fully, to stand comfortably while you use it, and to reach the back for cleaning without dragging the whole thing out of place.
Think about the surface underneath as part of the measurement. It should be level, stable and suited to the heat, weight or moisture the product brings with it. Then think about what sits nearby: curtains, fences, stored fuel, cleaning supplies and the things a busy household piles into corners. Planning the neighbourhood of an over-the-range microwave, not only its footprint, is what separates a setup that feels easy every day from one you fight with every weekend. Sketch the layout on paper if it helps; five quiet minutes with a tape measure prevents most of the expensive mistakes.
A Cleaning and Maintenance Rhythm That Actually Sticks
An over-the-range microwave rarely fails all at once; it drifts. Small deposits build up, moving parts get stiff, seals and surfaces pick up grime, and one day the performance you paid for is quietly gone. The fix is a rhythm rather than a heroic annual clean. Wipe down the surfaces you touch after use, while spills and splashes are still easy to move. On a regular cycle, do the deeper job the manual describes: the removable parts out, the hidden corners reached, the filters, trays, racks or drip paths dealt with, whichever your product has. Use the cleaners the maker allows for that surface, because the wrong chemical can mark a finish or damage a coating faster than the dirt would have.
Build the habit around an anchor you already keep, such as the end of a cookout, the weekly shop or the change of a season, so the job happens without willpower. While you clean, look at the product the way an inspector would: loose fixings, worn edges, cracked or perished flexible parts, and anything that has started to smell, stain or behave differently. Catching wear early usually means a small part or a good clean sorts it. Ignoring it usually means the same issue returns on the day you have guests, a full load or no spare time. A clean product is also simply nicer to use, and people look after things they enjoy using.
More Questions Before You Buy
Can I install an over-the-range microwave myself?
It depends on your skills, the electrical work involved and local rules. The units are heavy, need secure mounting and correct venting, and the guide above sets out when professional help is the sensible route. Never improvise the mounting; the unit hangs above a hot cooktop.
What clearance matters most above my cooktop?
The distance the maker specifies between the cooktop surface and the bottom of the microwave, which protects the unit from heat and leaves room for pots. Measure it before you buy and again at installation, and do not let a taller new range quietly steal it later.
Why is the fan so loud?
Smaller duct paths and higher speeds make more noise, and a clogged filter makes the fan work harder for less effect. Clean or replace filters first. If your installation can vent outside, ducted setups generally move air more effectively than recirculating ones.
Can I use the microwave while the fan is running for the stove?
Yes, that is normal use; the two functions are designed to work together. Heavy cooking below plus a long microwave session above is exactly the situation these models are built for, provided filters are maintained and clearances respected.
How often should I clean the grease filter?
Often enough that it never becomes coated and dripping: many households wash it monthly, and keen fryers more often. If it feels tacky or looks dull, it is due. Hot soapy water and a full dry before refitting is the usual routine, following the manual for your model.
Why does my kitchen still smell of cooking with the fan on?
Check the filters first. A saturated charcoal filter on a recirculating setup, or a clogged grease filter on any setup, will defeat a healthy fan. Also start the fan before cooking begins, since smells already spread through the house cannot be gathered back.
Final Practical Notes Before You Decide
Finally, buy for the household you have, not the one in the advertisement. The right over-the-range microwave is the one sized for your real gatherings, suited to your real space and matched to the maintenance you will honestly do. The picks above differ precisely because households differ, and the most satisfied owners are the ones who chose against their own habits and rooms rather than against a headline. Choose honestly, set it up carefully, keep the simple routines, and the product will repay you quietly for years.
Accessories deserve a cooler head than they usually get. Live with the over-the-range microwave for a while before adding extras, and let real use tell you what is missing: the tool you reach for and do not have is a genuine need, while the gadget bought in the first flush of enthusiasm usually ends up in a drawer. When you do add something, choose the version made or approved for your model where the maker offers one, and keep the same discipline as the main purchase — it should solve a problem you actually have.
Seasonal changes are a useful prompt for a walk-around check of any over-the-range microwave. At the turn of the year, look over the product and its surroundings: clearances still respected, surfaces clean, moving parts free, supplies stocked and nothing stored where it should not be. Households drift, and objects migrate into the spaces around appliances. A short seasonal reset keeps the setup you planned from quietly becoming the setup you would never have chosen.
One more habit separates satisfied owners from frustrated ones: keep the paperwork. The manual, the receipt and a note of the model details belong together, whether that means a folder, a drawer or a photograph stored with your other house documents. When a question arises in a year — a part, a setting, a warranty query — the answer is usually in those pages, and finding them in two minutes instead of twenty changes a small problem back into a small problem.
It is also worth setting a simple review date. A few months after an over-the-range microwave arrives, once the novelty has worn off, look at it with fresh eyes: is it positioned where it works best, are the accessories you actually use the ones within reach, and is there one small change — a moved shelf, a different routine, a better storage spot — that would make daily use smoother? Products settle into a household over time, and a short review catches the improvements that were invisible on day one.
If you share the over-the-range microwave with other people, share the knowledge too. The person who read the manual should not be the only person who knows the quirks: which setting behaves how, what the warning signs of a problem look like, and where the shut-off or the spare supplies live. Five minutes of showing beats a season of each person learning the same lessons separately, and it prevents the well-meant mistake made by someone who was never told.
Budget a little patience for the learning curve, whatever you choose from the list above. Almost every product in this category rewards its owner more in the third month than in the first week, because technique, placement and routine have had time to settle. Judging a purchase too early — or abandoning a sound product for a different one before learning it — is the most expensive habit in any kitchen. Give the choice a fair season before you grade it.
Over-the-Range Microwave FAQ
How should I use reviews when choosing a microwave?
Look for patterns across many recent reviews, such as noise, fit issues or door problems. One complaint matters less than a repeated one.
Are older models still a good choice?
A long-running model is easier to replace and service, but check the listing to confirm that it is still current.
Do I need a professional installer?
The unit is heavy and must be mounted securely. A professional installer is often a good idea.
What problems do buyers mention most often?
Common themes include fit issues with old mounting plates, noise from fans and door latches that wear out. Read the most recent reviews for each model to see whether these apply.
Does it matter which seller I choose?
Compare sellers on warranty and returns as well as the listing itself. A trusted seller and a clear return policy matter more with a heavy appliance.
How can I tell if a review is useful?
Useful reviews name the model, describe how long it has been in use and mention specific features. Be cautious with reviews that only describe delivery or packaging.
Where do I find the model number of my old microwave?
It is usually on a label inside the door frame, on the side or on the back of the unit. The manual and your purchase records may also list it. Photograph the label before you remove the unit.
Will the new microwave fit my old mounting plate?
Not always. Plates and hole patterns differ between models, so compare the new unit's template and installation guide with your old plate. You may need to remove the old plate and install the new one.
Is a long-running series always a better pick?
It can be easier to find parts and information, but products change over time. Check the specs and recent reviews for the specific model and confirm that it is still sold.
What should I check when the box arrives?
Look for dents, cracks and missing parts, and confirm that the template, plate, filters and turntable are included. Report damage to the seller and the carrier quickly, and keep the packaging until you are sure about the unit.
How long should I keep the receipt and manual?
Keep them at least as long as the warranty lasts, and ideally for the life of the appliance. They help with service, parts and resale. Store photos of the label too.
Can I install the microwave myself?
Some people do, but it involves heavy lifting, drilling and secure mounting, so many prefer a professional. If you do it yourself, work with a helper, follow the template and turn off the power.
What if the new unit does not line up with my duct?
Check whether the model can discharge in another direction or whether an adapter is available. If not, you may need to modify the ducting or choose a different model. Ask a professional if you are unsure.
The Short Version
For a classic replacement, the GE JVM3160RFSS. For a common fit, the Whirlpool WMH31017HS. For easy cleaning, the Samsung ME21M706BAS. For sensor features, the LG LMV2031ST. For standard openings, the Frigidaire FFMV1846VS. For a modern stainless look, the Cosmo.

