Pit smokers cook food with indirect heat and smoke from a charcoal or wood fire. They include offset smokers with a side fire box, drum-style barrels that hang meat over coals and bullet water smokers with a stacked design. The flavor is classic, and the learning curve is part of the fun.
The six smokers below are known options across those styles. We have not used these products ourselves, so confirm size, steel thickness and the current version on the listing before buying. Pit smokers vary widely in build quality, so details matter. Choose by how much fire tending you want. Barrels and bullets are simple, while offsets ask for fire management but reward practice. Think about space, fuel and the foods you cook before buying. Safety and setup matter with open fires. Place the smoker on a level, non-flammable surface away from fences and overhangs, keep a bucket and gloves nearby and use a chimney starter instead of lighter fluid. Let ash cool fully before disposing of it in a metal container, and keep children and pets away from hot steel. Practice with simple cuts such as chicken and ribs before attempting a brisket, and learn how your smoker responds to vent changes. Small adjustments made early are easier than big corrections later in the cook.
As an Amazon Associate we earn from qualifying purchases. Links below are affiliate links, and they do not change the product information we give.
What to Look For
| Feature | Why it matters |
|---|---|
| Style | Barrels are simple, offsets need tending, bullets are compact |
| Steel | Thicker steel holds heat better and lasts longer |
| Capacity | Compare cooking surface to the cuts you smoke |
| Access | Good vents and doors make fire control easier |
In this guide
Specs at a Glance
| Smoker | Style | Fuel | Notes |
|---|---|---|---|
| Pit Barrel Cooker Classic | Drum barrel | Charcoal | Hang-and-forget style |
| Oklahoma Joe’s Highland | Offset | Charcoal and wood | Large fire box |
| Char-Griller Competition Pro | Offset | Charcoal and wood | Roomy cook chamber |
| Dyna-Glo Signature Series Vertical Offset | Vertical offset | Charcoal and wood | Stacked racks |
| Weber Smokey Mountain Cooker | Bullet water smoker | Charcoal and wood | Compact and efficient |
| Realcook Charcoal Smoker | Barrel | Charcoal | Cart-style design |
The 6 Best Pit Smokers
Top pickBest for cooks who like simple routines
1. Pit Barrel Cooker Classic
A drum-style smoker that hangs meat from hooks above the coals. It is known for a simple setup and steady heat.
Suits: cooks who like simple routines. Strengths: an easy hang-and-forget method. Weaknesses: limited rack space. Skip it if you want precise control.
View Pit Barrel Cooker Classic on Amazon

Best for traditional barbecue lovers
2. Oklahoma Joe’s Highland Offset Smoker
A traditional offset smoker with a side fire box and a roomy cooking chamber. A favorite for people who like classic barbecue.
Suits: traditional barbecue lovers. Strengths: a large chamber and classic design. Weaknesses: needs fire tending. Skip it if you want a hands-off cook.

Best for serious backyard cooks
3. Char-Griller Competition Pro Offset Smoker
A competition-style offset smoker with a large cooking area and a sizable fire box. It suits cooks who want to practice real fire management.
Suits: serious backyard cooks. Strengths: plenty of space. Weaknesses: heavier to move. Skip it if you want an easy start.
View Char-Griller Competition Pro Offset Smoker on Amazon
Best for small patios
4. Dyna-Glo Signature Series Vertical Offset Smoker
A vertical offset smoker with stacked racks and an offset fire box. It saves floor space while giving you room for many cuts.
Suits: small patios. Strengths: a vertical footprint. Weaknesses: thinner steel than premium units. Skip it if you want a heavy build.
View Dyna-Glo Signature Series Vertical Offset Smoker on Amazon
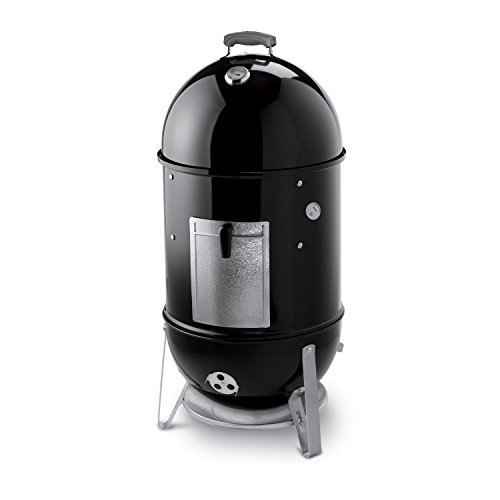
Best for reliable bullet smoking
5. Weber Smokey Mountain Cooker 18-inch
A bullet-style water smoker from a trusted grill brand, known for steady heat and efficient fuel use. A classic for backyard cooks.
Suits: reliable bullet smoking. Strengths: steady heat and a good reputation. Weaknesses: limited rack space. Skip it if you cook for large crowds.

Best for barbecue beginners
6. Realcook Charcoal Barrel Smoker
A cart-style barrel smoker with a roomy cooking area for charcoal and wood. It suits cooks who want a mid-range option with a traditional look.
Suits: barbecue beginners. Strengths: good space and a classic design. Weaknesses: build varies by version. Skip it if you want a premium brand.

Care and Setup
- Clean ash from the fire box after each cook.
- Season the smoker with oil on the first burn.
- Cover it to keep rain off the steel.
- Wipe grease from the grates and trays regularly.
Mistakes to Avoid
- Using too much lighter fluid.
- Cooking before the fire has settled to clean smoke.
- Ignoring vents and airflow.
- Skipping a thermometer on the cooking chamber.
Fire Management Skills by Style
Each pit smoker style asks for a different kind of attention, and knowing that before you buy avoids frustration. A drum barrel with hanging meat is the most forgiving: you fill a charcoal basket, light it, hang the food and mostly leave the lid closed. There is little to adjust, and many cooks use it as a first smoker.
A bullet water smoker adds one more variable. The water pan buffers heat, which helps steadiness, but you must manage the vents and refill or monitor the pan on long cooks. You load coals in a ring or pile, adjust the bottom intake to control burn and use the top vent mostly open. It takes a few cooks to learn, but it rewards you with steady temperatures.
An offset smoker is the most hands-on. The fire sits in a side box, and heat and smoke travel across the cooking chamber to the stack. You add wood or charcoal regularly, adjust airflow and watch for hot spots near the firebox. Results can be wonderful, but you spend more time tending the fire. A vertical offset condenses this into a smaller footprint.
Be honest about your patience and schedule. If you want to start a cook and do other things, choose a drum or bullet. If you enjoy the process and have a weekend afternoon, an offset gives you more control and a classic flavor. Practice with small, cheap cuts before trying a large roast.
Steel Thickness, Seals and Heat Leaks
Pit smokers vary a lot in construction, and the differences show up in fuel use and temperature control. Thicker steel stores heat and evens out swings when you open the door or when the wind picks up. Thin steel heats quickly but loses heat fast, so you burn more fuel to keep the chamber warm. When a listing mentions gauge or thickness, compare it with similar models, but treat claims cautiously unless the maker states them clearly.
Seals matter as much as metal. Gaps around the cooking chamber door, the firebox door and the joints between sections let in air you cannot control. That makes the fire burn unevenly and sends smoke out the wrong places. Look for tight-fitting doors, felt or high-heat gasket material, and joints that are welded or bolted without large gaps. Some owners add gasket tape or seal gaps with high-temperature sealant approved for cookers.
Check the stack and the vents. A stack at grate level on an offset helps draw smoke across the food rather than leaving it hovering at the top. Dampers on the intake and exhaust let you steer the fire. Handles, hinges and legs also tell you about quality: look for sturdy hardware that stays cool enough to touch or comes with heat shields.
Finally, consider weight and moving. A heavy smoker sits steadily but is hard to reposition, so choose its home with care before assembly.
Fuel Choices and Smoke Quality
Charcoal and wood are the building blocks of pit smoking, and how you combine them shapes both heat and flavor. Briquettes burn evenly and predictably, which suits long cooks in bullets and drums. Lump charcoal burns hotter and faster and leaves less ash, but sizes vary in the bag. Wood chunks or splits add flavor, and in an offset, they can serve as the main fuel once you have a coal bed.
Wood choice affects taste. Oak is a steady all-rounder, hickory is strong and classic, apple and cherry are mild and sweet, and mesquite is intense. Use seasoned, dry wood, not green or damp. Avoid softwoods like pine and any treated or painted wood, which can create harsh smoke and are unsafe for cooking.
The target is thin, pale, almost blue smoke. Thick white or gray smoke usually means the fire is starved of air, the wood is damp or the fire has not settled yet. Wait until the fire is established before putting food on, and add wood in small amounts at a time instead of piling it on. In an offset, preheat the firebox and use a small, hot fire rather than a smoldering one.
Use a chimney starter to light charcoal, and keep spare fuel dry in a covered container. Plan how much fuel you will need and have extra on hand, because running out mid-cook is a common mistake.
Thermometers and Reading the Cook
A pit smoker rewards cooks who watch the numbers. Lid thermometers are often off and read the air near the top of the chamber, not at the food. Add a probe at grate level to see the temperature where the food actually sits. For long cooks, a dual-probe thermometer with one probe for air and one for meat is a worthwhile addition, and models with alarms help during overnight cooks.
Test thermometer accuracy in a pot of boiling water and in ice water, and note any offset. Place the probe tip in the thickest part of the meat, away from bone and fat. Move the air probe to different spots in the chamber to find hot and cool zones, which are especially pronounced in offsets.
Read the food as well as the thermometer. Pork shoulders and briskets often seem to stall for a while as moisture evaporates, and patience beats cranking up the heat. Feel for probe tenderness, where a probe slides in with little resistance, rather than relying only on a target number. Poultry and ground meats should reach the safe internal temperatures listed by food safety guidance.
Keep a cook log with the weather, fuel, vent positions and results. A few notes after each session teach you how your smoker behaves and help you repeat what worked.
Rust Prevention and Long-Term Care
Steel smokers live outside, so rust is the main long-term enemy. A good routine keeps a pit smoker working for many seasons. After each cook, let the smoker cool, then remove ash and scrape grease. Ash holds moisture and speeds up corrosion, so empty it rather than leaving it overnight.
Season bare steel surfaces with a thin coat of high-heat cooking oil, particularly inside the chamber and on the grates. This builds a protective layer. Do not apply thick coats, which can turn sticky. Wipe the exterior and touch up chipped paint with high-heat paint made for grills.
Use a fitted cover that is breathable enough to avoid trapping moisture. If the smoker will sit through a wet season or in a humid climate, consider storing it in a covered area. Keep the stack and vents clear of nesting insects and debris.
Inspect regularly. Check welds, hinges, handles and wheels for cracks or loosening. Look for rust bubbling through paint, which signals that moisture is getting underneath. Surface rust can be sanded and re-seasoned, but rust that eats through the metal means the part needs replacement.
Grease buildup is a fire risk, so scrape the chamber and clean the firebox periodically. A well-kept smoker is also easier to run, because clean vents and tight seals give you the control you need.
A First-Cook Checklist for New Smoker Owners
A smoker rewards preparation more than almost any other piece of outdoor gear. Before your first long cook, work through this list so you spend the day tending the fire rather than solving problems.
- Read the assembly guide fully, then tighten bolts and check that doors and lids close squarely.
- Follow the maker’s seasoning or burn-in instructions before any food goes in.
- Place the smoker on a level, non-flammable surface well away from walls, fences and overhanging branches.
- Prepare more fuel than you think you need, plus a dry place to store it.
- Bring a fireproof glove, long tongs and a metal bucket or container for ash.
- Choose a forgiving first cook, such as pork shoulder or chicken pieces, instead of a costly large cut.
- Plan the day with a buffer so the meal is not tied to a dinner deadline.
Rushing is the main reason a first smoke goes badly. Treat it as practice and take notes on what the vents did and how long the fire held steady.
Barrel, Offset or Vertical: A Plain Comparison
The listed smokers fall into a few styles. Each asks something different from the cook.
| Style | Example from the list | Attention needed | Suits |
|---|---|---|---|
| Barrel cooker | Pit Barrel Cooker Classic | Low once set up | Cooks who like a simple, hanging method |
| Offset | Oklahoma Joe’s Highland, Char-Griller Competition Pro | High, with regular fire tending | People who enjoy learning fire control |
| Vertical offset | Dyna-Glo Signature Series | Moderate | Cooks wanting a smaller footprint |
| Water-style vertical | Weber Smokey Mountain 18-inch | Moderate | Those who want steady, even heat |
| Charcoal barrel | Realcook | Moderate | Budget-minded beginners with a small space |
If you want to learn the craft and do not mind babysitting a fire, an offset is rewarding. If you would rather set it and check in occasionally, a barrel or vertical design is gentler on your time.
Smoker Vocabulary Every Beginner Meets
Barbecue talk can sound like another language. These short definitions cover the terms you will see in manuals and recipes.
- Firebox: the chamber where fuel burns, either attached to the side or built into the base.
- Damper: an adjustable vent that controls airflow, and therefore how hot the fire runs.
- Stall: a period when a large cut seems to stop climbing in temperature while moisture leaves the surface.
- Bark: the dark, flavorful crust that forms on slow-smoked meat.
- Clean smoke: thin, pale smoke from a well-fed fire, as opposed to thick white billows.
- Rest: the time food sits after coming off the heat so juices settle.
Learning these terms makes recipes easier to follow and helps you describe problems clearly when you ask for advice or contact the maker.
Common Beginner Frustrations and How People Work Through Them
Almost everyone has an early cook that goes sideways, and the patterns are predictable. Knowing them in advance makes them easier to handle calmly.
The first is chasing temperature. New owners open vents wide, watch the dial climb, then slam the vents shut and wonder why the fire dies. Small, patient adjustments work better, because a fire reacts slowly to airflow changes. Make one change, then wait a while before judging the result.
The second is peeking. Every time the lid lifts, heat and smoke escape and the cook stretches longer. Use a thermometer you can read from outside the smoker, and trust it instead of looking inside every few minutes.
The third is fuel that is damp or poorly stored. Wet charcoal or wood burns unevenly and produces harsh smoke. Keep fuel in a sealed container off the ground, and follow the maker’s guidance on lighting methods and quantities.
The fourth is cleaning too aggressively or not at all. A thick layer of old grease can ignite, but scrubbing a seasoned interior down to bare metal removes the protective coating. Follow the care instructions for your model, and ask the maker if you are unsure about a particular surface.
Keep a simple notebook for the first few cooks, jotting down vent positions, fuel amounts and results. After a handful of sessions you will have a personal reference that beats any general advice.
What This Shortlist Is Really Solving
Guides to pit smokers often read like a catalogue, but the decision underneath is personal: how you cook, how much space you can give the equipment, and how much involvement you want while food is on. This shortlist was built around that decision. The opening picks, including Pit Barrel Cooker Classic, Oklahoma Joe’s Highland Offset Smoker, Char-Griller Competition Pro Offset Smoker, represent the directions most buyers in this category actually take, and the sections below are written to help you recognize which direction is yours before you commit.
Read the product descriptions above once for features, then read them again for fit. A model whose strengths match your ordinary week, rather than your most ambitious imagined weekend, is almost always the one that stays in service for years. The extra guidance that follows digs into the criteria, routines and small mistakes that decide satisfaction long after the first cook, and it applies whichever of these picks you choose.
Reading the Picks Side by Side
The full line-up here is: Pit Barrel Cooker Classic; Oklahoma Joe’s Highland Offset Smoker; Char-Griller Competition Pro Offset Smoker; Dyna-Glo Signature Series Vertical Offset Smoker; Weber Smokey Mountain Cooker 18-inch; Realcook Charcoal Barrel Smoker. Rather than ranking them by a single number, compare them in pairs against the job you have in mind. The first pick in the list is the guide’s general answer for pit smokers; the picks that follow trade emphasis, leaning toward particular sizes, styles or kinds of cook. Where two descriptions sound similar, the deciding detail is usually in how each one handles the ordinary work: setup, control during a real cook, cleaning afterward and the support behind it.
A useful exercise is to write one sentence about your typical session, including who is eating and how hands-on you want to be, then read each description and ask whether that sentence sounds easy or effortful with that model. The pick that makes your sentence sound easy is rarely the wrong choice. Keep that sentence in mind through the sections below, because every criterion that follows is really a way of testing the same fit from a different angle.
Fire Management Is the Whole Craft
Offset and barrel-style pit smokers ask more of the cook than pellet machines do, and repay it with a depth of smoke flavor that devotees chase for years. The central skill is fire management: building a clean, coal-based fire and feeding it small, steady additions so the chamber temperature holds in a calm band and the smoke runs thin and pale. When you compare the picks above, read their descriptions for firebox size, airflow control and construction weight, because those details decide how forgiving the fire will be on a windy afternoon in your third cook.
Start every session by giving yourself time. Light the fire well before the meat is ready to go on, let a proper coal bed form and let the chamber settle at temperature with clean smoke before food enters. Rushing this stage is the beginner’s defining mistake, and it flavors the whole cook. Add fuel in small pieces on a schedule set by watching the fire, not the clock, and keep the exhaust open so smoke flows across the food and out rather than pooling and turning bitter.
Fuel Choices: Charcoal Beds and Wood Splits
Most pit cooks build on a charcoal bed for dependable heat and add wood splits for flavor, or run wood more fully once their fire craft matures. Lump charcoal burns hot and clean with little ash; briquettes burn longer and more evenly but produce more ash to manage. Wood should be seasoned and dry: green or wet wood smolders dirtily and punishes food. The picks above differ in how their fireboxes handle these fuels, so match the design to the fuel style you intend to practice.
Size your fuel to the firebox. Splits that are too large smolder and spike; pieces that are too small vanish before they contribute. Pre-warm the next split on top of the firebox, a classic pit habit, so it ignites cleanly when added rather than smoking heavily while it catches. Keep a modest stock of wood dry and off the ground, and learn how your local woods behave: the assertive ones flavor quickly, the gentle ones can burn all day politely.
Temperature Zones and Cooking to the Pit’s Map
Every pit has a map: hotter near the firebox, cooler toward the far end, different again on upper and lower grates. This gradient is a tool once you know it. Large cuts can start nearer the heat and move as they color; items that finish early migrate to the cool zone to hold. Rotate and reposition food deliberately rather than randomly, and use a grate-level thermometer in the zone where the food actually sits, because a lid gauge reads its own neighborhood, not the meat’s.
Map your pit deliberately in the first month. A row of simple test foods, or a set of thermometers across the grate during a practice burn, reveals the zones in one session. Write the map down. Knowing that the left side runs hotter turns future cooks from guesswork into placement strategy, and it explains results that once seemed random. Pits reward this kind of attention disproportionately, which is why their owners tend to become evangelists.
Maintenance for Steel That Lives Outdoors
A pit smoker is steel, fire and weather in negotiation, and maintenance is how the steel wins. After cooks, remove ash once it is fully cold, since ash holds moisture against the metal. Keep the cooking chamber seasoned by its own use: a light coat of cooking oil on interior surfaces, as many pit keepers practice, protects against rust between sessions. Scrape grates while warm, manage grease before it becomes a fire risk, and check the firebox floor, which lives the hardest life in the whole cooker.
Outside, a cover once the pit is cold and dry, a position out of standing water and an occasional inspection for rust at seams and welds will carry a well-built pit for many years. Touch up exterior rust as the maker directs, keep hinges and dampers moving with use, and store wood dry so the next fire starts clean. The ritual is part of the ownership pleasure for most pit cooks: the machine asks for care and gives back character.
Your First Season: A Realistic Progression
A pit smoker’s first season goes best as a progression of forgiving challenges. Open with chicken, which cooks in a single afternoon and teaches fire building, damper control and the look of clean smoke. Follow with ribs, which add timing and the judgment of doneness by feel. Then take on pork shoulder, your first long cook, where the coal bed, fuel additions and the stall all appear in manageable form. Keep each session’s notes short and honest, and resist skipping steps because a video made the advanced cook look easy.
By the season’s end, patterns will own you less and serve you more: you will know how your pit responds to a damper nudge, how long a coal bed carries, and which weather defeats you. That knowledge, not any accessory, is what guests taste. Plan the second season around the cooks you loved, add one new challenge at a time, and let the pit’s repertoire grow at the speed of your confidence.
Hosting Around a Live Fire
Cooking on a pit for guests is theatre with a schedule. The fire needs tending at its own intervals, the meat finishes on its own clock, and both facts can be features: guests gather near the pit, the cook holds a respected post, and the meal lands when the food, properly rested, says it is ready. Build the day backwards from serving, keep the fire’s needs in the plan, and choose sides that can be made ahead or that thrive on waiting, so the menu forgives the fire’s timing.
Safety choreography matters with an audience. Keep a clear zone around the firebox, a place for hot tools that is out of the traffic path, and children assigned to the far side of the gathering. Announce when lids open and when hot grates move. None of this dims the party; it is the quiet professionalism that lets everyone, including the cook, relax beside a machine that is, after all, a controlled open fire.
Reading a Finished Cook and Learning From It
The end of a pit cook is a debrief waiting to happen. Slice the meat and read it: the smoke ring and color speak of your fire’s cleanliness, the tenderness of your temperature control, the moisture of your fuel and resting choices. Taste a piece from the end and one from the middle, since a pit’s zones cook at different rates and both deserve judgment. Note which parts of the cook you would repeat exactly and the single thing you would change.
Ask your eaters one question only: what would you want again? Their answers steer the repertoire better than any critique of technique. Write the debrief in the pit journal while the details are warm, then clean the pit while your hands still remember the session. This closing ritual, repeated over seasons, is how an ordinary owner becomes the person whose barbecue invitations are answered within the minute.
Fuel Storage and the Pit’s Pantry
A pit is only as good as its fuel store. Keep wood splits stacked off the ground, under cover, with air moving through the pile so they stay seasoned and dry. Charcoal belongs in a sealed container, since it absorbs moisture and odors from the air and lights reluctantly when damp. A small stock of kindling and a reliable lighting method, kept together near the pit, turn the start of every cook from a scavenger hunt into a ceremony.
Rotate the store as you use it, burning the oldest wood first, and glance over the pile when the seasons change for pests or damp. Fuel bought or cut ahead and stored well is one of the quiet luxuries of pit ownership: the confidence that whenever a free Saturday and a good cut coincide, the fire is ready to be exactly as good as your skill allows.
Practical Details Worth a Second Look
Barrel-style and offset designs ask slightly different things of you. Barrel cookers hang or rack food over coals in a compact, efficient chamber, while offsets separate fire and food for a classic flow of smoke. Read the picks above with that distinction in mind and choose the style whose tending rhythm matches the cook you want to become.
Finally, accept that mastery here is measured in seasons, not weekends. Every pit cook, including the imperfect ones, teaches the fire something through you. Keep the sessions regular, the notes honest and the standards rising gently. The flavor that people cross town for is simply what consistent fire management tastes like.
Clean smoke is the flavor goal, and it has a look: thin, pale and almost shimmering, rather than thick white clouds. Thick smoke usually means a young fire, wet fuel or a choked exhaust. Wait for the fire to mature before food goes on, keep the exhaust open and let the pit breathe. Patience at this stage decides whether dinner tastes of wood or of a chimney.
Wind is the pit cook’s weather. It can supercharge a fire through the intake or strip heat from the chamber, sometimes in the same hour. Position the pit thoughtfully, use the dampers as the maker intends and expect to tend more actively on gusty days. Many experienced cooks simply choose their barbecue days with the forecast open, and there is no shame in that wisdom.
Resting and holding are part of pit craft. Large cuts improve with a proper rest, and a towel-lined cooler holds a finished shoulder or brisket safely warm while the rest of the meal catches up. This buffer is what makes pit cooking compatible with guests: the meat waits for the party, not the other way around.
Thermometers belong at grate level and in the meat. A pit’s own gauge is a rough guide at best. One reliable probe monitoring the chamber where the food sits, and an instant-read thermometer for checking cuts, will teach you more in three cooks than a season of guessing. Replace guesswork with measurement and the learning curve flattens wonderfully.
Start your pit journey with forgiving cuts. Pork shoulder tolerates temperature swings, chicken teaches fire control in short sessions, and ribs reward attention without demanding an all-day commitment. Brisket, the final exam, goes better after you know your pit’s map and your fire’s appetite. Sequence the learning and every cook funds the next.
Grease management is fire safety in work clothes. Fatty cooks load the chamber and the grease path; clean them before build-up can ignite during a hot session. Know where your pit drains, keep that path clear, and never leave a pit unattended with a grease load and a rising fire. Respect for this detail is what separates experience from luck.
Keep a pit journal. Note the fuel, the weather, damper positions, temperatures and results. Fire craft feels like intuition from the outside, but it is really pattern recognition, and a journal accelerates it. Three months of notes will tell you how your pit behaves in rain, in cold and in the still heat of summer.
Company changes a pit cook for the better if you plan for it. Assign yourself the fire and let others bring sides, because tending a pit is a genuine job during a long cook. Build the schedule backwards from serving, add buffer everywhere and enjoy the fact that the cook’s station, beside the fire with a drink in hand, is the best seat at the party.
Households cook together, so let the other cooks vote. The person who will clean the equipment, carry supplies or cook on the nights you are away has practical knowledge no comparison table holds. A short conversation about routines and pet peeves before buying prevents the slow resentment that builds when a well-reviewed machine fits only one person’s habits.
Seasonality is worth a thought as well. Equipment bought for summer may be asked to perform in autumn rain or winter cold, and storage space that is free in June may be precious in December. Reading the picks above with the whole year in mind, rather than the current month, quietly improves the odds that the choice still feels right in every season.
One underrated step before buying is to picture the second month of ownership, not the first weekend. Novelty carries the early cooks; routine carries the rest. Ask where the equipment will stand, where its supplies will live, and which ten minutes of setup or cleaning you will repeat every time. If those ten minutes sound pleasant with the pick you are leaning toward, you have probably found the right one.
Keep the packaging and paperwork until the equipment has survived a few real cooks. Manuals hide genuinely useful details in their later pages, including care schedules, troubleshooting charts and the exact names of replaceable parts. A folder, physical or digital, with the manual and your purchase record turns any future question into a five-minute answer instead of an afternoon of searching.
It is worth saying plainly what experienced buyers of pit smokers already know: the differences between good options in this category are smaller than the differences between careful and careless ownership. Setup done properly, supplies kept in good condition and a cleaning routine that survives busy weeks will move your results further than any single feature on a comparison chart. Choose a pick you can live with easily, then invest your attention in using it well.
Friends and family will ask which model you chose, and the honest answer worth giving is the reason, not the name. When the reason is a routine you actually keep, a size that fits your space, or a style of cooking your household loves, the recommendation helps them. When the reason is only that a chart ranked it first, it helps nobody. This guide has tried to give you reasons of the first kind for every pick on the list.
Before the first serious use, read the manual once with the equipment in front of you, touching each control and part as it is named. Ten unhurried minutes at that moment prevents most of the confusion that otherwise arrives mid-cook, when hands are full and patience is spoken for. Keep the manual somewhere the whole household can find it, because the person who needs the troubleshooting page is rarely the person who filed it.
There is also pleasure in restraint. A category like pit smokers invites collecting, upgrading and second-guessing, yet the cooks who enjoy their equipment most tend to settle, learn and cook. Let the first season be about meals rather than modifications. If a genuine limitation appears again and again in your notes, address it then, with evidence. Until it does, the equipment you have is almost certainly enough.
Finally, take a moment after the first successful session to set up the habits that protect all the later ones: supplies stored properly, tools back in their places, a note made of anything you would change, and the equipment left clean and ready. Future you, arriving home tired on a weeknight and finding everything ready to cook, will be grateful for that small act of housekeeping more than for any feature on the original listing.
A Simple Decision Path
If you are still torn after the detail above, decide in this order. First, eliminate any pick whose size or setup does not fit your space, using the descriptions and your own measurements. Second, eliminate any pick whose routine, cleaning or fuel and supply needs you know you will not keep up. Third, among what remains, choose by the cook you will make most often, not the most impressive one you can imagine. That order works because the first two filters remove the choices that fail in daily life, leaving only models you would genuinely be happy using.
It is also fine to let the end of the list make the case: Realcook Charcoal Barrel Smoker earned its place by serving a particular kind of buyer well, and if that description sounds like you, a later position in the list means nothing. Shortlists are maps, not podiums. The right outcome of this guide is not the most popular model for pit smokers; it is the model whose strengths you will still be appreciating, cook after cook, long after the comparison charts are forgotten.
More Questions Buyers Ask
How long does it take to learn fire management?
Most cooks feel genuinely in control after a season of regular sessions, with big improvements in the first few cooks. Start with forgiving cuts, keep notes and change one thing at a time. The fire teaches quickly when you cook often and pay attention to smoke quality and coal bed rather than to the clock.
What wood should a beginner burn?
Seasoned, dry wood in modest splits, starting with gentler, widely used cooking woods before the most assertive ones. Avoid green, wet or treated wood entirely. Build your heat on a charcoal bed at first if your pit allows it, and add wood for flavor while your fire skills develop.
Why does my temperature swing so much?
Usually fuel additions that are too large or too late, dampers adjusted in big movements, or wind. Feed small pieces on the fire’s schedule, adjust airflow gently and wait for each change to register before adjusting again. A mature coal bed is the foundation; chase the bed, not the gauge.
How do I know the smoke is clean enough for food?
Look for thin, pale smoke with a pleasant wood smell rather than thick white billows. Let the fire establish and the chamber settle before food goes on. If smoke turns heavy mid-cook, the fire usually needs air or a smaller, better-placed addition of fuel.
Can I cook in winter on a pit smoker?
Yes, with more fuel, more time and more tending. Cold and wind pull heat from the chamber, so position the pit with shelter where safe, keep the fire fed steadily and allow longer cooks. Many pit cooks prize winter sessions; just dress for the tending, not for a quick visit.
How should I clean the pit after a cook?
Brush grates while warm, remove ash once fully cold, clear the grease path and wipe or scrape build-up before it hardens into a problem. Keep the interior lightly seasoned and the exterior protected, and store the pit covered, cold and dry. The manual for your model is the final word on its care.
Pit Smoker FAQ
Which pit smoker is easiest?
Drum barrels and bullets are the simplest, since there is less fire management.
What fuel do they use?
Most use charcoal, often with wood chunks added for flavor.
Do I need a thermometer?
Yes. Built-in lid thermometers can be off, so add a reliable probe.
How do I keep the temperature steady?
Use quality fuel, adjust the vents slowly and avoid opening the lid too often.
How much charcoal does a pit smoker use?
It depends on the style, the weather, the steel thickness and how tightly the smoker seals. Drums and bullets tend to be fuel efficient, while offsets need steady feeding. Track your own use over a few cooks.
Do I need to soak wood chunks?
Many cooks skip soaking, since damp wood mostly steams before it smokes. Dry, seasoned chunks usually give cleaner smoke. Follow the guidance in your manual if it differs.
Can I use a pit smoker on a wooden deck?
Use a non-combustible pad and keep clearances from railings and walls. Hot ash and embers can fall, so place the smoker on solid ground where possible.
How do I put out the fire safely?
Close the vents to starve the fire of air and let the coals burn out. Do not douse hot steel with water. Dispose of cooled ash in a metal container.
What is the best way to avoid bitter smoke?
Wait for the fire to burn clean, use dry seasoned wood in small amounts and keep air flowing. Avoid smoldering fires with the vents nearly closed.
Should I add a water pan to an offset?
Some cooks use one to add humidity and steady heat, while others skip it. It is optional, so try it on one cook and compare.
How often should I season the smoker?
Season before first use and refresh the oil coat when the surface looks dry or after deep cleaning. A light wipe after cooking helps protect the metal.
The Short Version
For easy hang-and-forget cooking, the Pit Barrel Cooker Classic. For a traditional offset, the Oklahoma Joe’s Highland. For a competition-style offset, the Char-Griller Competition Pro. For a vertical offset, the Dyna-Glo Signature Series. For a classic bullet, the Weber Smokey Mountain Cooker. For a roomy barrel, the Realcook charcoal smoker.
Related Guides
- 6 Best Barrel Smokers for Backyard Cooking: Drum and Offset
- 6 Best Texas-Style Offset and Barrel Smokers (2026)
- 6 Best Charcoal Grills and Smokers: Offset, Bullet, Drum (2026)
- 6 Best Charcoal Grills for Smoking: Gravity, Offset, Bullet (2026)
- 6 Best Pit Boss Smokers: Vertical, Horizontal and Portable


