A barrel smoker is a drum-style or barrel-shaped cooker that burns charcoal or wood to cook meat low and slow. The tall drum or long barrel holds steady heat, and many of the designs are known for needing little tending once the fire is set. That makes them a popular pick for backyard ribs, pork butts and whole chickens.
The six smokers below mix true drum cookers with barrel-style offset and vertical units, with a few electric and pellet options for easier use. We have not used these products ourselves, so confirm capacity, fuel and included accessories on the current listing before you buy. Assembly is common, and some listings sell parts separately.
As an Amazon Associate we earn from qualifying purchases. Links below are affiliate links, and they do not change the product information we give.
What to Look For
| Feature | Why it matters |
|---|---|
| Fuel | Charcoal and wood give classic flavor; pellets and electric simplify the cook |
| Capacity | Hanging hooks or racks decide how much meat fits |
| Airflow | Good intake control makes low temperatures easier to hold |
| Steel and finish | Thicker steel and a porcelain or heat-safe finish last longer |
| Footprint | Tall drums save floor space; offsets take more room |
In this guide
Specs at a Glance
| Smoker | Fuel | Style | Notes |
|---|---|---|---|
| Pit Barrel Cooker Classic | Charcoal | Drum, hanging hooks | Few controls to manage |
| Oklahoma Joe’s Highland | Charcoal and wood | Offset barrel | Side firebox |
| Landmann Smoky Mountain | Charcoal | Vertical bullet | Water pan; check the size on the listing |
| Masterbuilt Gravity Series 560 | Charcoal | Gravity-fed | Digital control; needs power |
| Bradley Original Smoker | Electric with wood bisquettes | Cabinet | Bisquette feed; check the version |
| Camp Chef Woodwind Pro | Wood pellets | Pellet grill | Needs power |
The 6 Best Barrel Smokers for Backyard Cooking
Top pickBest for hands-off cooks
1. Pit Barrel Cooker Classic
A steel drum cooker where meat hangs from hooks above a basket of charcoal. It is designed around a simple, mostly hands-off method, with a lid and a fixed vent. Check the listing for the accessory package included.
Suits: hands-off cooks. Strengths: few settings to manage. Weaknesses: limited control over temperature. Skip it if you like to tune the fire.
View Pit Barrel Cooker Classic on Amazon

Best for traditional pit fans
2. Oklahoma Joe’s Highland Offset Smoker
A barrel-style offset smoker with a side firebox, long cooking chamber and a chimney. It rewards patience with a classic wood-smoke flavor. Check the listing for the cooking area and included thermometer.
Suits: traditional pit fans. Strengths: a large chamber with a firebox. Weaknesses: needs fire management. Skip it if you want an easy start.

Best for beginners with charcoal
3. Landmann Smoky Mountain Vertical Smoker
A vertical charcoal smoker in the bullet style, with a water pan and stacked grates. It fits a modest backyard and is priced for first-time smokers. Confirm size and features on the listing.
Suits: beginners with charcoal. Strengths: a compact footprint. Weaknesses: thinner build than premium units. Skip it if you want heavy steel.
View Landmann Smoky Mountain Vertical Smoker on Amazon
Best for charcoal flavor with less effort
4. Masterbuilt Gravity Series 560
A charcoal cooker that feeds fuel from a hopper and uses a digital fan to hold a set temperature. It can smoke and grill. Check the listing for features, since the line has several versions.
Suits: charcoal flavor with less effort. Strengths: digital control. Weaknesses: needs power. Skip it if you want a no-electric cooker.
View Masterbuilt Gravity Series 560 on Amazon
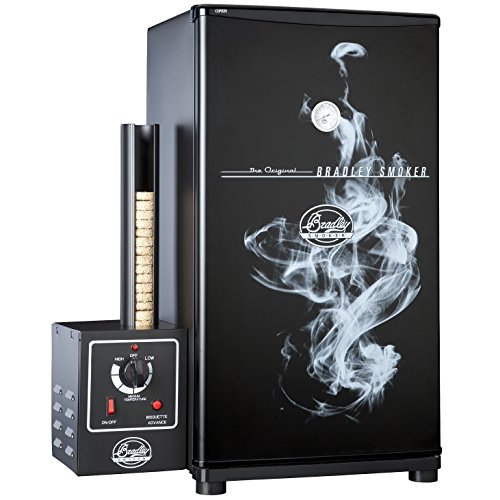
Best for consistent, gentle smoke
5. Bradley Original Smoker
An electric cabinet smoker that feeds wood bisquettes automatically. It aims for even, steady smoke. The brand also sells larger sizes, so confirm which one you are viewing.
Suits: consistent, gentle smoke. Strengths: automatic feed. Weaknesses: bisquettes are a recurring cost. Skip it if you want to burn raw wood.
Best for versatile cooks
6. Camp Chef Woodwind Pro
A pellet grill that smokes and grills, with a digital controller and an optional sear box on some listings. It is the easy-going pick here. Check the listing for what is included.
Suits: versatile cooks. Strengths: pellet convenience. Weaknesses: not a true barrel shape. Skip it if you want a drum design.
View Camp Chef Woodwind Pro on Amazon
Care and Setup
- Season a new drum or barrel with a light coat of oil and a hot burn.
- Empty ash and drippings after the unit has cooled.
- Keep a thermometer on the lid and a probe in the meat.
- Store charcoal and wood in a dry place.
- Cover the smoker when it is not in use.
Mistakes to Avoid
- Using too much fuel on the first cook.
- Opening the lid repeatedly.
- Burning green or damp wood.
- Smoking over a surface that cannot take falling embers.
- Judging doneness by the clock, not by meat temperature.
Drum, Offset or Vertical: Choosing a Layout
The word barrel covers several different cookers, and the layout changes how you cook. A drum cooker keeps the fire at the bottom and the meat directly above, so heat and smoke rise through the food in a short path. It is compact and usually quick to learn. A horizontal offset puts the fire in a side box and pulls heat and smoke across a long chamber. That design offers more cooking room and the classic wood-smoke profile, but the temperature varies along the chamber, so you turn and move food as you cook.
A vertical bullet stacks grates over a fire bowl, often with a water pan in between. The pan steadies temperature and adds moisture, and the footprint stays small. Gravity-fed and pellet units are different again, because a fan and controller feed fuel for you, which suits people who want smoked food without watching the fire.
Match the layout to your habits:
- If you like a quiet afternoon of tending, an offset gives the most to work with.
- If you want to light it and leave it, a drum or a controller-driven unit is the easier route.
- If space is tight, think vertical.
- If you also want to grill hot, check that the model has a grate position or accessory that allows it.
Read the listing for how the cooking area is arranged, since hooks, racks and shelves hold different kinds of cuts.
Airflow and Fire Control Basics
Every charcoal or wood smoker is an airflow machine. Air comes in through low intakes, feeds the fire, then leaves through an exhaust. Open the intake more and the fire burns hotter; close it and the fire slows. The exhaust should stay mostly open during a cook so smoke keeps moving, because stale, stagnant smoke tastes bitter.
Beginners tend to overcorrect. Small changes to a vent take several minutes to show up on the thermometer, so adjust a little and wait. It also helps to light the fuel fully before closing the lid, and to let the smoker settle at the target temperature before adding food. A smoker that has fully warmed up holds heat far better than one that is still cold in the steel.
Fixed-vent drum designs reduce the number of decisions you make, which is why they appeal to people who want a simple method. Cookers with adjustable dampers give you more control but ask for more attention. Tight lids, intact gaskets and snug door seals matter because uncontrolled air leaks make the temperature unpredictable. When you read a listing, look at how many intakes there are, whether the lid fits closely, and where the thermometer sits. A lid thermometer reads the air at the top, not the temperature at the food, so a separate probe is a worthwhile companion.
Wood and Charcoal for Cleaner Smoke
Good barbecue smoke is thin and almost invisible, with a faint blue tint. Thick white smoke usually means the fire is starved for air or the wood is damp, and it leaves a harsh taste on the meat. Aim for a clean-burning fire first, then use wood for flavor.
Charcoal comes as lump or briquettes. Lump is natural wood charcoal and tends to burn hot and quickly. Briquettes are shaped from compressed charcoal and binders and usually burn more evenly and longer, which suits long cooks. Either can work, so choose according to how steady you need the fire to be. Check the bag for added lighter fluid, and avoid it, because the taste can transfer.
For smoke flavor, add chunks of seasoned hardwood rather than a mass of wood. Chunks smolder slowly and are easier to manage than small chips that flash and burn out. Stronger woods can overwhelm lighter foods, so many cooks use mild fruit woods for poultry and pork and stronger woods for beef. Keep the wood dry, and never use treated, painted or resinous softwood in a smoker. Feed the fire in small steps rather than dumping on a large load, and let new fuel catch before you shut the lid. Electric and pellet units use their own fuel types, so follow the maker’s list.
Planning Capacity and Cook Time
Capacity is not just square inches of grate. A hanging system uses vertical space, so racks of ribs or sausages can fit in a small footprint, while a flat-grate smoker is better for whole birds, large roasts and trays. Look at the size of the cooking chamber, the number of racks or hooks, and the clearance between them. A tall item like a whole turkey needs headroom, and a large brisket needs length.
Plan your cook backwards from the time you want to eat. Low and slow cooking takes hours, and the exact time varies by cut, by smoker and by weather, so allow a generous buffer. Resting the meat after the cook is part of the process, and wrapping it and holding it warm in a cooler can absorb schedule slippage. Use a probe for doneness rather than the clock, and expect plateaus where the temperature seems stuck.
Think about fuel supply too. Charcoal smokers burn through a load over time, and extra fuel may need to be added on a long cook. A small fire bowl may need a refill sooner than a large one. Weather matters: wind, cold and rain pull heat out of thin steel, so a windy day can double your fuel use. A cover, a windbreak and extra fuel at hand keep a long cook on track.
Placement, Safety and When to Replace
Set a smoker outdoors on a stable, level, non-combustible surface, away from walls, fences, overhangs and tree branches. Sparks and hot ash can fall, so avoid dry grass and wooden decks unless you use a proper heat-safe pad. Keep children and pets back from hot metal, and never use a charcoal cooker in a garage, tent or enclosed porch, because carbon monoxide builds up quickly.
Fire safety is practical. Keep a bucket of sand or a suitable extinguisher near, dispose of ash only when it is fully cold, and use a metal container with a lid. Wear heat-rated gloves and long-handled tools, and open the lid slowly to let flare-ups settle.
Smokers last as long as you keep moisture and grease away from the steel. Signs that it may be time to replace or repair parts include:
- Rust that has eaten through the firebox or the barrel wall.
- A lid that no longer seals because the metal has warped.
- Rotted or broken handles, hinges and thermometer fittings.
- Grates that flake or are corroded past cleaning.
Many parts, such as grates and thermometers, are replaceable, so check the listing and the maker’s site for parts support before you buy.
Drum Smokers and Offset Smokers: What Sets Them Apart
Barrel smokers come in two main designs, and each has its own character. A drum smoker, sometimes called an upright, stands vertically. Charcoal sits in a basket at the bottom and the food hangs or rests on grates above it. Because the heat source is directly beneath the food, a drum can run hot and is often used for hanging ribs, chicken and other items. An offset smoker has a horizontal barrel as the cooking chamber and a smaller firebox on the side. Smoke and heat travel across the food on their way to the chimney, giving a traditional style of smoking that many pitmasters enjoy.
| Style | Effort level | Notes |
|---|---|---|
| Drum | Lower, simpler fire control | Compact footprint, vertical cooking |
| Offset | Higher, needs fire tending | More cooking room, classic smoke profile |
Beginners often find a drum easier to manage because the fire sits in one place and responds predictably to the vents. An offset smoker rewards patience and practice, and demands regular attention to the firebox.
Space, Safety and Clearances
Barrel smokers are big and hot. Before you buy one, walk around your yard and find a safe spot. The unit should sit on level, non flammable ground, well away from fences, sheds, overhanging branches and the house. Check the clearances in the manual, and think about wind direction so smoke does not blow into neighbors’ windows. Keep children and pets away from the hot barrel.
- Check local rules on open fires and smoke.
- Keep a fire extinguisher or a bucket of sand nearby.
- Use heat resistant gloves and long tools.
- Never leave a hot smoker unattended around children.
Ash should only be handled when fully cooled and placed in a metal container, following the maker’s directions.
Fuel, Wood and Temperature Habits
Most barrel smokers burn charcoal for heat and wood chunks for flavor. Briquettes burn steadily, and lump charcoal burns hotter and faster. Wood chunks give smoke, and different woods give different flavors. Use dry, seasoned wood, and avoid anything treated or painted. Aim for steady, moderate heat. Thin, almost blue smoke is the target, while thick white smoke can leave a harsh taste. Use a thermometer at grate level, and a probe thermometer in the meat. Follow official food safety guidance for internal temperatures.
More on Mistakes to Avoid
Opening the lid too often, overloading the firebox and skipping the first seasoning burn are the usual problems. Clean grease buildup regularly, as it can create fire risks and off flavors. Cover the smoker when cool to protect against rain.
Reading a Barrel Smoker Listing
The listing for a barrel smoker can be long, and a few details deserve your attention. Check the steel thickness, since thicker steel holds heat better and resists warping. Look at the cooking area and the number of racks or hooks, and consider how much food you want to cook at once. Check the firebox size in an offset design, because a larger firebox holds more fuel and can burn longer between refills. Note the chimney height and position, as they affect draft and airflow.
Look for details on seals and doors. Tight fitting doors keep smoke and heat inside, and a poorly sealed unit wastes fuel and gives uneven temperatures. Check for built in thermometers, but plan to add your own at grate level because lid gauges can differ from the temperature where the food sits. Look at wheels and handles, since a heavy smoker is hard to move without them. Read the assembly notes and see whether the unit comes pre-assembled or in parts. Consider the finish too: high temperature paint helps resist rust, though a cover is still a good idea.
Finally, read the maker’s guidance on the first burn, seasoning and care. It tells you how much work the smoker will need over time.
Cleanup and Seasoning
Season the inside with a thin coat of cooking oil and run a hot burn as the manual describes. After cooking, scrape off residue and empty ash only when cool. Keep the barrel dry between uses, and treat small rust spots promptly with the maker’s advice.
Putting the Decision Into Practice: A barrel smoker
The advice earlier in this guide comes together when you apply it to your own space, habits and household. Start by writing down what your backyard demands on an ordinary week, not on the best day or the worst one. Most disappointing purchases happen because the decision was made against an imagined routine: the room as it looks in a photo, the household as it behaves when guests are coming, or the cook as they plan to be rather than the one who shows up on a tired weekday evening. A short, honest note about how the space is really used will do more for the outcome than any amount of browsing, because it turns a long list of possibilities into a short list that genuinely fits.
Work through the main criteria one at a time and give each a plain verdict. First, consider how the smoker manages airflow and holds a steady low heat. Then weigh capacity and hanging or grate options for the cuts you cook, because the two often pull in opposite directions and the right balance depends on your household. Next, look honestly at fuel efficiency over a long cook and how often you refuel; this is the point where many people compromise without noticing, and the compromise only shows up weeks later. After that, check the footprint and a safe, level place for it to stand, and finally cleaning access for ash, grease and grates after smoking. When two options still look equal after all five checks, choose the one that is easier to live with on an ordinary day, since that is the day you will meet it most often.
It also helps to separate needs from preferences before you commit. A need is anything that would make the wrong choice fail outright: it does not fit, it cannot be cleaned the way your home requires, it does not suit the people who use it every day, or it fights the layout of the room. A preference is everything else, and preferences can flex when a strong option is weak in one small area. Writing the two lists side by side stops a minor preference from quietly overruling a real need, and it gives you a calm way to compare the picks in this guide without starting the whole search again each time you revisit the decision.
Matching the Choice to Real Households
Consider ribs and chicken for a family weekend cook. In that situation the priorities reorder themselves: the feature that looked like a nice extra in the abstract becomes the thing that decides whether the choice works at all, while a headline feature may matter far less than expected. Walk the scenario through step by step in your mind, from the first moment of use to putting things away afterwards, and notice where friction would appear. If a candidate handles the awkward moment in the middle of that routine gracefully, it is probably the right shape of answer for you, even if another option looks stronger on paper.
Consider a larger brisket or shoulder that needs hours of steady heat. In that situation the priorities reorder themselves: the feature that looked like a nice extra in the abstract becomes the thing that decides whether the choice works at all, while a headline feature may matter far less than expected. Walk the scenario through step by step in your mind, from the first moment of use to putting things away afterwards, and notice where friction would appear. If a candidate handles the awkward moment in the middle of that routine gracefully, it is probably the right shape of answer for you, even if another option looks stronger on paper.
Consider a beginner learning fire control on forgiving cooks first. In that situation the priorities reorder themselves: the feature that looked like a nice extra in the abstract becomes the thing that decides whether the choice works at all, while a headline feature may matter far less than expected. Walk the scenario through step by step in your mind, from the first moment of use to putting things away afterwards, and notice where friction would appear. If a candidate handles the awkward moment in the middle of that routine gracefully, it is probably the right shape of answer for you, even if another option looks stronger on paper.
Households also change. Children grow, routines shift, a room gets rearranged, a new hobby arrives, or an older relative comes to stay. A good choice in this category leaves a little room for that change: it can be moved, adjusted, combined with what you already own, or handed a slightly different job without being replaced. When you compare the options above, give quiet credit to that kind of flexibility. It rarely shouts from a product page, but over years of ownership it is often the difference between something that keeps earning its place and something that is worked around, resented and eventually replaced long before it has worn out.
A Step by Step Routine From Day One
Begin before the new arrival is even in use. Clear and prepare the space, and deal with the small jobs that are easy now and annoying later: cleaning the surface it will sit on or hang in, checking the fixings, light, ventilation or access around it, and reading any care guidance that came with it while you are still unhurried. Take a quick photo of the space as prepared, and keep any labels, spare parts or instructions in one labelled place. These small acts take minutes, yet they are the ones people most often wish they had done once the item is in daily service and everything has become harder to reach.
During the first week of use, pay deliberate attention rather than letting habit form by accident. Notice how the choice behaves at the busiest moment of the day, not the quietest. Notice who struggles with it, what gets left undone, and what small adjustment would remove the friction: a different position, a changed order of steps, a supporting accessory you already own, or simply a better place to keep the things that go with it. Small corrections made in the first week tend to stick, and they turn a reasonable purchase into one that feels made for the household rather than merely tolerated by it.
After that settling in period, settle into a simple rhythm of use. Keep the everyday steps light and repeatable, because a routine that depends on effort or special equipment will quietly stop happening. Pair the task with something that already happens, such as a weekly clean, a laundry day or a regular tidy of the room, so it is carried by an existing habit. And keep the standard realistic: the goal is a home that works comfortably and looks cared for, not a showroom that nobody is allowed to disturb. A routine you actually keep beats a perfect routine abandoned by the second month.
Care, Cleaning and Storage That Protect Your Purchase
Long life in this category comes mostly from ash and grease management, grate care and dry storage, done little and often rather than in rare rescue missions. Dirt, moisture, heat and friction do their damage slowly and quietly, so the habits that matter are the small ones: dealing with marks promptly, letting things dry fully before they are put away, keeping the item out of harsh conditions it was never meant for, and checking the parts that move, rub or carry weight before wear turns into damage. None of this needs special products in most homes; it needs attention at the moment when the fix is still small.
Storage deserves the same thought as use. Keep the item and anything that goes with it clean, dry and easy to reach, in a place where it will not be crushed, snagged, faded or forgotten. If it is stored seasonally, check it when it comes out rather than when you next need it urgently, so there is time to clean, repair or replace it calmly. If it lives in daily use, give it a defined home so it is not constantly moved, stacked or balanced somewhere unsuitable. Things that are easy to put away properly tend to be put away properly, and that single fact protects them more than any special treatment.
When something does go wrong, work from the gentlest response upward. Identify what you are actually dealing with before reaching for a product or a tool, test any new approach in a hidden spot, and change one thing at a time so you can tell what helped. Stop and reassess if the problem spreads, the material reacts badly, or the fix would risk more than the fault costs. Many items in this category are replaced over problems that a patient, staged approach would have solved, and many others are damaged by a hurried fix that was stronger than the situation ever required.
Comparing the Picks in This Guide
The picks gathered in this guide, including Pit Barrel Cooker Classic, Oklahoma Joe’s Highland Offset Smoker, Landmann Smoky Mountain Vertical Smoker, Masterbuilt Gravity Series, Bradley Original Smoker and Camp Chef Woodwind Pro, were chosen to cover the main shapes this decision takes rather than to repeat the same answer several times. Read them against your own criteria list rather than against each other in the abstract. The right question is not which pick is strongest overall, but which one’s strengths land on the criteria you marked as needs, and which one’s weaknesses fall only on preferences you can flex. A pick that looks second best in a general comparison is often the best answer for a particular room, household or routine.
Pay particular attention to how each pick handles the middle of the task rather than the beginning or the end. Most options perform well in the moment they are designed to show off; the differences appear in the unglamorous middle: the repeated adjustment, the awkward reach, the cleaning afterwards, the storage between uses. The discussion of each pick above gives you the material to judge that middle honestly. If a pick’s limitation sits exactly in the part of the routine you perform most often, treat that as a serious mark against it, however strong the rest of its case may be.
Finally, decide with a simple rule for breaking ties. If two picks both meet your needs, prefer the one that is easier to care for, easier to store, and easier to adapt when the household changes, in that order. Those qualities compound quietly over years of ownership, while a small edge in a headline feature is usually forgotten within weeks. And once you have decided, stop comparing: continued browsing after a sound decision tends to manufacture doubt rather than improve the outcome, and the energy is better spent on the setup and habits that will make the choice succeed.
Mistakes That Quietly Undermine a Good Choice
The most common mistake in this category is deciding from a single moment: a photograph, a display, a recommendation meant for a different household, or one bad experience with a previous item. Each of those shows you something real, but none of them shows you your own room, your own routine and your own constraints together. The second most common mistake is measuring or judging carelessly at the start and then trying to compensate later with accessories, workarounds and patience. Time spent checking how the smoker manages airflow and holds a steady low heat properly, before anything is ordered or begun, is almost never wasted.
Another quiet mistake is solving only the visible part of the problem. A choice can look right and still fail because the supporting details were ignored: the surface beneath it, the light or ventilation around it, the storage it needs, or the people who will use it differently from you. When you plan, plan the whole small system, not just the headline item. Equally, avoid overcorrecting from your last experience. The failure of a previous purchase tells you what to check this time; it does not automatically mean the opposite extreme is right for you now.
If the outcome still disappoints after a fair settling in period, diagnose before you replace. Work out whether the problem is the item itself, its position, the routine around it, or an expectation it was never going to meet. Position and routine problems are cheap to fix and surprisingly common; expectation problems are solved by adjusting how the item is used rather than by buying again. Only when the item itself fails a genuine need on your original list is replacement the honest answer, and by then your list will make the next decision faster and far more certain than the first.
How the Choice Holds Up Through the Year
Seasons test choices in this category in ways a single shopping day cannot. Light changes, rooms grow warmer or colder, windows open, guests arrive, and the household’s busiest weeks rarely resemble its quietest ones. A choice that was made with cleaning access for ash, grease and grates after smoking honestly in mind tends to absorb those swings without complaint, while one bought for a single season often becomes the thing that is worked around for the other three. As the year turns, watch for the moments when the choice is under strain and note whether the strain comes from the season itself or from a weakness that was there all along. Seasonal strain passes; a real weakness deserves a plan.
It is worth doing one short review each season, taking no longer than a few minutes. Look at how the item has worn, whether the routine around it still happens, and whether the space has changed around it: furniture moved, a new appliance nearby, different people using it, or new habits in the household. Catching a small drift early, whether that means a cleaning habit that slipped, a position that no longer suits the room, or wear that needs attention, keeps the choice performing as it did at the start and postpones replacement far more effectively than any single deep effort once a year.
A Final Walkthrough Before You Commit
Before you finalise anything, walk the whole decision once more in order. Stand in your backyard and look at the space with fresh eyes. Confirm the measurements or preparations one last time, because a surprising share of disappointments trace back to a figure written down in a hurry. Run through who will use the result, when they will use it, and what they will do immediately before and after. Check where the item and its companions will live when not in use. If any answer is vague, resolve it now, while resolving it is still free, rather than after delivery, fitting or first use has made it expensive in time and patience.
Keep a few simple notes as you go, and keep them afterwards. Record the measurements you settled on, the criteria that mattered most, what you chose and why, and any care steps that proved important in the first weeks. These notes feel unnecessary on the day everything is new, yet they become quietly valuable later: when a matching item is needed for another room, when a part or companion piece has to be replaced, when a new household member asks how something should be looked after, or when you face the same decision again years from now and cannot remember what you learned the first time. A single page of honest notes, kept where you keep household paperwork or saved with your other home records, turns one good decision into a reusable piece of household knowledge rather than a lesson that has to be relearned from scratch.
Then read the relevant pick in this guide one final time with your criteria list beside it, and mark each need as met, partly met or unmet by what the guide actually says, not by what you hope might be true. A partly met need is acceptable when you have a realistic way to cover the gap with something you already own or a habit you are genuinely willing to keep. An unmet need is a signal to look at another pick rather than to hope. This unglamorous final pass is what separates the households that buy once and settle from those that buy, doubt, return and buy again.
Barrel Smoker FAQ
How long should I expect a careful choice in this category to last?
That depends far more on care and fit than on the item itself. A choice that suits the space, is used as intended and is looked after little and often will usually serve for a long time, while a poor fit wears out patience long before it wears out materials. Judge lifespan by how well the choice matches your routine, and by whether you are willing to keep up the small habits that protect it.
What should I check in the first week of use?
Check the things that are easy to change early: position, setup, the order of your routine, and whether everyone who uses it can do so comfortably. Small frictions noticed in the first week are useful information, not failures. Correct what can be corrected while habits are still forming, and note anything that genuinely fails a need on your original list.
Is it worth keeping a spare or a backup?
For items in daily use, a modest backup often saves real disruption, provided you have somewhere sensible to keep it. For occasional items, a backup usually just becomes clutter. Decide by asking how disruptive a short gap would be, and how likely the item is to be needed again at short notice in your household.
How do I know when it is time to replace rather than repair or adjust?
Replace when the item fails a genuine need, when wear affects how safely or comfortably it can be used, or when you have already adjusted position and routine and the same problem keeps returning. Adjust or repair when the problem is local, recent or clearly caused by setup. A clear original criteria list makes this judgement much easier.
Can one choice serve two different rooms or purposes?
Sometimes, and versatility is worth credit when it is real. Test the idea honestly against both jobs, though: a compromise that serves two purposes poorly helps nobody. If the second use is occasional and undemanding, a shared choice often works well. If both uses are daily and demanding, separate choices usually serve better.
Should I involve the rest of the household in the decision?
Yes, at least briefly, for anything used daily by more than one person. Other users notice different frictions: a reach that is awkward, a step that gets skipped, a preference that changes how the item should be set up. Five minutes of their input before you commit is far cheaper than months of small complaints afterwards, and people look after things better when they helped choose them.
What if my space or needs are unusual?
Then weight the criteria in this guide by your own situation rather than following the general order. Unusual spaces and routines do not need unusual products nearly as often as they need honest measuring, a clear list of needs, and a willingness to test setup and position during the first weeks. The worked scenarios above show how to reorder priorities when your household does not match the average case.
What is the single most useful habit after buying?
Keep the small routine: use the item as intended, deal with marks and mess promptly, let things dry and settle properly, and review the setup once after the first weeks rather than never. That one loop of use, quick care and occasional review prevents most of the problems that lead people to replace items in this category far earlier than they needed to.
What does a barrel smoker do well?
It holds steady low heat, which suits ribs, pork shoulder and poultry.
Is a drum smoker good for beginners?
Often yes, since the simple design needs fewer adjustments.
How much charcoal do I need?
It depends on the model and the cook, so follow the maker’s guide.
Are electric smokers true barrel smokers?
No, but they offer an easier path to smoked food.
Do I need to soak wood chunks before smoking?
Most cooks do not. Soaked wood steams before it smolders and can make dirty smoke. Use dry, seasoned chunks and manage airflow instead.
Why does my drum smoker run too hot?
Usually the intake is too open, the fuel load is too large, or the fire was not settled before the lid closed. Reduce air in small steps and allow time for the temperature to respond.
Can I use a barrel smoker in the rain?
Many people do, but wet fuel and wind make temperature control harder. Keep fuel dry, use a cover or windbreak, and never run a charcoal cooker under a roof or in an enclosed space.
What is the difference between lump charcoal and briquettes?
Lump is natural wood charcoal and burns hot and fast. Briquettes are shaped and tend to burn steadier and longer, which many people prefer for long cooks.
How do I clean a barrel smoker?
Let it cool, empty ash, scrape grates, and wipe grease from the interior as the maker advises. Avoid scrubbing away the seasoned layer inside the chamber.
Can I smoke at a higher temperature for faster results?
Many cuts can be cooked hotter, but tough cuts need time to break down. Follow a recipe for the cut and judge doneness by meat temperature and tenderness.
How do I tell if a used smoker is worth buying?
Check for rust-through, a warped lid, loose joints and missing parts. Surface rust can often be cleaned and reseasoned, but structural damage usually is not worth the trouble.
The Short Version
For a classic drum, the Pit Barrel Cooker. For a traditional offset, the Oklahoma Joe’s Highland. For a simple bullet, the Landmann. For charcoal with controls, the Masterbuilt Gravity 560. For electric, the Bradley. For pellets, the Camp Chef Woodwind Pro.


