A smoker grill is any cooker that can hold low heat for long hours while burning wood or charcoal for flavour. The main choice is fuel type, because pellet, charcoal, electric, propane, offset and kamado designs all suit different cooks.
The six models below each stand for a different style, so you can compare approaches before narrowing down. We have not used these products ourselves, so confirm dimensions, capacity and included parts on the current listing before buying.
As an Amazon Associate we earn from qualifying purchases. Links below are affiliate links, and they do not change the product information we give.
What to Look For
| Feature | Why it matters |
|---|---|
| Fuel | Pellets are easy, charcoal gives classic flavour, electric is hands-off |
| Cooking area | Count racks and surface to fit the cuts you cook most |
| Heat holding | Thicker steel and good seals keep temperature steady |
| Control | Digital controllers help hold a set temperature without watching the whole afternoon |
| Space | Check how much patio or yard room you have, because some of these units are large |
In this guide
Specs at a Glance
| Product | Fuel | Style | Notes |
|---|---|---|---|
| Traeger Pro 575 | Wood pellets | Pellet grill | Digital controller |
| Weber Smokey Mountain 18 inch | Charcoal | Bullet smoker | Water pan design |
| Masterbuilt Digital Electric Smoker | Electric | Cabinet | Simple controls |
| Oklahoma Joe’s Highland | Charcoal and wood | Offset | Separate firebox |
| Kamado Joe Classic Joe | Charcoal | Ceramic kamado | Also grills and bakes |
| Camp Chef Smoke Vault 24 | Propane | Vertical cabinet | Water pan and racks |
The 6 Best Smoker Grills
Top pickBest for cooks who want set-and-forget convenience
1. Traeger Pro 575 Pellet Grill
A popular wood pellet grill with a digital controller and app connection. Pellet fuel makes it one of the easier ways to smoke, bake and grill in a single cooker.
Suits: cooks who want set-and-forget convenience. Strengths: simple operation and wood flavour. Weaknesses: a pellet grill needs power. Skip it if you want a deep charcoal taste.
View Traeger Pro 575 on Amazon
Best for charcoal flavour fans
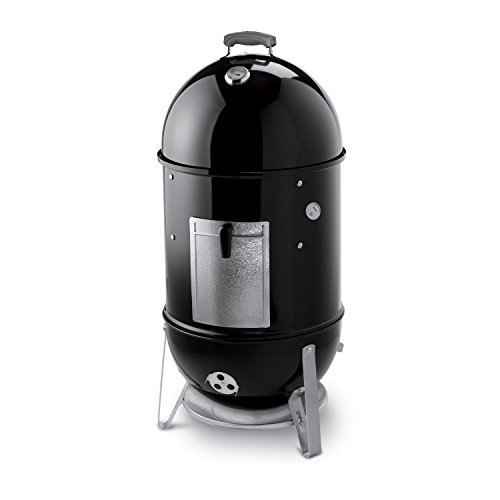
2. Weber Smokey Mountain Cooker 18 inch
A long-running bullet-style charcoal smoker with a water pan and stacked racks. It has a strong reputation for steady temperatures and straightforward use.
Suits: charcoal flavour fans. Strengths: reliable heat control and a classic design. Weaknesses: it needs tending over a long cook. Skip it if you want an automatic fuel feed.

Best for beginners and small yards
3. Masterbuilt Digital Electric Smoker
An upright electric smoker with a digital panel and wood chip tray. It plugs in, so there is no coal to light, which makes it a friendly option for tight spaces.
Suits: beginners and small yards. Strengths: easy temperature setting. Weaknesses: lighter smoke flavour. Skip it if you want a heavy bark.

Best for cooks who enjoy tending a fire
4. Oklahoma Joe’s Highland Offset Smoker
An offset smoker with a side firebox, designed for burning charcoal and wood. It gives the traditional barbecue experience but asks more of the cook.
Suits: cooks who enjoy tending a fire. Strengths: authentic stick-burner style. Weaknesses: it takes practice to control the fire. Skip it if you want minimal effort.


Best for all-round outdoor cooks
5. Kamado Joe Classic Joe Ceramic Grill
A ceramic kamado cooker that smokes, grills, roasts and bakes with excellent heat holding. It is heavy and needs a stable stand.
Suits: all-round outdoor cooks. Strengths: insulation and versatility. Weaknesses: weight and ceramic care. Skip it if you want a light cooker.

Best for people who want gas simplicity
6. Camp Chef Smoke Vault 24 Propane Smoker
A vertical propane smoker with a built-in thermometer, multiple racks and a water pan. It runs on gas for easy heat and has a side wood tray.
Suits: people who want gas simplicity. Strengths: easy heat control with a roomy chamber. Weaknesses: smoke flavour is milder than charcoal. Skip it if you do not own a propane tank.
View Camp Chef Smoke Vault 24 on Amazon
Care and Setup
- Season a new smoker as the maker recommends before cooking food.
- Empty ashes and grease after every cook once everything has cooled.
- Cover the smoker if it lives outdoors, but only after it has cooled completely.
- Keep a spare bag of fuel on hand for long cooks, stored dry and off the ground.
- Wipe down racks and drip trays with warm soapy water and let them dry before the next use.
Mistakes to Avoid
- Buying by rack count without checking the actual cooking area.
- Peeking too often and losing heat.
- Skipping the break-in seasoning.
- Choosing a fuel type that does not fit your routine or your yard.
- Placing the smoker on a deck against a wall or railing.
Matching the Fuel Type to Your Routine
Fuel is the first decision because it shapes everything else: flavor, effort, cost per cook, and where you can put the cooker. Pellet cookers burn compressed wood and use a controller to hold temperature, so they suit people who want to set a number and walk away. Electric smokers are the simplest, with a heating element and a wood tray, and suit small spaces. Charcoal gives classic smoke but asks you to manage vents and fuel. Offset cookers use a firebox and logs or charcoal and demand the most attention. Kamado cookers use heavy ceramic walls to hold heat with little fuel. Propane smokers use a gas burner for steady heat and a tray for wood.
Ask yourself how much time you want to spend tending. A weekend cook who enjoys the process may love an offset or a charcoal bullet, while a parent cooking after work may prefer a pellet or electric model. Consider whether you have a power outlet, a place to keep a propane tank, and a dry spot for fuel.
Think about taste too. Charcoal and log burners generally give a more pronounced smoke than electric or propane, while pellets sit in between and depend on the wood used. No fuel is right for everybody, so match it to your habits, your yard and your patience, and be ready to adjust as your skills grow.
Capacity and Grate Math for Real Cooks
Manufacturers often list total cooking area, but usable space is what counts. Think about what you cook most: a whole brisket, several racks of ribs, two pork shoulders, a turkey or a few chickens. Lay out the cuts on paper to the size of the grate, leaving space for air to circulate. Overcrowding blocks airflow and leads to uneven cooking.
Consider the shape of the chamber. Vertical cabinets stack racks, so the total area can be large but each rack is small, and a long brisket might not fit. Horizontal cookers give a wide single level, better for large cuts. Check the distance between racks so tall items such as a beer-can chicken or a rib rack fit. Look at the clearance under the lid and whether the racks are removable.
Plan for the occasional large gathering, but do not buy far beyond your usual need. A very big cooker uses more fuel, takes longer to heat and costs more to run. Smaller cookers are easier to keep at temperature and easier to clean. If you often cook for crowds, compare the capacity of the cooker with your needs, and consider cooking in stages or holding food safely in a warm, insulated cooler.
Build Quality, Insulation and Heat Stability
A smoker’s job is to hold a steady low temperature for hours, so build quality matters. Thicker steel absorbs and holds heat better than thin sheets. Tight door seals and lids prevent leaks that waste fuel and cause temperature swings. Insulated walls, double walls or ceramic bodies help in cold or windy weather. Look at descriptions of gaskets, latches and the fit of doors.
Check the parts that wear. Hinges, handles, dampers and legs should feel solid. Paint and finish should resist high heat. On electric and pellet models, look at the quality of the controller, probe, igniter and fan, and ask about replacement parts. A smoker with easily available parts and a clear warranty is easier to keep running.
Wind, cold and rain affect performance. A sheltered location, a windbreak or an insulated blanket designed for your model can help. In winter, expect longer preheats and more fuel. In summer, shade helps avoid overheating. Use a good probe and grate-level thermometer to see what is happening. If you cannot keep a stable temperature despite adjusting vents and fuel, check the seals, the cleanliness of the vents and the quality of the fuel before blaming the cooker.
Flavor and Technique Differences Between Cooker Types
Different smokers call for different habits. On a pellet cooker, the main skills are choosing pellets, setting the temperature and using a probe. Some cooks use a smoke setting at low temperature to build flavor before raising heat. On a charcoal cooker, you learn to light the fuel, set vents and add wood chunks. A water pan can steady temperature and add humidity.
On an offset, you manage a fire in the firebox, adding small splits of wood to maintain clean combustion. This takes practice, but gives a distinct flavor. Kamados reward restraint: a small amount of lit charcoal is enough, and vents make fine adjustments, so overshooting the temperature is hard to undo. Electric and propane cabinets keep it simple, with a wood tray or box for smoke and a water pan for moisture.
Whatever you choose, learn the basics: clean smoke, steady heat, patience and resting meat. Start with forgiving cuts such as chicken thighs, ribs or pork shoulder. Record the temperature, wood, time and results to improve. Avoid opening the lid constantly. Let the bark set before spritzing or wrapping. As you gain confidence, experiment with rubs, woods and techniques such as reverse searing or finishing on a hot grill.
Ownership Checklist: Costs, Space and Support
Before buying, think about total ownership. Consider fuel, replacement parts, covers, probes and accessories. Pellet and gravity-fed cookers need electricity and a steady supply of fuel, while charcoal and wood need storage and handling. Consider cleaning time: grease trays, ash pans and grates need regular attention, and some designs are easier to clean than others.
Check the space. Measure where the cooker will sit, the path to get it there and the room around it. Make sure the surface is level, non-flammable and sturdy, and keep the cooker away from structures. If you plan to move it, check the wheels and weight. Check any local rules or housing association limits on smoke and fuel types, especially for balconies and shared spaces.
Look at support. Does the maker offer a clear warranty, manuals and parts? Are there guides and community groups for your model? Read how to contact service. Signs that it is time to replace include rusted-through walls, failed controllers that cannot be replaced, warped doors that do not seal, and persistent temperature swings. Ask questions before buying, keep documents and take care of the cooker to extend its life.
Smoker Grill Vocabulary in Plain English
Smoker grills blend barbecue culture with technical terms, and a listing can feel like it is written in code. This glossary explains the words you will meet most often while choosing among the models above.
- Low and slow: cooking at modest temperatures for a long time, the traditional approach to tough cuts of meat.
- Smoke ring: a pink band just under the surface of smoked meat, often admired but not a promise of flavor.
- Firebox: the area where the fuel burns. Its size and position affect heat management.
- Offset: a design where the firebox sits to the side of the cooking chamber, sending smoke across the food.
- Pellet, charcoal, gas and electric: the main fuel types, each with its own handling and setup needs.
- Damper and vent: openings that control airflow, and so temperature, in many smokers.
- Water pan: a pan that holds liquid in the cooking chamber to help moderate heat and humidity in some designs.
Picking a Smoker Grill by How You Cook
You want hands-off convenience
A pellet or electric model uses controls to hold a set temperature, so you can focus on seasoning and timing. Check the maker’s description of controls and power needs.
You enjoy tending a fire
A charcoal or offset design rewards attention. It takes practice to manage airflow, but many cooks love the process and the flavor it brings.
You want a grill that also smokes
Look for combination designs that handle both direct grilling and low-temperature smoking. Think about whether the setup for each mode is easy.
You cook for a crowd
Cooking area matters. Check the stated grate size and how many racks fit, and consider whether the unit has the capacity for large cuts.
Fuel Types Compared
| Fuel | Effort level | Notes |
|---|---|---|
| Pellet | Low, set and monitor | Needs electricity and a supply of pellets |
| Charcoal | Higher, manage airflow | Traditional flavor, learning curve |
| Gas | Low to moderate | Convenient, flavor often comes from wood chips |
| Electric | Low | Simple controls, needs a power source |
Safety and Placement
A smoker produces heat, fire and smoke, so placement matters. Set the unit outdoors on a stable, non-flammable surface, away from walls, fences, trees and overhanging structures, following the clearances in the manual. Never use a smoker in a garage, under a covered porch or in an enclosed space. Keep children and pets away, and have a plan for extinguishing the fire as the maker advises.
Follow current food safety guidance from official sources for safe internal temperatures and handling of raw meat. A reliable thermometer helps you judge doneness, since time alone is not enough. For gas hookups, electrical supply or any structural work, rely on the maker’s instructions and a licensed professional.
Reading a Smoker Grill Listing
Look at the cooking area, the fuel type and the construction. Check the thickness of the steel, which affects heat retention, and the quality of the lid seal. Read what is included, such as racks, thermometers and covers. Confirm the dimensions so the smoker fits your patio, and check the weight if you plan to move it. Look for notes about cleaning ash and grease, and see how easy it is to access the firebox or pellet hopper.
Finally, read the warranty summary and the return terms. Smokers are large and heavy, so you will want to know the policy before you commit. Plan your first cook with something forgiving, and learn how your unit holds temperature before you invite a crowd.
A Calm First Cook on a New Smoker Grill
Treat the first session as a practice run. Read the manual and follow any seasoning or burn-in instructions the maker gives, since many units benefit from an initial heating to clear manufacturing residue. Set up away from structures, check the fuel supply and make sure you have tools within reach, such as long tongs, a thermometer and heat-resistant gloves.
Choose forgiving food for the first attempt. Chicken thighs, sausages or a pork shoulder in a modest size teach you how the smoker holds temperature without too much risk. Place a thermometer near the food, not only relying on the built-in gauge, which can differ from the temperature at the grate. Keep the lid closed as much as you can, since every peek lets heat and smoke escape.
Take notes on fuel use, vent settings and timing. Over a few cooks, you will build a personal guide to your smoker, and the results will become more predictable. Follow food safety guidance from official sources for safe handling and internal temperatures.
Matching Smoker Grills to How You Actually Cook
The right choice among smoker grills depends less on any single headline feature and more on how cooking that moves between direct grilling and low, slow smoking fits into an ordinary week at your house. Start by picturing the last few times you wished you owned one. Were you cooking for two on a weeknight, feeding a crowd, or trying to keep food ticking along while you did something else entirely? Each of those situations rewards a different design, and a model that feels perfect for one household can feel like hard work in another. Writing down your two or three most common situations before you compare models keeps the decision grounded in real use instead of showroom appeal.
Space is the second honest test. Measure where the new purchase will live in the patio, including the room needed to open doors or lids fully, reach controls without stretching over hot surfaces, and set down trays or boards nearby. Then think about where it goes between uses if it will not live out permanently: a cupboard shelf, a garage rack or a spot by the back door. Gear that is awkward to store quietly stops being used, however good it is on paper. A slightly simpler model that lives within easy reach usually serves a household better than a larger, more capable one that has to be fetched, assembled and put away every single time.
Finally, be honest about how much attention you enjoy giving a cook. Some people love tending, checking and adjusting; others want to set things up and walk away. Neither preference is wrong, but it should steer you between the more hands-on and more automated designs in the list above. If you share cooking with a partner or family members, their patience matters too: controls everyone understands get used correctly, while a system only one person can operate becomes a bottleneck on busy days. The best purchase is the one the whole household will still be using happily a year from now.
The Buying Criteria, One Level Deeper
Capacity deserves a second look because it is easy to misjudge in both directions. Think in terms of the largest load you cook a few times a year, not the largest load you can imagine. Oversizing wastes money, space and often fuel or energy on every ordinary use, while undersizing only hurts on the big occasions — and those can usually be handled by cooking in batches or borrowing capacity from your oven or a second device. Look at usable space rather than headline space: shelves, racks, probes or cooking surfaces that cannot be used at the same time as the others do not add real capacity, whatever the summary numbers suggest.
Controls and feedback shape every use after the first. You want to be able to tell, at a glance and from a normal working distance, what the device is doing and how long it has left to run. Buttons or dials you can operate with messy or gloved hands, displays that stay readable in bright light, and alerts you can actually hear from the next room all matter more in practice than a long list of extra programmes. If a design depends on an app, check what still works when the phone is elsewhere or the connection drops; the core job should never depend entirely on a network behaving itself.
Build quality shows itself in the parts you touch and clean rather than in the parts you admire. Hinges, latches, handles, knobs and seals take the daily strain, so look for smooth movement, even gaps and materials that will not suffer from heat, moisture or repeated washing. On anything that cooks, even heat matters more than peak heat: food at the edges should behave much like food in the centre, and the design should make it easy to move things around when it does not. Where replacement parts such as grates or filters exist, a maker that sells them openly is a quiet sign the product is meant to be kept, not replaced.
Running costs and consumables are the part of the budget people forget. Before you buy, think through charcoal, pellets or propane depending on the design, and how often your style of cooking will get through them. A model that is cheap to buy but hungry in daily use can cost more over a few years than a thriftier design that cost more up front. The same goes for your time: a design that needs constant supervision, complicated assembly or lengthy cleaning is charging you minutes on every use. Add those minutes across a year of regular cooking and they often outweigh a modest difference in purchase price between two otherwise similar models.
Setup, First Use and Getting Comfortable
Set aside unhurried time for the first setup rather than trying to fold it into a meal you have promised other people. Unpack on a clear surface, check every part against the manual’s list while it is all in front of you, and keep the packaging until the first successful use is behind you. Wash or wipe down the parts the manual tells you to prepare, in the way it describes, and run any empty first cycle or burn-in it recommends. That first session is also the moment to learn where the hot, sharp or heavy parts are, so later use feels routine rather than surprising.
Your first real cook should be something forgiving that you already know how to cook another way. Familiar food gives you a baseline: you can judge what the new gear changed, instead of guessing whether a disappointing result came from the recipe or the equipment. Take a few notes as you go — settings used, how long things took, what you would move or change next time. Those notes feel unnecessary on the day and invaluable a month later, when you are trying to repeat a success or avoid repeating a mistake. Two or three calm practice runs will teach you more than any amount of reading.
Build a small routine around each use: what gets checked before you start, where tools and ingredients wait while things cook, and what happens in the first few minutes after serving. For smoker grills, that routine might mean confirming fuel or power, checking that grates, ash systems, grease trays and interior walls are clean and in place, and knowing exactly where hot items will land when they come off the heat. Routines sound dull, but they are what separate relaxed cooks from frazzled ones, and they are the main reason experienced users seem to get better results from the same equipment as everyone else.
Cleaning, Care and Storage That Prevent Most Problems
Most problems with smoker grills start as cleaning that was postponed once too often. Grease, ash, moisture and food residue build up quietly and then show themselves as off flavours, uneven performance, sticking, smells or parts that no longer move freely. A short clean while things are still warm — once it is safe to touch — almost always beats a long scrub days later. Follow the manual on which parts can be washed, soaked or put through a dishwasher, and be especially careful with anything electrical, coated or sealed: water and harsh scouring undo in one afternoon what careful use preserves for years.
Make a simple rhythm: a quick wipe and empty after every use, a proper clean of grates, ash systems, grease trays and interior walls after a few uses, and a deeper check every season. On that deeper check, look for rust starting at edges and fasteners, seals that have flattened or cracked, cables or cords with damaged insulation, and vents or openings that have narrowed with residue. Catching these early is cheap; catching them late usually means a repair or a replacement. Dry everything thoroughly before storage, because trapped moisture does more quiet damage in a cupboard or garage than almost anything that happens during cooking itself.
Store the gear the way you would want to find it on a busy day: clean, dry, complete and with its small parts kept together. A labelled box or bag for accessories, cords and attachments saves the rummaging that leads people to improvise with the wrong tool. If the patio is outdoors or in a garage, a cover or a sheltered spot protects against weather and dust between uses. Keep the manual, or at least a photo of its key pages, somewhere you can find it; the one specification or cleaning instruction you need is always the one that has gone missing.
Troubleshooting: What to Check Before You Blame the Product
When results disappoint, change one thing at a time and start with the basics. Confirm the setup matches the manual: parts seated correctly, vents or openings in the position the design expects, and the right mode or setting for the food in front of you. Check the simple supplies next — fuel or power, the freshness and preparation of the food itself, and whether the load is larger, thicker or colder than the last time things worked well. A surprising share of bad results trace back to an overloaded cooking space, food that went on straight from the coldest part of the fridge, or a lid and door opened so often that the cooking environment never settled.
Temperature and timing questions deserve a calm, methodical answer rather than guesswork. Give the equipment time to settle after any adjustment before judging the result, and judge doneness by the food — its feel, its juices, its tenderness and, where food safety matters, a thermometer reading taken in the thickest part — rather than by the clock alone. If you use a separate thermometer or probe, test it occasionally in iced water and in boiling water so you know whether the readings themselves can be trusted. Keep a short log of what you changed and what happened; patterns appear in a log that memory smooths away.
Know the point at which troubleshooting stops and support begins. Burning smells from electrical parts, damaged cords, cracked components that carry weight or hold heat, gas smells that do not clear, or controls that behave erratically are all reasons to stop, switch off and contact the maker rather than improvise. The same applies to anything still under warranty: opening sealed parts or modifying a design can void cover you have already paid for. For everything less serious, the maker’s support pages and manual troubleshooting tables are genuinely useful, because the most common faults on any popular model are well known and usually simple.
How to Choose Between the Picks Above
The shortlist in this guide — Traeger Pro 575 Pellet Grill, Weber Smokey Mountain Cooker 18 inch, Masterbuilt Digital Electric Smoker, Oklahoma Joe’s Highland Offset Smoker, Kamado Joe Classic Joe Ceramic Grill and Camp Chef Smoke Vault 24 Propane Smoker — covers the main shapes this category takes, and the honest differences between them are about fit rather than quality alone. A practical way to decide is to score each model against your own three situations from earlier: your most common cook, your biggest regular cook, and the way you prefer to work. Cross off any model that fails one of those outright, however impressive its other features look. What remains is usually two or three genuine contenders, and between those, the deciding factors are the everyday ones: controls you like, cleaning you will actually do, and storage that fits your space.
If you are buying as a gift, weight simplicity and forgiveness more heavily than maximum capability. A design that does the core job beautifully and explains itself clearly will be used every week; a feature-packed one that needs study may end up admired and untouched. And if you are replacing something you already own, name the one thing that frustrated you most about the old one before you shop. Making sure the new purchase fixes that specific frustration — rather than simply being newer — is the surest route to feeling, a year later, that the money was well spent on smoker grills.
A Final Practical Checklist Before You Buy
Work through the unglamorous checks before the exciting ones. Confirm the measurements where the purchase will live in the patio, including door, lid and drawer swing, the reach of any cord, and the clearance the maker asks for around vents and hot surfaces. Confirm what arrives in the box and what is sold separately, because a missing rack, probe, tray or fitting discovered on cooking day turns a good purchase into a frustrating one. Read the returns terms while you still have a choice of sellers; a product you can return after a genuine trial is a lower-risk purchase than the same product bought with no way back.
Think, too, about the second month rather than the second day. In the second month the novelty has gone, and what remains is the weekly reality: how long setup takes when you are tired, whether cleaning grates, ash systems, grease trays and interior walls still feels reasonable, and whether the results have become reliably repeatable. Products that survive the second month become fixtures. If a design only impresses when you imagine its best possible day, and looks like a burden on an ordinary tired evening, believe the ordinary evening. It is the one that will happen most often, and it is the standard your purchase has to meet to earn its space.
Lastly, plan the first few uses as a small project rather than a single event. Choose two or three dishes or tasks that suit cooking that moves between direct grilling and low, slow smoking, buy ingredients or supplies for those first, and give yourself permission for the first attempt to be a lesson rather than a performance. Households that approach new equipment this way almost always end up using it more, because early confidence compounds. The cooks who abandon good equipment usually do so after one over-ambitious first attempt that no beginner with unfamiliar gear should have been expected to pull off.
Smoker Grill FAQ
Which type of smoker is easiest?
Electric and pellet smokers are generally the most hands-off. Charcoal and offset models take more practice.
Can a smoker also grill?
Pellet grills and kamados do both. Dedicated bullet and cabinet smokers are made for low and slow cooking.
How big should I go?
Think about your largest cut. A full brisket needs far more room than a rack of ribs.
Do I need a thermometer even with a digital controller?
A separate probe is still wise. Built-in sensors read the air near the sensor, not the inside of your meat.
Is a smoker grill hard to clean?
Not if you clean after each use. Look for removable grease trays and ash pans.
Is a pellet grill really set and forget?
Largely, for temperature, but you still need to keep the hopper filled, clean the grease and ash, and check the meat. Weather and pellet quality can still affect results.
Do I need a water pan?
It helps on many charcoal and propane cabinets by steadying temperature and adding moisture. Some designs use it more than others, so follow the maker's instructions.
Can I smoke in cold weather?
Yes, but expect longer preheats and more fuel use. Shelter from wind and insulated blankets made for your model can help.
What is the difference between a smoker and a grill?
A smoker holds low heat for long cooks with smoke, while a grill uses high direct heat. Some cookers, such as pellet and kamado models, can do both.
How often should I clean the smoker?
Empty ash and grease after each cook once it is cool, and do a deeper clean every so often depending on use. Follow the maker's guidance.
Can I leave a smoker running overnight?
Some cooks do with automated models, but safety comes first. Check the manual, keep the cooker on a safe surface, and consider the risk of power or fuel problems.
Is a bigger smoker always better?
No. Larger units take more fuel and time to heat, and are harder to store. Choose a size that fits your usual cooks with a little room to spare.
Can one cooker really grill and smoke well?
A good combo does both jobs credibly, though specialists will beat it at the extremes. For most households the trade is worth it: one footprint, one set of skills to learn, and the freedom to sear on Tuesday and smoke on Saturday. Judge a combo on the job you will do most often, and make sure the other job is genuinely workable rather than a token feature.
How do I switch from smoking to grilling without a flavour clash?
Brush the grates down and burn off residue at high heat after a smoky cook, empty old ash, and start the next session clean. Strong smoke flavours live in built-up grease more than in the metal itself. A clean cooker and a hot preheat reset the stage so grilled foods taste grilled, not like yesterday’s brisket.
What size should I choose for a family that entertains?
Size for the entertaining you actually do. A cooker that handles a crowd’s burgers in two relaxed batches is better than a vast one that eats fuel for four weeknight chops. Look at the main grate area for grilling and the total rack space for smoking, and remember that elbow room around food matters as much as raw area on both jobs.
How do I manage two-zone cooking on a combo?
Set the fire or burners so one side runs hot and the other gentle, with a clear boundary between them. Sear over the hot zone, finish in the gentle zone, and keep the lid down so the whole space behaves predictably. Practising the layout with something simple, like chicken pieces, teaches you your cooker’s hot spots faster than any diagram.
What maintenance matters most on a dual-purpose cooker?
Grease management, because grilling and smoking both produce it and old grease is the main cause of flare-ups, off flavours and fires. Keep trays emptied, ash cleared so airflow stays honest, and seals and hinges checked each season. A combo works harder across more styles than a specialist cooker, so its cleaning rhythm should be a little more disciplined.
Is a combo a good first cooker?
It can be an excellent one, because it lets a beginner learn both fires without buying twice. Choose a design whose controls are simple to understand, whose parts are easy to clean, and which has a strong community of owners sharing advice. Learning on forgiving foods first — sausages, chicken, pork shoulder — builds skill before expensive cuts are risked.
Consider the environment the equipment will work in over its whole life, not just on delivery day. Kitchens get steamy, patios get rained on, garages get dusty, and counters get crowded as other appliances arrive. A design with sealed, wipeable surfaces, protected controls and honest guidance about where it is meant to be used will age far better than one that assumes perfect conditions. If you live somewhere humid, coastal or very cold, say so when you read makers’ guidance, because those climates are harder on seals, electronics, finishes and stored fuel than the mild conditions most product photography quietly assumes.
Teach one other person in the household how the equipment works, even if cooking is mostly your job. A second person who can check a temperature, safely move food, or shut things down properly is a genuine safety feature, and it turns cooking for a group from a solo performance into something shared. Write the household’s few house rules — where hot items land, what never goes near the heat, how the gear is left after use — somewhere visible until they are second nature to everyone.
Keep a small notebook or phone note dedicated to this one area of cooking. Record the model settings or setup you used, the size and starting state of the food, the weather or room conditions if they mattered, and one honest sentence about the result. Reviewing a season of those notes shows patterns no single cook can teach: which settings you always override, which foods your household asks for again, and which problems keep coming back to the same simple cause. That record quietly turns guesswork into knowledge, and it makes every later purchase better informed too.
When friends ask what to buy, the most useful answer is rarely a model name. It is the reasoning in this guide: match capacity to real loads, favour controls everyone can understand, respect the cleaning a design demands, and count the running costs honestly. A buyer who understands those four things can judge a new model on the spot, including models that did not exist when this guide was written. Features change every season; the questions that reveal whether a product fits a household barely change at all.
Budget a little of the purchase price for the unglamorous extras that make the main purchase work well: the right tools for handling hot food, storage that keeps parts together, cleaning supplies the maker recommends, and a backup for anything the cook depends on, such as a second thermometer or spare fuel. People who skip these end up improvising at the worst moments. People who plan for them find the whole hobby calmer, and their main equipment lasts longer because it is being used the way it was designed to be used.
Safety deserves a place in any buying decision, not as an afterthought but as a feature to check like any other. Look for stable footing, handles that stay cool enough to use as intended, cords and cables that route away from heat and traffic, and controls that cannot be knocked into a new setting by a passing sleeve. Then keep the same mindset in daily use: turn pot handles, keep loose clothing and towels away from heat, supervise children around hot equipment, and never leave a live cooking fire or a heating appliance entirely unwatched beyond what its maker intends. Most accidents in home cooking are small, predictable and preventable, which is exactly why a calm routine matters more than confidence does.
The Short Version
For convenience, the Traeger Pro 575. For classic charcoal, the Weber Smokey Mountain. For an easy plug-in, the Masterbuilt electric. For a stick-burner, the Oklahoma Joe’s Highland. For versatility, the Kamado Joe Classic Joe. For gas, the Camp Chef Smoke Vault 24.
Related Guides
- 6 Best Meat Smokers: Pellet, Electric, Charcoal and Offset
- 6 Best Grill and Smoker Combos: Gas, Charcoal, Pellet (2026)
- 6 Best Commercial Smokers: Pellet, Charcoal and Offset (2026)
- 6 Best Oklahoma Joe's Smokers: Offset, Charcoal, Pellet (2026)
- 6 Best Professional Smokers: Pellet, Offset and Charcoal (2026)


