A retro microwave looks like a mid-century kitchen appliance from a 1950s catalog, with rounded corners, chrome-style trim, pastel or bold colors, and a pull handle instead of a button. It does the same job as any countertop microwave, but it doubles as a design piece.
The six models below come from brands known for retro or vintage-style appliances. We have not used these products ourselves, so the descriptions are general. Confirm interior size, power rating and color on the current listing before buying, since sellers sometimes list more than one version.
As an Amazon Associate we earn from qualifying purchases. Links below are affiliate links, and they do not change the product information we give.
What to Look For
| Feature | Why it matters |
|---|---|
| Style | Handle shape, trim and color choice decide how well it matches your retro kitchen |
| Interior size | Check that your plates and dishes fit, not just the cubic-foot figure |
| Power | Higher wattage heats faster; check the listing for the actual figure |
| Controls | Dials are easy to read; push-button panels add presets |
| Footprint | Retro bodies can be deep, so measure your counter and shelf |
In this guide
Specs at a Glance
| Microwave | Type | Size | Notes |
|---|---|---|---|
| Galanz Retro Microwave Oven | Countertop retro | Compact to mid-size | Several colors on the listing |
| Smeg 50s Retro Style Microwave | Countertop retro | Mid-size | Matches Smeg appliance sets |
| Daewoo Retro Microwave Oven | Countertop retro | Compact to mid-size | Classic handle and dial styling |
| Commercial Chef Retro Microwave | Countertop retro | Compact | Often sold in bright colors |
| Magic Chef Retro Microwave | Countertop retro | Compact | Simple dial-style design |
| Emerson Retro Microwave | Countertop retro | Compact | Retro color options |
The 6 Best Retro Microwaves
Top pickBest for retro kitchens
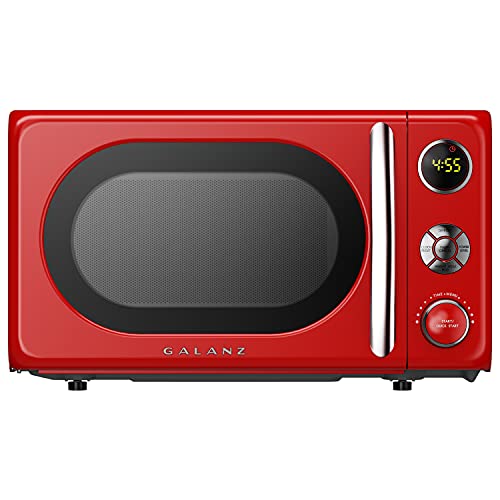
1. Galanz Retro Microwave Oven
Galanz is a well-known name in retro appliances, and this microwave pairs rounded styling with a dial and a pull handle. Color and size options vary by listing, so check that the version you pick matches the photos and your counter space.
Suits: retro kitchens. Strengths: a vintage look at a familiar brand. Weaknesses: sizes and colors differ. Skip it if you need extra-large capacity.

Best for coordinated retro sets
2. Smeg 50s Retro Style Microwave
Smeg built its reputation on 1950s-inspired appliances, and its microwave is designed to match the brand’s kettles, toasters and refrigerators. That makes it popular with buyers who are decorating a whole retro corner.
Suits: coordinated retro sets. Strengths: strong design and a matching ecosystem. Weaknesses: it is a niche-looking appliance. Skip it if you only want basic function.
View Smeg 50s Retro Style Microwave on Amazon
Best for small kitchens
3. Daewoo Retro Microwave Oven
Daewoo offers a retro-styled microwave with a curved body and classic handle. It suits small kitchens that want a vintage touch without a large footprint, and its dial-style look is easy to read at a glance.
Suits: small kitchens. Strengths: a vintage look on a smaller body. Weaknesses: color choice may be limited. Skip it if you need preset-heavy controls.
View Daewoo Retro Microwave Oven on Amazon
Best for bright, playful spaces
4. Commercial Chef Retro Microwave
Commercial Chef sells a retro microwave in lively colors, a good fit for dorms, first apartments and game rooms. Check capacity and wattage on the listing.
Suits: bright, playful spaces. Strengths: bold color options. Weaknesses: smaller interior than family models. Skip it if you cook for a large household.
View Commercial Chef Retro Microwave on Amazon
Best for light daily use
5. Magic Chef Retro Microwave
Magic Chef is a long-established appliance name and offers a retro-style microwave with a simple look. It is easy to place and use, and it fits a cottage or diner-style kitchen well.
Suits: light daily use. Strengths: an easy, no-fuss design. Weaknesses: fewer features than large models. Skip it if you want sensors and presets.
View Magic Chef Retro Microwave on Amazon

Best for casual retro style
6. Emerson Retro Microwave
Emerson sells retro microwaves in vintage-inspired colors, aimed at buyers who want a stylish appliance without a big-name brand. Check the listing for the model details.
Suits: casual retro style. Strengths: a fun look with simple controls. Weaknesses: details vary by listing. Skip it if you want a big-name brand.

Care and Setup
- Wipe the interior after each use to keep splatters from baking on.
- Clean painted or glossy exteriors with a soft cloth, not abrasive pads.
- Leave clearance around the vents when you place it.
- Use microwave-safe dishes and covers, and stir or rotate food for even heating.
Mistakes to Avoid
- Assuming every retro model has the same interior size.
- Ordering a color without checking it matches your other appliances.
- Running it empty, which can damage the unit.
- Placing it too close to a wall that blocks the vents.
Style Versus Function in a Retro Design
A retro microwave asks you to weigh looks against everyday convenience. Rounded bodies, chrome-style trim and pull handles are the point of the design, but they can change how the appliance sits on a counter and how easily it works. The rounded shape may reduce usable interior corners, a deep body can stick out past the counter edge and a bold color has to coexist with your other appliances and cabinets. These are all worth thinking about before you fall for a photo.
Controls deserve a close look. Dials are intuitive and easy to read, with a clean, nostalgic feel, but they may offer less precise timing and fewer presets than a push-button panel. Some retro models combine a dial with a few buttons, which gives a bit of both. Think about what you do with your microwave: reheating coffee and leftovers needs little more than a time dial, while defrosting by weight or cooking from presets benefits from a digital panel.
Decide where the style matters most. If the microwave sits in plain sight on an open counter, the design and finish may be the priority. If it will be tucked into a corner or a shelf, simple function might matter more, and a more conventional model could be easier to use. Retro appliances are often a statement piece, so choose one you will still enjoy looking at, and make sure it fits your cooking habits too.
Interior Size and the Dishes You Actually Use
Cubic feet tell you the volume, but not whether your plate fits. A retro microwave often has a compact cavity and a rounded interior, so check the turntable diameter and the interior height as well as the capacity. If the listing does not give these, look at the product dimensions and consider whether a standard dinner plate or a favorite casserole dish will rotate freely. A plate that scrapes the wall will stop the turntable and heat unevenly.
Think about the foods you heat. Mugs, bowls and takeout containers fit in nearly any microwave, but larger platters, tall containers and bulky dishes may not. Popcorn bags need room to expand, and a frozen meal tray may be wider than a small cavity. Measure your most-used dishes and compare them with the interior dimensions where available.
Consider the household size. A compact retro model suits one or two people, a dorm or a secondary space, while a family cooking full meals may find it limiting. Check the weight and the counter footprint, too, because a small interior does not always mean a small exterior. Look at door size and how far it opens, and make sure there is room for it to swing. A glass turntable that can be removed makes cleaning easier, so check whether the tray comes out.
Power and Heating Performance Expectations
Wattage is the main indicator of heating speed, and it is stated on the product listing or the label. Higher wattage generally heats faster and more evenly, while lower wattage needs longer cooking times. Many recipes and package instructions assume a particular wattage, so a lower-powered microwave may need extra time. If your retro model is modest in power, plan to adjust times and stir or rotate food partway through.
Even heating depends on more than wattage. The turntable, the cavity shape and the way the microwaves are distributed all play a part. Cold spots are normal in many microwaves, which is why instructions often call for standing time. Let food rest after heating so the temperature evens out, and stir liquids and thick foods to avoid hot pockets. Always use microwave-safe containers and follow food safety guidance on heating leftovers thoroughly.
Do not expect a stylish microwave to offer every feature. Sensor cooking, convection and inverter technology are more common on modern mainstream models, and a retro design may keep things simple. That is often a plus for reliability and ease of use. If a particular function matters, such as a defrost setting or a child lock, check the listing before you buy. When specifications are missing, ask the seller or choose a model with clearer information.
Placement, Ventilation and Electrical Needs
Where the microwave goes affects safety and longevity. Place it on a stable, level surface that can support its weight, away from the edge of the counter and out of reach of small children. Leave the clearance the manual specifies around the vents, often at the sides, back and top. A retro body with a rounded or deep shape may make it tempting to push it into a tight nook, but blocked vents can lead to overheating.
Keep it away from heat and moisture. Avoid placing a microwave directly beside a stove, next to a sink where it could be splashed, or under a cabinet with too little headroom. Do not stack items on top that might block ventilation or fall off. If you plan to use the microwave on a cart or shelf, make sure it is stable and rated to carry the load.
Electrical needs are simple but important. Plug it into a suitable outlet, ideally one that is not shared with other high-demand appliances, and avoid extension cords unless the maker approves them. Check the cord length against your layout so that you do not stretch the cord across a walkway. Look at the plug and the cord from time to time for damage. If the microwave trips a breaker or the lights dim when it runs, consult an electrician. Never operate the oven if the door does not close correctly or the seals look damaged.
Cleaning, Finish Care and Replacement Signs
Retro finishes can be delicate. Painted, glossy or colored surfaces and chrome-style trim can scratch or dull with abrasive pads and harsh cleaners. Use a soft, damp cloth with mild soap, dry the surface and avoid sprays that run into the vents or controls. Wipe up splashes right away so they do not stain or bake on. For dials and buttons, a barely damp cloth is enough, and avoid pushing moisture into the gaps.
Inside, steam softens stuck-on food. Heat a bowl of water for a short time, let it stand, then wipe the interior. Clean the door seal and the edges where the door meets the frame, since food debris can interfere with closure. Wash the turntable and roller ring according to the manual, and replace them correctly. Occasionally check for odor and wipe the cavity with a mild solution if needed.
Know when to retire it. Signs include a door that does not latch or has a bent hinge, sparks or arcing, a cracked or damaged interior surface, a turntable that no longer turns, heating that is clearly weaker than before, unusual noises or burning smells, and a damaged cord. Microwave ovens contain high-voltage parts, so do not attempt to open the casing or repair it yourself. If a problem appears, stop using the oven and contact the maker or a qualified technician. Dispose of old units according to local rules.
Why Style Deserves a Place in the Decision
A microwave sits in plain view for years, so it makes sense to care how it looks. A pastel or chrome finish can lift an otherwise plain counter and give the room a cheerful focal point. Style should not outrank function, though. The happiest owners pick a design they love and then confirm that size, controls and placement suit daily use. Treat looks as one factor among several, and you avoid regret later. If two models seem equal on practical points, let the color and shape break the tie, since you will see it every day.
A Checklist for Choosing a Retro Microwave
Looks drive the purchase, but a few practical checks keep the result enjoyable. Run through these before you commit to a color.
- Match the color to your kitchen under real light, since photos can shift hues on screen.
- Measure the counter spot and add room around the sides and top, following the manual for clearances.
- Check interior volume and turntable size against the plates and containers you use.
- Decide whether you like dial controls, push buttons or a mix, and look for clear labels.
- Look at the finish description, whether painted metal, enamel or plastic trim.
- Read the warranty and support details from the maker listing.
The Galanz, Smeg, Daewoo, Commercial Chef, Magic Chef and Emerson options all lean on vintage styling, but they differ in size and features. A smaller unit suits a compact kitchen, while a larger one handles family dishes. Think about how often you cook with it, not just how it looks.
Dial Controls Compared With Push Buttons
One of the charms of a retro design is its control style. Here is a plain comparison so you know what you are choosing.
| Control style | Feels like | Consider |
|---|---|---|
| Mechanical dial | Simple, nostalgic and quick to twist | Less precise for exact times |
| Push buttons | Familiar and often more presets | Takes a few moments to learn the layout |
| Mixed controls | Dial for time, buttons for functions | Check the manual for each function |
Dials suit people who just want to warm leftovers and boil water for tea. Buttons suit those who use presets for popcorn, defrosting or similar tasks. Read how each model labels its controls on the listing, and check images for readability. A retro look is nice, but you will touch the controls every day.
Mistakes That Spoil the Retro Look
The first mistake is ignoring the finish. Painted and colored surfaces can scratch or dull when cleaned with harsh pads or strong products. Use a soft cloth and the cleaner type the maker recommends.
The second is poor placement. Putting a stylish microwave in direct sun or beside a hot cooktop can fade or stress the finish over time. Pick a spot with steady conditions and enough space for ventilation, as the manual describes.
People also buy on color alone and forget capacity. A small cavity might look cute but struggle with a wide dinner plate. Measure your most-used dishes and compare them with the interior size on the listing.
Finally, avoid putting anything in the microwave that the maker warns against. Metal, certain containers and sealed items can cause trouble, so read the use and care section of the manual. When in doubt, choose a dish labeled as microwave safe by its own maker, and ask the support team of your microwave brand if something is unclear.
Matching the Kitchen Around It
A retro microwave looks best when the rest of the room supports the theme. You do not need a full renovation, though. A matching kettle or toaster, a few coordinated canisters or a simple mat on the counter can tie things together.
Think about the wall behind the microwave and the cabinets nearby. A soft pastel unit might sit nicely against white tile, while a bold red one could stand out on a neutral counter. Take a photo of your kitchen and compare it with the color options before ordering.
Cord length and outlet location matter for style too. A tidy cord run looks better than a tangle, and you should follow the manual about extension cords and power strips. Keep the area around the unit clear of clutter, and give the door room to open fully. With a little planning, the appliance becomes a feature instead of an afterthought.
Building a Retro Kitchen Around One Appliance
A retro microwave is rarely bought alone in spirit; it is usually the piece that starts a kitchen’s personality. The good news is that one strong retro appliance carries a room further than a matched set bought in a hurry. Let the microwave set the color story, then echo it in small, changeable things, a kettle, a bread bin, tea towels, rather than committing every large item to the same shade before you know you love living with it.
Color is the decision to make in the room’s real light. Finishes that glow in a showroom can look flat under a north facing window or shout under warm evening bulbs, so if you can, compare samples or at least photographs of the color in real kitchens. Remember also that the microwave sits at eye level on most counters, more visible than almost any other appliance, which is why its finish and its daily wipe down matter more than for a machine that hides under a counter.
The charm only survives if the appliance works hard without complaint, because nothing kills a style choice faster than a machine the household resents using. That is why this guide weighs capacity, power, and controls alongside the curves and chrome: the retro kitchen that succeeds is the one where the pretty microwave is also simply the microwave everyone reaches for, every day, without thinking about it.
How the Six Picks in This Guide Compare
With six picks on the table, the useful comparison is not which one is best in the abstract but which differences actually reach your daily life. Read the six descriptions above as a set: the Galanz Retro Microwave Oven and the Smeg 50s Retro Style Microwave represent one end of this guide’s thinking, the Daewoo Retro Microwave Oven and the Commercial Chef Retro Microwave sit in the middle ground where most households land, and the Magic Chef Retro Microwave and the Emerson Retro Microwave answer more specific needs. The descriptions already tell you who each one suits and where each one asks you to compromise, so the work here is matching those profiles to your household rather than hunting for a single winner.
Start the comparison with the fixed facts of your situation, because they eliminate picks faster than any preference can. The space available, the route it must travel to get there, the size of your household, and the way you actually shop, cook, and store food are not opinions, and a pick that fails one of them is out however much you like its looks. Only when two or three picks survive those fixed facts do the softer questions, styling, controls, and extra features, deserve your attention, and by then the choice is usually between good options rather than between right and wrong.
Then compare the survivors on the cost of being wrong. If you are torn between the Galanz Retro Microwave Oven and the Emerson Retro Microwave, ask which mistake you would rather live with: the capability you might occasionally miss, or the size, complexity, or upkeep you will deal with every day. Everyday consequences should outweigh occasional ones in almost every purchase like this, which is why this guide keeps returning to your ordinary week as the test. Your biggest shop, your busiest cooking day, and your laziest Sunday are the three scenes to run each finalist through before you decide.
Finally, use the short version at the end of this guide as the tie breaker it was written to be. It compresses each pick into the household it serves best, in one line each. If one of those lines describes your home so exactly that it could have been written about you, that is your answer, and the remaining differences between the picks are details you will adapt to within a week of ownership and never think about again.
Power, Size and What Retro Styling Does and Does Not Change
A retro microwave is a modern microwave in period dress, and the buying decision works best when you judge both halves honestly. The styling is the point of the purchase, so choose the shape, color, and details you will enjoy looking at every day. Underneath, judge it exactly as you would any microwave: the cooking power, the interior size against your dishes, and the controls you will use when you are reheating leftovers at the end of a long day.
Interior capacity deserves a physical check. Take the largest dish or mug you actually microwave and confirm it fits and turns, or fits the way the model is designed to hold it. Compact retro models suit reheating, drinks, and single portions beautifully, but a household that regularly reheats a family casserole or a full dinner plate needs the interior to match that habit, not the smaller one the styling suggests.
Controls are the daily interface and retro designs split between dials and buttons. Dials are quick, tactile, and easy to wipe clean, and they suit simple reheating habits perfectly. Buttons and presets add precision for defrosting by weight and multi stage cooking. Neither is better in the abstract; the right answer is the one that matches how you cook, chosen before the color chart comes out, not after.
Placement, Ventilation and Counter Life
Countertop microwaves need air around them, and retro models are no exception despite looking like solid little cabinets. Leave the clearances the manual describes at the sides, back, and top, keep the vents uncovered, and think twice before pushing the unit tight under a low cabinet where steam from every mug of tea will rise into the cupboard above. A microwave that can breathe runs cooler, lasts longer, and steams up its surroundings less.
Consider the door swing and the surface in front. The door needs room to open fully and you need room to set down a hot dish straight from the cavity, ideally without crossing the kitchen holding it. A heatproof mat or trivet living permanently beside the unit sounds like a small thing until the first time you lift out a bowl of soup with nowhere planned to put it.
Power supply is simple but worth a glance. Plug the microwave into its own suitable outlet rather than a crowded strip of adapters shared with a kettle and a toaster, keep the cord from trailing across the hob or the sink, and if the unit will live in a rental or an older kitchen, check that the circuit handles a microwave alongside whatever else runs at breakfast time.
Cooking Evenly in a Small Cavity
Microwaves heat unevenly by nature, and small cavities make technique matter more, not less. Arrange food in a ring with the center emptier, since the middle heats slowest, stir or turn food partway through when the dish allows it, and let food stand after the cycle so the temperature evens out and finishes the job. Standing time is cooking time with the door closed, and skipping it is the main reason reheated food has icy and scalding patches in the same bowl.
Covers help when they are the right kind. A microwave safe cover or an upturned plate traps steam that keeps food moist and speeds even heating, while sealed containers build pressure and films that touch food can misbehave. Vent whatever you cover, use only containers and wraps labeled for microwave use, and never put metal, foil trims, or the decorative metallic edging some retro style crockery carries anywhere near the cavity.
Defrosting rewards patience over power. Use the defrost setting or a low power level, separate pieces as soon as they loosen, and remove portions that have thawed so they do not start cooking while the center is still frozen. For the small quantities a compact microwave usually handles, this gentle approach gives noticeably better results than blasting on full power and hoping.
Cleaning and Keeping the Finish Looking Good
The painted finishes and chrome details that make a retro microwave charming also ask for gentler cleaning than a plain steel box. Wipe the exterior with a soft, damp cloth and mild detergent, dry it to keep the shine, and keep abrasive pads and harsh sprays away from the paint and trim. Steam and splashes left to sit are what dull finishes over time, so a quick wipe after a messy cook protects the look you paid for.
Inside, steam is your cleaning tool. A bowl of water heated until the cavity steams loosens dried splashes so they wipe away with a cloth, and a little lemon in the water helps with odors. Clean the turntable and its support separately in the sink, dry them, and make sure they sit back correctly, because a turntable that rocks or sticks leaves food rotating unevenly and heating in patches.
Odors come from old spills, especially under the turntable and around the door seal, where splashes hide. If a smell survives a normal clean, check those hidden places before blaming the machine. Keeping a cover on reheated food prevents most splashing in the first place, and the two minutes saved on cleaning each week quickly outweigh the small effort of covering a bowl.
Everyday Reheating: The Job It Actually Does
For all the features in the brochure, a home microwave’s life is reheating: last night’s leftovers, the mug of tea gone cold, the soup for one. Judging a retro model by that life is the honest test. How fast it brings a mug back without boiling it over, how evenly it revives a plate of leftovers, how intuitive the controls are when you are tired: these unglamorous things are the product, and the styling is the frame around them.
Technique lifts reheating more than power does. Sprinkle a little water over rice and pasta, arrange the plate with the densest items at the edge, cover, and let the food stand. A plate reheated this way at a slightly lower power for a little longer eats like a meal rather than a compromise, and the difference costs nothing but the thirty seconds of standing time most people skip and then blame on the machine.
Safety Habits That Become Automatic
A few habits keep microwave cooking trouble free for years. Never run the unit empty, since the energy has nowhere to go; take care with superheated liquids, which can erupt when disturbed, by not overheating drinks and letting them stand; and keep the door and its seals clean, because the door is the safety system and food soil on the seal is both unhygienic and unhelpful to its fit. None of this is burdensome once it is simply how the household uses the machine.
Children can be taught the same short list: microwave safe containers only, no metal ever, care with steam when a cover comes off, and an adult for anything large, hot, or unfamiliar. A retro microwave’s simple dial, where fitted, is genuinely easier for a supervised child to use correctly than a panel of presets, which is one of the quieter arguments for the simple control layouts in this guide.
A Step-by-Step Way to Make the Final Decision
A disciplined way to finish this decision is to work through it in a fixed order, because the order stops the exciting details from outranking the important ones. First, settle the fixed facts about retro microwaves: the space, the access route, the household it must serve, and the jobs it must do in an ordinary week. Write those down. Any pick that fails a fixed fact is out, and removing it early protects you from falling for a feature list attached to something that will not fit your home or your life.
Second, read the surviving listings the way a skeptic reads them. Check exactly what is included, what is sold separately, what the model name and version actually are, and whether the photograph matches the version described, because ranges like this often sell near identical variants that differ in the one detail you care about. Confirm the dimensions from the specification rather than the headline, and if a detail you need is not stated, treat it as absent rather than assuming the best, since assumptions are where most disappointing purchases begin.
Third, think through delivery, installation, and the first week before you pay. Who brings it in, what must be moved or disconnected, where the old one goes, and what you will check in the first days while returning or exchanging is still simple: these questions cost nothing now and real money later. A purchase of this size should arrive to a plan, not to a surprise, and the households that enjoy their choice longest are usually the ones that planned the boring parts as carefully as they chose the exciting one.
Finally, give the decision a night’s distance if it still feels uncertain. The right pick tends to look right again in the morning, for reasons you can state plainly: it fits, it serves the household’s real habits, and its compromises are the ones you mind least. If you cannot state why a pick is right in two sentences, the hesitation is information, and the comparison sections above will usually show you which of the six answers your situation best.
Practical Notes for Everyday Owners
Match the color decision to the room’s fixed points rather than to a passing trend. Worktops, cupboards, and the kettle you already own are the context the microwave will live in for years, and a color that sits happily with them will please you long after a bolder choice chosen in isolation starts to argue with the room.
Keep the space in front of the microwave sacred. It is the landing zone for everything hot that comes out, and in a small kitchen it is the first space to be colonized by post, fruit bowls, and chargers. A clear foot of counter in front of the door is a safety feature you will appreciate every single day.
If two people in the house use the microwave differently, one reheating drinks and one cooking vegetables and grains, choose the model for the harder job. Capacity and power chosen for the bigger task handle the smaller one effortlessly, while the reverse leaves one of you quietly frustrated for years.
Register the purchase and keep the manual, even for a simple appliance. The manual holds the exact clearances, cleaning guidance for the finish, and the defrost charts for your model, and those specifics are what generic advice online cannot give you when something behaves oddly.
Keep a microwave safe cover living on top of the unit or in the cupboard directly above it. Covers only prevent splashes if they are within reach at the moment of reheating, and the state of the cavity a year from now depends on that small geography more than on any cleaning product.
Note the timings that work in your machine for your three most common jobs, a mug, a plate of leftovers, a bowl of porridge, and keep the note inside the cupboard door. Every microwave heats a little differently, and your own three numbers are worth more than the chart on any packet.
When the microwave eventually retires, its replacement decision will be easy if you have noticed what you actually used: most households use three functions for ninety percent of cooking. Buy the next one for those three, in the color you still love, and the retro kitchen carries on without a beat.
Retro Microwave FAQ
Do retro microwaves heat as well as modern ones?
The heating technology is similar. Check the wattage on the listing, because lower power means longer cooking times.
Are they good for small kitchens?
Many are compact, but retro bodies can be deep and rounded, so measure the space first.
Can I buy a matching set?
Some brands sell matching toasters, kettles and refrigerators. Smeg and Galanz in particular offer wider retro lines.
How do I clean a painted finish?
Use a soft, damp cloth with mild soap and dry it afterward. Avoid steel wool and strong cleaners that could dull the paint.
Are retro microwaves less powerful than modern ones?
Not necessarily. Power varies by model, so check the wattage on the listing and adjust cooking times if it is lower than your recipes assume.
Can I put metal in a retro microwave?
Generally no. Follow the manual for approved containers and avoid metal, foil and dishes with metallic trim unless the maker says it is safe.
How do I stop the paint from fading or chipping?
Use a soft cloth and mild soap, avoid abrasive pads and wipe spills promptly. Keep it away from direct stove heat.
Do dial controls last longer than buttons?
There is no guarantee either way. Dials are mechanically simple, but durability depends on build quality, so check the warranty and listing details.
Will it fit under my cabinet?
Measure the height with the door open and the clearance above the vents. Compare these figures with the product dimensions before ordering.
Why does food heat unevenly?
Microwave energy is distributed unevenly in most ovens. Stir, rotate and let food rest after heating for more even results.
Is it safe to run it empty?
No. Running a microwave empty can damage it, so avoid it and keep a cup of water inside if you are testing.
Does a retro microwave cook as well as a plain modern one?
The cooking technology is the same family of technology, so results depend on power, cavity design, and your technique rather than on styling. A well chosen retro model reheats, defrosts, and cooks everyday food just as a comparable plain model does. Judge it by its specifications and size for your dishes, and let the styling be the pleasure on top of a sound appliance choice.
How do I know if my dishes are microwave safe in it?
Use dishes labeled microwave safe, and be careful with vintage and decorative crockery, which can contain metallic decoration or glazes never meant for microwave use, an ironic trap when the kitchen style is retro. If you are unsure about a dish, heat it empty briefly alongside a cup of water; a dish that gets hot while the water stays cool is absorbing energy itself and should not be used.
Why does the turntable sometimes stop or judder?
Usually the turntable or its support ring is not seated properly, or food debris is caught in the track. Remove the plate and ring, clean the track and the wheels, and refit everything flat. Heavy or oversized dishes that drag on the walls also stall rotation, which is another reason to check your largest dish fits with room to turn before you buy.
Can I install a retro microwave in a cabinet or a shelf nook?
Only if the model is designed or approved for it and the ventilation clearances in the manual can be met. Countertop models are built to breathe into the room, and enclosing one in a tight nook traps heat and steam. Measure the nook, compare it honestly with the manual’s requirements, and choose a different spot if the clearances are not there.
What power level should I use for reheating?
Full power suits drinks and soups, but dense or delicate foods reheat better at a medium setting for longer, which lets heat spread without toughening edges or splitting sauces. Eggs, fish, and anything with cheese or cream especially reward the gentler approach. If your model has a reheat preset you like, note it; consistency is worth more than theory at breakfast time.
How long should a microwave like this last?
With normal home use and basic care, a microwave is a long lived appliance, and the parts that age first are usually door latches, lights, and turntable motors rather than the cooking system. Treat the door gently rather than slamming it, keep the cavity clean, and if the unit ever sparks, makes unusual noises, or runs with the door open, stop using it and have it checked.
Why does food spark occasionally in the microwave?
Sparking usually means metal: a fork left in a dish, foil, a twist tie, or the metallic trim on decorative crockery. Stop the machine, remove the offending item, and check the cavity walls for damage if it happens repeatedly. Certain dense vegetables can also make tiny crackles, but true sparking should always be treated as metal until proven otherwise.
Can I use the microwave to prove dough or soften butter?
Yes, gently. Butter softens in short bursts at low power, checked often, since the line between soft and melted is seconds. Dough can rest in the closed, off microwave with a cup of hot water beside it, using the box as a warm, draft free proving cupboard, a trick bakers have used for years. Neither job needs the microwave to run hard; both use its sheltered space.
Why is the outside of the unit warm after cooking?
Some warmth on the cabinet after a long cook is normal, as the machine sheds the heat of its own workings. What matters is the ventilation: if the unit is boxed in tightly, that warmth builds, so check the clearances in the manual and keep the vents clear. A unit that is too hot to touch, or that smells hot, should be stopped and checked rather than explained away.
Do I need to rotate food if there is a turntable?
The turntable does most of the rotating for you, but large or irregular dishes still benefit from a stir or a turn halfway, and food arranged in a ring heats more evenly than food in a mound. The turntable narrows the hot and cold spots; your arrangement and a pause to stir finish the job, especially with dense foods like lasagne and thick stews.
The Short Version
For the best-known retro name, the Galanz. For a matching set, the Smeg. For a smaller body, the Daewoo. For bold colors, the Commercial Chef. For simplicity, the Magic Chef. For budget style, the Emerson.

