A freestanding soaking tub sits on its own in the room instead of being built into an alcove, which makes it a focal point as much as a fixture. Shapes run from slim ovals to deep rounded bowls, and materials range from acrylic to stone resin and cast iron. This guide helps you sort out what matters before you compare listings.
We have not used these products ourselves, so we do not describe how any tub feels in daily use. What we can do is describe how construction, dimensions and plumbing layout affect the fit in your bathroom. Take measurements first, keep the checklist beside you, and bring the numbers to your installer if you hire one.
As an Amazon Associate we earn from qualifying purchases. Links on this site are affiliate links, and they do not change the information we give.
In this guide
Quick Picks
| Pick | Product | Best For |
|---|---|---|
| Best Overall | WOODBRIDGE 59″ Freestanding Soaking Tub B0102 | Most mid-size bathrooms |
| Best for Small Bathrooms | WOODBRIDGE 54″ Freestanding Tub B1702-MB | Compact footprints |
| Best for Tall Bathers | WOODBRIDGE 67″ Freestanding Tub B0010-BG | Longer, deeper soaks |
| Best Back-to-Wall | Empava 67″ Back-to-Wall Freestanding Tub | Placing the tub against a wall |
| Best Jetted Soak | Empava 59″ Round Whirlpool Tub | A spa-style soak with jets |
Our Picks

1. WOODBRIDGE 59″ Acrylic Freestanding Bathtub B0102 — Best for most bathrooms
The 59-inch length is the middle ground of this lineup: long enough for an adult soak, short enough to leave walking clearance in many primary bathrooms. The listing gives dimensions of 59 by 29.5 by 22.87 inches, so measure that footprint against your floor plan before ordering. The shell is acrylic, which keeps the empty tub light for its size and makes the filled weight easier for older floors to carry than cast iron. A brushed gold overflow and pop-up drain are included in the box, which answers the drain question on the checklist, but like most freestanding tubs it has no faucet holes, so plan on a floor-mounted or wall-mounted filler. Choose it if you want a classic oval soaker at a standard size, with the drain hardware already matched to the tub.

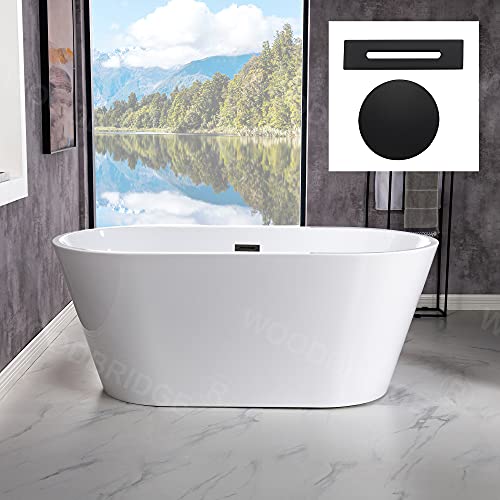
2. WOODBRIDGE 54″ Acrylic Freestanding Bathtub B1702-MB — Best for small bathrooms
At 54 inches long, this is the pick for bathrooms where a standard tub would crowd the room. The listing gives dimensions of 54 by 29.5 by 24 inches and a stated capacity of 55 gallons, so it still holds a useful depth of water for its footprint, and the 24-inch rim height is tall for a tub this short, which helps the soak feel less shallow. Construction is acrylic, with a matte black overflow and drain included, a finish that pairs naturally with black faucet hardware. Because it is shorter, check the interior length against your own height if you like to stretch out fully. It suits condo and guest bathrooms, and anyone whose floor space, rather than budget, is the tightest constraint.

3. WOODBRIDGE 67″ Acrylic Freestanding Bathtub B0010-BG — Best for tall bathers
If you are tall, or you simply like to stretch out fully, the extra length here is the point. The listing measures 67 by 31.5 by 28.38 inches with a 71-gallon capacity, the largest footprint and fill in this group. The shell is acrylic, and a brushed gold overflow and drain are included. Run the filled-weight check from the guide before you commit: 71 gallons of water alone weighs roughly 590 pounds, before the tub and the bather, so upper floors and older framing deserve a builder’s opinion first. The taller 28.38-inch sides also mean a higher step over the rim. Pick it for a spacious primary bathroom where the tub is meant to be the centerpiece of the room.


4. Empava 67″ Back-to-Wall Freestanding Bathtub — Best for placing against a wall
Not every bathroom can float a tub in the middle of the floor. This Empava has a flat back side designed to sit against the wall, so you keep the freestanding look while giving up clearance on only three sides. Exterior dimensions are 66.93 by 30.71 by 22.83 inches. The body is 100 percent glossy white acrylic reinforced with fiberglass, and a chromed drain and overflow are included. The long 67-inch body still suits taller bathers, while the back-to-wall layout can simplify where the filler and drain lines run, subject to your installer’s plan. Choose it when the layout, not the soak, is the problem: long narrow rooms, or a remodel that keeps the plumbing near the existing wall. It is still a full-length tub, so confirm the 67-inch body clears your door swing and leaves walking space at the foot end before ordering.

5. Empava 59″ Round Whirlpool Bathtub — Best for a jetted, spa-style soak
This is the spa end of the range: a round 59-inch tub with hydromassage jets. The listing gives dimensions of 59 by 59 by 25.59 inches and a 100-gallon capacity, so it needs a genuinely open floor area, and the round shape suits two bathers sitting across from each other better than a long oval does. A waterfall faucet is built in, which removes the separate filler purchase most freestanding tubs require, and the drain sits on the right side. As a powered jetted tub it needs an electrical supply as well as plumbing, so it belongs in a planned remodel rather than a quick swap. Pick it if jets and an included faucet matter more to you than a simple, quiet soak.
View Empava 59″ Round Whirlpool Bathtub on Amazon
What to Look For
| Factor | Why it matters | What to check |
|---|---|---|
| Footprint | The tub must fit the room with space left to walk around it and open doors. | Measure length, width and the clearance you want on every side. |
| Interior depth | Depth to the overflow decides how much water covers you when seated. | Look for the maker’s stated depth to the overflow, not only the outer height. |
| Material | Acrylic, resin composite and cast iron differ in weight, surface feel and how they hold warmth. | Read the construction notes and the care instructions for cleaners. |
| Weight when filled | Heavy tubs load the floor, especially on upper levels or older framing. | Add the empty weight, the water volume and a bather, then ask a builder about the floor. |
| Drain and overflow | Placement affects whether the tub suits your existing plumbing or needs new rough-in work. | Check if the drain sits at one end or the center, and whether it is included. |
| Faucet arrangement | A freestanding tub often needs a floor-mounted or wall-mounted filler bought separately. | Confirm the tub has no faucet holes and plan the filler type and location. |
Setup and Care Tips
- Have a licensed installer confirm floor support and drain position before the tub arrives.
- Unpack carefully and inspect the surface in good light for scratches before signing off on delivery.
- Level the tub with its adjustable feet or shims, then check again after it is filled.
- Clean with the non-abrasive products the maker recommends and rinse the surface well.
- Wipe the rim and base dry now and then so water does not linger around the joints.
Mistakes to Avoid
- Ordering from a photo without checking the doorway and stair width for delivery.
- Forgetting to set aside space and plumbing work for a separate filler.
- Ignoring the filled weight when the bathroom is on an upper floor.
- Choosing a rim that is too wide or too tall for the filler you plan to use.
- Using harsh scouring powders that may dull or mark the surface.
Measuring the Room Before You Fall for a Shape
A freestanding tub looks lovely in a showroom and can feel enormous in a real bathroom. The footprint is only the beginning. You also need space to walk around the tub, to clean behind it and to use the door without bumping into the rim. Many bathroom guidelines suggest keeping clear space around fixtures, and local building codes may set minimum distances, so check the rules where you live.
Grab a tape measure and a roll of masking tape. Mark the outline of the tub on the floor and live with it for a day. Walk through the room, open the door and imagine a towel rail, a bath mat and a stool in the space. If the outline feels cramped, a smaller or slimmer model may suit you better. Note too the ceiling height, window position and radiator or vent locations.
Interior Depth, Slope and How You Sit
Two tubs with the same outside length can feel very different inside. Wall thickness, interior depth and the slope of the back all change how you sit. A steep, upright back gives a deep, enveloping soak, while a gentler slope is more relaxed and easier to climb into. Look for descriptions of the interior and, when the listing states a water capacity or overflow depth, compare them.
Who Needs Extra Length
Taller bathers often want to stretch out, and a longer interior helps. Check the interior dimensions in the listing, since outside length includes the thick rim.
Who Needs Easier Access
Anyone with limited mobility should consider the height of the rim and how easy it is to step over. Talk to a professional about grab bars and safe surfaces.
Floor Strength and Structural Questions
A tub filled with water and a bather is heavy. Before you commit, find out whether your floor is suited to the load. Concrete slabs are usually less of a concern than upper-storey timber floors, but every house is different. Ask a licensed builder or structural engineer, particularly for older homes or upper floors, and follow their advice. Do not rely on guesswork for structural matters, and check the weight figures given by the maker in the listing or manual.
Drain Position and Plumbing Rough-In
Many freestanding tubs need the waste pipe to line up with the tub’s drain. The position of the drain in the floor, the trap and the overflow all affect how simple the installation will be. If you are replacing an old tub, the existing plumbing may not match the new one. A plumber can adjust the pipework, but that adds work. Compare the drain location in the listing with the floor layout, and ask the installer to confirm the fit before you buy.
- Check where the drain sits relative to the tub’s centre.
- Confirm the drain size and type the tub requires.
- Ask about access to the pipes for later maintenance.
Filling the Tub: Faucet Styles and Positions
A freestanding tub needs a way to fill. Options include a floor-mounted faucet standing beside the tub, a wall-mounted spout and a deck-mounted fitting on the rim, where the tub design supports it. The faucet has to reach the tub, and the spout should deliver water where it will not splash on the floor. Faucet types often are sold separately, so check what is included in the listing. Match the faucet height to the tub’s rim, and ask a plumber to check the supply lines and valves, because a filling system needs proper installation and compliance with local rules.
Materials Compared in Everyday Terms
| Material | Everyday character |
|---|---|
| Acrylic | Light enough to move, smooth surface, many shapes |
| Stone resin | Heavy feel, matte or solid look, takes time to clean certain marks |
| Cast iron | Very heavy and sturdy, needs a strong floor |
| Fibreglass blends | Lightweight options with varied finishes |
Whichever you pick, read the maker’s cleaning advice. Some finishes dislike abrasive cleaners or certain chemicals, and using the wrong product can leave marks.
Water Volume and Your Hot Water Supply
A deep tub can hold a lot of water, and filling it takes a good deal of hot water. If your water heater is small, a full soak may use up the supply before the tub is ready. Look for the capacity figure in the listing, which may be stated up to the overflow, and compare it with your heater’s size in its manual. Remember that a bather displaces water, so real fill levels differ from the figure.
Filling speed depends on your pipes and the faucet’s flow. A plumber can tell you whether your supply lines suit a large tub. Think about the practical side as well: how long does it take to fill, and is that acceptable on a busy evening?
Comfort Details That Make Soaking Better
Small touches add up. A rim wide enough to hold a book or a tray, a back that supports your neck, a smooth interior that feels pleasant and an overflow that does not dig into your skin all matter. Try to sit in a similar tub in a showroom if you can, or look at interior dimensions and slope descriptions in the listing.
- Check whether the rim is flat enough to hold a tray.
- Consider adding a bath pillow if the back is steep.
- Look at the colour of the interior, since white shows dirt and shows off clean water.
- Choose a mat with grip for the floor beside the tub.
Ventilation, Light and Surrounding Surfaces
Hot baths put moisture into the air, which can affect paint, wood and plaster over time. Make sure the room has a working extractor fan or an openable window, and run it during and after bathing. Choose wall and floor finishes that tolerate humidity, such as tile or moisture-resistant paint. Place lighting where it will not glare at someone lying back; soft wall lights and dimmable ceiling fixtures are popular. Electrical fittings in bathrooms must meet local safety rules, so hire a licensed electrician for any lighting work.
Styling the Space Around the Tub
A freestanding tub is a statement piece, and the space around it deserves thought. A small table or stool holds towels and candles in battery-powered form, a rug with a rubber backing adds warmth underfoot, and a wall shelf keeps bottles off the rim. Place the tub so that it looks good from the doorway, because that is the view you will see most often. Keep the area around the drain and the faucet free of clutter for easier cleaning.
Jets, Whirlpool Features and Added Needs
A jetted tub brings pumps, pipes and electrical connections. That means more installation work, a place to reach the pump for service and an electrical supply installed to local rules by a licensed electrician. If you want a jetted model, check the listing for what it includes and what you must add. For a plain soaking tub, none of this applies, and the installation is simpler.
Positioning Options: Centre, Corner and Against a Wall
Where the tub sits changes both the look and the practical details. A central position under a window creates a dramatic focal point but demands a plan for floor-mounted plumbing and plenty of space for cleaning on all sides. A corner placement saves floor area and may suit smaller rooms, while a position against a wall makes plumbing and cleaning simpler. Some models are designed with a flat back for wall placement, and the listing should say so.
Questions to Ask Yourself
- Will anyone need to walk around the tub every day?
- Do you want water supply pipes visible or hidden?
- Can you reach the back and sides with a cloth?
- Is there a risk of the tub blocking a door, vent or access panel?
Worked Example: Comparing Three Shapes for a Medium Bathroom
Imagine a bathroom with a clear floor area of about three metres by two. A long oval tub fits along one wall and leaves a generous aisle, but it takes the whole length of the room. A round tub occupies a compact square in one corner, leaving space for a vanity. A slim rectangular tub with a flat back sits snugly against a wall and leaves the middle of the room open.
The oval looks graceful and offers a long soak. The round tub is cosy and good for sitting upright, though less suited to stretching. The rectangular option feels modern and is easy to clean around. Weigh these trade-offs against your habits: do you soak to stretch out, to read upright, or to share the room with others?
Cleaning Habits That Suit Each Finish
A soft cloth and mild cleaner are the safest first choice for most finishes, but always follow the maker’s instructions. Rinse the tub after use to prevent soap film, wipe the rim to remove splashes and keep the drain clear with a hair catcher. Avoid scouring pads or harsh powders on glossy surfaces unless the maker says they are acceptable, since scratches collect dirt. For matte finishes, mild soap and a soft brush usually serve well. Keep metal drain parts dry where possible to protect their finish.
Bringing the Tub Home: Delivery and Handling
Large tubs are awkward to carry. Measure doorways, hallways, stair turns and the bathroom door before delivery day. Clear a path, protect the floor and ask whether the delivery team will take the tub into the room. Unpack carefully and inspect the surface for chips or scratches before the delivery crew leaves, then take photos of any damage and contact the seller promptly. Keep the packaging until the tub is installed.
Warranty Papers and Documentation
Keep the manual, the invoice and any installation notes in one folder. If a problem appears later, such as a crack, a finish defect or a drain fault, these papers help you explain what happened and when. Photograph the tub on installation day, including the underside and the drain area if it is visible. Read the maker’s terms about installation, because some require a licensed tradesperson for the warranty to apply.
Troubleshooting After Installation
Water Drains Slowly
Check the drain for hair and debris and ask the installer whether the pipe slope is correct.
The Tub Feels Wobbly
Look at the feet or base. Many tubs have adjustable feet that should be set as the instructions say.
Cold Surfaces
Run a little warm water in the tub before you fill it, which many people find makes the surface more comfortable.
Glossary
- Freestanding: placed away from walls on its own base.
- Overflow: an opening that prevents water from spilling over the rim.
- Rough-in: the pipework installed before the fixtures.
- Trap: the curved pipe that holds water to block drain odours.
- Soaking depth: the water level reachable before the overflow.
Planning Checklist
- Mark the footprint on the floor.
- Check the floor load with a professional.
- Confirm drain position and faucet type.
- Measure the route for delivery.
- Read cleaning instructions for the material.
- Book qualified tradespeople for plumbing and electrical work.
With each item checked off, the bathroom you picture is much closer to the bathroom you will actually get.
Choosing a freestanding soaking tub in More Depth
The shortlists and tables earlier in this guide narrow the field, but the final choice between similar freestanding soaking tubs usually comes down to a handful of practical details that listings present unevenly. The points below dig into those details one at a time. None of them requires specialist knowledge; they require an honest look at your space, your routine and the people who will share the purchase with you. Work through them in order and you will usually find that one of the picks above separates itself from the rest for reasons that have nothing to do with marketing.
Interior Dimensions Over Exterior Ones
Catalogue dimensions describe the outside of the tub, but you bathe in the inside. Length at the base, backrest slope and how much of you the water covers decide comfort far more than the headline size. Taller bathers should look hard at interior length and depth to the overflow; a deep, shorter tub can soak you better than a long, shallow one. If two people will ever share it, interior width at the shoulders is the number that matters. Treat this as a deciding factor only when it matches how you will actually use the purchase week after week, not just on the first day. A feature that solves a problem you genuinely have is worth prioritising, while the same feature is wasted money and extra bulk when your routine never calls on it. Compare the picks above on this point before you look at anything else on the listing.
Getting It Through the Door
Freestanding tubs are single, rigid pieces that must travel from the street to the bathroom through your actual doors, halls and stairs. Measure the narrowest point on that route, including turns, before falling for a large model. Many a perfect tub has been defeated by a standard doorway. Delivery terms matter too: kerbside delivery of a heavy tub still leaves you moving it, so plan people and protection for floors. It helps to decide your position on this before you start comparing models, because listings are written to make every version sound essential. Write down what your space, your routine and your household actually demand, then check each pick against that short list. Anything that fails a genuine requirement can be crossed off early, which makes the remaining choice much simpler.
Floor Strength and Drain Position
A filled tub with a bather is one of the heaviest loads in a house, concentrated on a small footprint. Upper-floor installs deserve a structural check, and every install needs the drain position planned against the tub’s drain location, since freestanding designs give less fudge room than alcove tubs. Flexible drain kits solve many layouts, but knowing your floor drain position before ordering is what separates a smooth install from a replumb. Shoppers often notice this detail only after the first week of use, when returning or exchanging is at its most inconvenient. Reading the product description and the manual-style information on the listing with this one point in mind takes a few minutes and prevents the most common source of disappointment. When two picks look equal elsewhere, let this be the tie-breaker.
Material Feel and Heat Retention
Acrylic is warm to the touch, light and forgiving to install; heavier composite and cast materials feel more substantial and may hold heat differently, at the cost of harder handling. All benefit from the same habit: fill hot, and the tub will not steal the first minutes of warmth the way a cold, heavy shell can. Judge material by weight, care needs and feel rather than by prestige. There is usually a trade-off hiding here, and the honest version of it is that you cannot maximise everything at once. Decide which side of the trade-off suits your home and accept the compromise on the other side deliberately rather than discovering it later. The picks in this guide differ from each other on exactly this kind of point, which is what makes the comparison table worth a second look.
Faucet Style Is Part of the Purchase
A freestanding tub needs a floor-mounted filler, a wall-mounted spout within reach, or a deck-mounted set on a wide rim, and each choice has plumbing and cost implications. Floor fillers look superb and need floor plumbing planned early. Decide the filler at the same time as the tub, check that the spout reach clears the tub rim, and budget for it as one project, because it is. A practical way to judge this is to picture the busiest, least convenient day on which you will still want the product to work well. If it copes with that day, it will cope with ordinary days easily. If it only works when everything is calm, tidy and unhurried, it will frustrate you in real life no matter how good it looks in photographs.
A freestanding soaking tub in Real Life: Situations Worth Planning For
Specifications and feature lists only tell half the story. The other half is how a freestanding soaking tub fits the situations your household actually creates, including the awkward ones that never appear in product photographs. These are the scenarios readers most often say they wish they had thought about before ordering.
A Compact Bathroom That Still Wants a Bath
Shorter, deeper tubs exist precisely for this: they trade length for soaking depth, so you sit deeper rather than stretch out. Placed carefully, a compact freestanding tub can even make a small room feel less boxed-in than an alcove bath with panels. Measure the filler position twice, because small rooms leave no spare inches for a floor filler that lands wrong. In this situation the differences between the picks stop being abstract and become easy to rank, because one or two features suddenly matter more than everything else on the list.
A Long Soak as a Daily Ritual
If the bath is your main way of unwinding, prioritise interior depth, a backrest angle you can lean into for half an hour, and water capacity your hot water system can actually supply. A ledge or nearby stool for a book and a drink sounds trivial until the first bath. In this scenario, jets are optional extras; depth and comfort are the product. Planning for this case in advance usually costs nothing, but discovering the mismatch after purchase is what leads to returns, workarounds and money spent twice.
Placing the Tub Against a Wall
Back-to-wall designs give the freestanding look with easier plumbing and cleaning, since there is no narrow gap behind the tub collecting dust. They suit rooms where a centre placement would crowd the door swing or the path to the basin. You give up the full island look and gain a bathroom that is simpler to live with every day. If this sounds like your household, weight the buying criteria above toward durability and ease of everyday handling rather than toward the longest feature list.
A Spa-Style Bath With Jets
A jetted tub adds pumps, power supply, access for servicing and more thorough cleaning to the project. It suits bathers who genuinely love whirlpool bathing and will maintain it. If you soak rarely, the simpler soaking tub delivers most of the pleasure with none of the upkeep, and the honest self-test is how often you used jets in hotels versus how often you just had a bath. In this situation the differences between the picks stop being abstract and become easy to rank, because one or two features suddenly matter more than everything else on the list.
Getting Set Up and Using It Well, Step by Step
The order below follows the sequence most owners settle into after the first few uses. It avoids the two classic beginner errors: rushing the first setup, and only reading the instructions after something has already gone wrong.
Step 1: Measure the room and the route. Record the bathroom space, the drain position, and every doorway and turn between the street and the room. Check both before ordering anything.
Step 2: Decide placement and filler together. Mark the tub outline on the floor with tape, stand the filler position, and walk around it. Live with the tape through a day of using the bathroom.
Step 3: Prepare floor and plumbing. Have the floor checked for strength and level, and the drain and supplies roughed in to the positions the chosen tub and filler require.
Step 4: Dry-fit before final fixing. Set the tub in place, connect the drain loosely, check level and stability, and confirm the filler clears the rim before anything is sealed.
Step 5: Fill-test before sealing fully. Run water in, check every joint for leaks, sit in the filled tub to confirm the floor feels solid, then complete sealing and finishing.
Step 6: Keep the paperwork. File warranty, care instructions and the exact model details together; future plumbers and sealant choices will thank you.
Care, Cleaning and Long-Term Ownership
Daily care for a modern tub is gentle cleaning and nothing more exotic. Rinse after use, wash with a soft cloth and a mild, non-abrasive cleaner, and dry the rim and filler so water spots do not build into scale. Abrasive powders and scouring pads dull acrylic and composite finishes permanently, and the damage shows most on the glossy surfaces that made the tub attractive.
Jets, where fitted, need their own routine: run the system as the maker directs with plain water after use, and deep-clean the pipework periodically with a product made for jetted tubs, because the hidden pipework is where residue accumulates. A jetted tub that is never flushed will eventually blow specks into the bath, which is a maintenance backlog, not a mystery fault.
Protect the install around the tub as well. Check the sealant line at the floor and any wall junction each season, confirm the tub still sits without rocking, and keep the floor drain area accessible. Heavy bottles dropped in the tub are the usual cause of chips; small chips in many materials can be repaired with a suitable kit if caught early, so inspect after any impact rather than discovering damage months later.
How the Picks Compare With Each Other
Readers often ask for the picks to be set directly against one another rather than described one at a time. The comparison below uses only what this guide has already said about each model: its position in the Quick Picks table, the job it is listed as best for, and the strengths and limits covered in its review above. It is a way of double-checking a shortlist, not a new ranking.
WOODBRIDGE 59″ Freestanding Soaking Tub B0102 appears in the Quick Picks table as the choice for most mid-size bathrooms. The mid-size all-rounder of the list, sized for the common bathroom and the common bather, which is why it anchors the table. If that description matches the job you described for yourself in the criteria sections above, it is the natural starting point; if it does not, the honest answer is that a neighbouring pick will serve you better even if this one caught your eye first. Re-read its full review above with your own situation in mind before deciding, because the limitation noted there matters more to some households than to others.
WOODBRIDGE 54″ Freestanding Tub B1702-MB appears in the Quick Picks table as the choice for compact footprints. The shorter length is a deliberate trade: less stretch, in a footprint that fits rooms the bigger tubs cannot enter. If that description matches the job you described for yourself in the criteria sections above, it is the natural starting point; if it does not, the honest answer is that a neighbouring pick will serve you better even if this one caught your eye first. Re-read its full review above with your own situation in mind before deciding, because the limitation noted there matters more to some households than to others.
WOODBRIDGE 67″ Freestanding Tub B0010-BG appears in the Quick Picks table as the choice for longer, deeper soaks. The longest and deepest direction in the group, for bathers who measure a soak by full immersion. If that description matches the job you described for yourself in the criteria sections above, it is the natural starting point; if it does not, the honest answer is that a neighbouring pick will serve you better even if this one caught your eye first. Re-read its full review above with your own situation in mind before deciding, because the limitation noted there matters more to some households than to others.
Empava 67″ Back-to-Wall Freestanding Tub appears in the Quick Picks table as the choice for placing the tub against a wall. Back-to-wall placement is its defining practicality, simplifying plumbing and cleaning while keeping the freestanding look from the front. If that description matches the job you described for yourself in the criteria sections above, it is the natural starting point; if it does not, the honest answer is that a neighbouring pick will serve you better even if this one caught your eye first. Re-read its full review above with your own situation in mind before deciding, because the limitation noted there matters more to some households than to others.
Empava 59″ Round Whirlpool Tub appears in the Quick Picks table as the choice for a spa-style soak with jets. The jetted outlier: it answers a different wish, spa bathing at home, with the maintenance that wish honestly involves. If that description matches the job you described for yourself in the criteria sections above, it is the natural starting point; if it does not, the honest answer is that a neighbouring pick will serve you better even if this one caught your eye first. Re-read its full review above with your own situation in mind before deciding, because the limitation noted there matters more to some households than to others.
Ownership Details Worth Settling Early
Plan the first bath as part of the project, not an afterthought. Check the filler reach with the tub in place, run the water to the temperature you like, and note how long filling takes and how the level sits against the overflow with you in it. Small disappointments, a spout that dribbles onto the rim, a drain that gurgles, are cheapest to correct while the installers and the paperwork are still warm.
Think about the room’s other surfaces before the tub arrives. A freestanding tub splashes more than an alcove bath by design of its use, so flooring, skirting and nearby painted walls should tolerate water, and a bath mat with real grip belongs in the budget. Towel warming, a stool that will not mind damp, and lighting that flatters rather than interrogates all complete the room the tub is meant to create.
It is also worth deciding, before the purchase arrives, where its accessories and consumables will live. A freestanding soaking tub ownership always accumulates small companions: tools, spares, cleaning items, attachments or paperwork, and when they have a home the routine stays tidy and the product stays easy to use. When they do not, they migrate into drawers and boxes and are effectively lost. A single labelled box or shelf section near where the product is used is the whole system, and setting it up on delivery day is far easier than retrofitting order onto a year of drift.
Finally, give any new purchase a fair settling-in period before judging it. The first uses of a freestanding soaking tub involve unfamiliar routines, and many early irritations turn out to be habits that adjust within a fortnight, while genuine faults show a consistent pattern that does not improve. Use that period deliberately: follow the manual’s routine exactly, note what actually bothers you and when, and you will know by the end of it whether you are looking at a learning curve, a setup error you can fix, or a real problem to raise with the seller while the paperwork is still fresh.
FAQ
Is a freestanding tub harder to install than a built-in one?
It can be, because the drain and supply lines are often run through the floor and the filler is a separate part. A plumber can tell you what your existing layout allows.
Does the material change how long water stays warm?
Makers of heavier materials often say they hold heat longer, while lighter materials warm up faster to the touch. Treat those statements as the maker’s claims and compare the construction details for yourself.
How much water does a freestanding soaking tub use?
Capacity varies a lot with size and depth, and the listing figure is usually to the overflow, which is more than you will use with a bather displacing water. The practical check is your hot water supply: a deep tub filled mostly with hot water can empty a small tank before it is full. Compare capacities between models and think about your cylinder or heater, not just the tub.
Can a freestanding tub go on an upper floor?
Often yes, but the filled weight is substantial and concentrated, so the floor structure must be checked, ideally by a builder or engineer, especially in older houses or where joists have been cut for plumbing. Position over load-bearing walls helps. Treat the check as a normal part of the project rather than an optional worry.
Are freestanding tubs comfortable for tall people?
They can be, if you choose by interior length and depth rather than outside size. A deep tub lets a tall bather sit with water to the shoulders even without full leg stretch, and backrest angle matters as much as inches. If possible, sit in a showroom tub of similar interior dimensions; it is the one product where a physical test tells you more than any listing.
How do I clean behind a freestanding tub?
With difficulty, which is why placement matters: leave enough gap to reach with a slim mop or cloth, or place the tub close enough to the wall that the gap traps nothing, or choose a back-to-wall design that removes the gap entirely. Decide this before installation, because moving a plumbed tub to clean behind it is not a realistic routine.
Do I need a floor-mounted faucet?
Not necessarily. Floor-mounted fillers are the classic pairing, but wall-mounted spouts work where the tub sits near a wall and the reach is sufficient, and some tubs accept deck-mounted taps on a wide rim. Each route has different plumbing costs and positions, so the filler decision belongs in the same conversation as the tub and the room layout.
What is the difference between a soaking tub and a normal bath?
A soaking tub is deeper, designed for sitting immersed up to the shoulders, often with a smaller footprint and a more upright backrest than a standard bath built for reclining and quick daily use. The experience is closer to a hot tub’s still soak than to a conventional bath. If you mostly shower and bathe occasionally, depth is exactly what makes the occasional bath feel worthwhile.
How long does a freestanding tub take to fill?
It depends on the tub’s capacity and your water pressure and filler size, and deep soaking tubs take longer than standard baths, which is worth knowing before a spontaneous soak becomes a twenty-minute wait. A high-flow filler shortens it considerably. Run the hot supply’s capacity into the calculation too: a tub that takes longer to fill than the hot water lasts is a design problem, not a patience test.
Can I install a freestanding tub where an alcove bath was?
Often yes, and it can transform the room, but the drain position, floor finish beneath the old bath and the filler arrangement all need attention, since alcove baths hide unfinished floor and wall that a freestanding tub exposes. Budget for making good those surfaces, and have the floor checked where the new tub’s feet will stand, which may not be where the old bath spread its weight.
The Short Version
Begin with the room measurements and the floor, then match depth, material and drain position to your plumbing. Plan the filler as part of the purchase, and keep delivery access in mind.