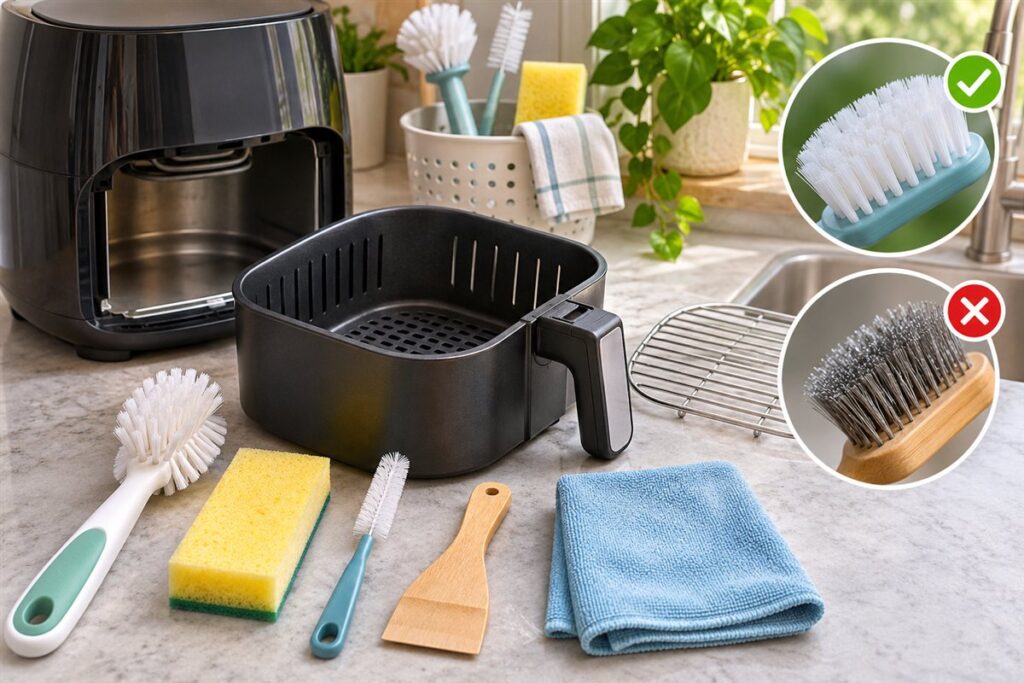
A small set of tools is enough to keep an air fryer clean: a soft brush, a non-scratch sponge, a narrow tool for corners and a cloth for wiping. Choose soft bristles for coated surfaces, and avoid anything sharp or rough. Always unplug the unit and let it cool before you clean.
The Basic Tool Kit
- Soft bottle or dish brush: reaches into the basket and the corners of the drawer.
- Non-scratch sponge: lifts residue from flat surfaces.
- Narrow detail brush: clears gaps around the rim and handle.
- Soft cloth or paper towel: wipes the outside and dries parts.
- Wooden or plastic scraper: loosens baked-on bits without gouging.
Matching Tools to Surfaces
| Surface | Suitable tool | What to avoid |
|---|---|---|
| Coated basket | Soft sponge or brush | Steel wool and hard scouring pads |
| Metal rack | Stiffer brush | Leaving it wet |
| Inside the cavity | Damp cloth, soft brush | Spraying liquid at the heating element |
| Outer body | Damp cloth | Soaking the unit |
A Simple Routine After Each Use
- Unplug the unit and wait until it is fully cool.
- Remove the basket, tray or drawer.
- Soak removable parts in warm soapy water if food has stuck.
- Scrub gently with the soft brush, working into corners.
- Rinse, then dry with a cloth before refitting.
- Wipe the inside of the unit with a damp cloth, and leave the door or drawer open to air-dry.
Follow the maker’s manual and safety instructions. Never put water on the heating element or any electrical part, and check whether your parts are suitable for a dishwasher.
Reaching Tight Spots
Corners and rims collect grease. A narrow brush or a cloth wrapped around a thin plastic tool can reach them. Take your time, and do not force tools into gaps around the fan or heating area. If you cannot reach it, wipe what you can and read your manual for guidance on deeper care.
When to Replace Tools
Brushes with bent or shed bristles should be replaced, since they can scratch. Sponges that smell or fall apart do the same job poorly. Wash tools after use and let them dry fully so they last longer.
Storing Your Cleaning Kit
Keep the brushes and sponges in one small caddy or tray near the sink, so the routine stays easy. Hang brushes with the bristles up or lay them flat to dry. A tidy kit makes it more likely you will clean right after cooking, when residue wipes off with the least effort.
Use separate cloths for the outside of the unit and the inside of the basket, and wash them often.
Bristle Types Compared
The bristles are what actually touch your air fryer, so they deserve some thought. Nylon or similar synthetic bristles are the most common in kitchen brushes. They come in soft and medium stiffness, and softer ones are usually the safer choice for coated surfaces. Silicone bristles are flexible, gentle and easy to rinse, though they may not lift stubborn residue as well as stiffer fibers. Natural-fiber brushes can work but may hold moisture longer.
Metal bristles are best avoided on coated baskets and trays, because they can scratch the finish and shorten the life of the part. Stiffer brushes may be fine for bare metal racks, but check what your manual says first. If you are unsure about a surface, start with the softest option and only move up if needed.
- Soft synthetic: a good default for baskets and drawers.
- Silicone: gentle and quick to rinse, suited to light residue.
- Medium synthetic: for metal racks and tougher residue.
- Metal: not recommended for coated parts.
Look at how firmly the bristles are anchored, since a brush that sheds fibers can leave bits in the basket.
Handle Shape, Length and Reach
A brush that fits the space is easier to use than a good one that does not. Air fryer baskets are deep and drawers are narrow, so a long handle keeps your hand away from edges while you scrub. A bent or angled head can reach the corners where grease collects. A narrow tip fits around the rim and the handle mounting.
Grip matters when your hands are wet and soapy. Look for a handle with a textured or contoured surface, and avoid ones that are slippery when wet. A hanging loop makes it easier to dry and store the brush where air can reach it. Consider whether the brush has a scraper edge, which can help with baked-on bits, but make sure the edge is soft enough not to gouge a coating.
Before you buy, think about the shape of your own basket. Round, square and drawer-style units each have different corners, and one brush will not suit them all equally. If you own more than one unit or a dual drawer model, choose tools that work in both.
Sponges, Cloths and Scrub Pads
Brushes are only part of the toolkit. A non-scratch sponge handles flat surfaces and everyday residue. A microfiber or soft cotton cloth is good for wiping the outside, the rim and the interior cavity. Melamine-style sponges are sometimes used for marks, but they can be abrasive on certain finishes, so check the manual and test on a hidden spot before using them.
Scouring pads vary a great deal. Those labeled non-scratch are intended for delicate surfaces, while heavy-duty pads may damage coatings. Steel wool should not be used on coated parts. If a label does not say whether a pad is safe for non-stick surfaces, treat it as unsuitable.
Keep separate cloths for the unit and for the rest of the kitchen to avoid spreading grease. Replace cloths and sponges regularly because they hold moisture and can develop odors. Wash cloths in the laundry and let sponges dry fully between uses. Using disposable wipes for a quick clean can be convenient, but make sure they are safe for food-contact surfaces and rinse parts afterward as the maker advises.
Protecting Coatings and Staying Safe
The coating on a basket is what stops food sticking, and once it is scratched or worn it is hard to restore. Protect it by choosing soft tools, avoiding harsh cleaners and not using sharp utensils inside the basket. Soaking in warm soapy water loosens residue so that you can use less force.
Safety comes first. Always unplug the unit and let it cool before cleaning. Do not immerse the main body in water, and never allow water to reach the heating element or any electrical part. Use a damp cloth for the inside, and avoid spraying liquid directly into the cavity. Check your manual for which parts can go in the dishwasher.
If the coating begins to flake or peel, stop using the affected part and contact the maker or consider a replacement. Flaking is a sign the part has reached the end of its life. Do not try to cook with a part that is visibly damaged, and keep the manual handy for the maker’s advice on care and replacement.
Buying Checklist and Budget Tiers
You do not need an expensive set. A basic kit with one soft brush, one sponge and a cloth covers most needs. Mid-range sets often add a narrow detail brush and a plastic scraper. Higher-priced sets may include more pieces or better materials, but the extras are only worthwhile if you will use them.
Before buying, ask a few questions. Is it labeled safe for non-stick surfaces? Does the head fit the corners of my basket? Is the handle comfortable? Can it hang or stand to dry? Are replacement heads available? Does the set include things I will never use?
- Check that materials are food-safe and suitable for kitchen use.
- Look for brushes that are easy to rinse and do not trap debris.
- Avoid sets with very stiff bristles unless you have bare metal parts.
- Replace tools when they look worn, smell, or lose their shape.
A simple set used regularly beats a large set left in a drawer.
FAQ
Can I use a toothbrush?
A soft one works well for small corners, as long as you keep it for cleaning only.
How often should I deep clean?
It depends on use. A quick wash after greasy meals and a closer look every few weeks is a common habit.
What is the best brush for a coated basket?
A soft-bristle brush or a non-scratch sponge is usually a safe choice. Avoid metal bristles and rough pads, and check your manual for any specific advice.
Can I use a magic eraser-type sponge?
These can be abrasive on some finishes, so check your manual first and test on a hidden area. If in doubt, stay with a soft sponge and soak the part instead.
How do I clean the heating element area?
Make sure the unit is unplugged and fully cool, then wipe gently with a damp cloth or follow the manual. Do not spray liquid in or use harsh tools.
Should I buy a long-handled brush?
A longer handle helps in deep baskets and narrow drawers because it keeps your hand clear of edges. Choose one that fits your unit's shape.
How do I dry brushes properly?
Rinse them well, shake off water and hang or stand them with the bristles up so air can circulate. This helps prevent odors and mold.
Are dishwasher-safe brushes worth it?
They can be convenient if you want to sanitize them, but only if the listing states they are dishwasher safe. Otherwise, hand washing is fine.
When should I replace a cleaning tool?
Replace it when bristles bend or fall out, when a sponge breaks down or smells, or when the tool starts to look dirty even after washing.
The Short Version
Choose soft tools, keep water away from electrical parts, and wash a little after each cook. A short routine beats a hard scrub later.