The best commercial ice cream makers use a built-in compressor to chill the bowl, so you can churn batch after batch without pre-freezing anything. True restaurant machines are large and costly, so many small shops, caterers and serious home cooks turn to compressor and heavy-duty countertop models that sit between home and industrial gear.
The six makers below range from compressor machines to freezer-bowl and pint-style models. We have not used these machines ourselves, and we avoid specs we cannot back up. Please confirm capacity, power and what is included on the current listing before buying. If you plan to sell what you make, check your local rules, because home-style machines may not be accepted for commercial food production.
As an Amazon Associate we earn from qualifying purchases. Links below are affiliate links, and they do not change the product information we give.
What to Look For
| Feature | Why it matters |
|---|---|
| Cooling method | Compressor models make back-to-back batches; freezer bowls need pre-freezing |
| Batch size | Larger bowls suit shops; smaller ones suit families |
| Bowl material | Stainless bowls are easy to clean and last well |
| Controls | Timers and hardness settings give a steadier texture |
| Cleaning | Removable parts speed up washing |
In this guide
Specs at a Glance
| Maker | Cooling | Style | Notes |
|---|---|---|---|
| Cuisinart ICE-100 | Built-in compressor | Countertop | Timer; no pre-freezing |
| Whynter ICM-201SB | Built-in compressor | Countertop | Stainless bowl |
| Lello Musso Lussino 4080 | Built-in compressor | Countertop | Stainless steel build |
| Breville Smart Scoop | Built-in compressor | Countertop | Hardness settings |
| Ninja CREAMi | Freezes pints first | Pint processor | Single-serve pints |
| Cuisinart ICE-21 | Freezer bowl | Countertop | Bowl must be pre-frozen |
The 6 Best Commercial Ice Cream Makers

Top pickBest for serious home cooks
1. Cuisinart ICE-100 Compressor Ice Cream and Gelato Maker
A countertop machine with its own compressor, so you can churn ice cream or gelato without pre-freezing a bowl. It has a timer and a removable bowl.
Suits: serious home cooks. Strengths: no wait between batches. Weaknesses: bulky and heavy. Skip it if you have little counter space.

Best for frequent batches
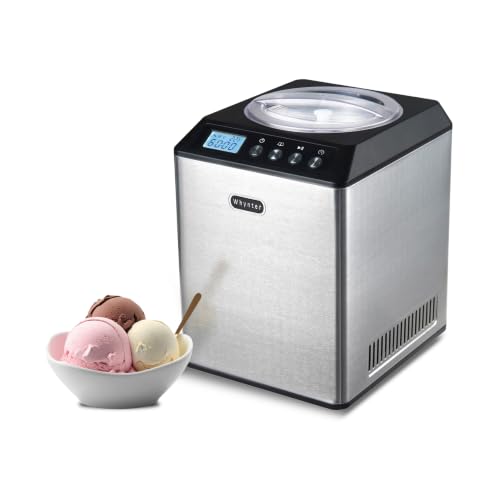
2. Whynter ICM-201SB Ice Cream Maker
A compressor ice cream maker with a stainless steel bowl, popular with home users who want near-commercial output.
Suits: frequent batches. Strengths: a stainless bowl and self-cooling. Weaknesses: large footprint. Skip it if you want a light, portable unit.

Best for enthusiasts who care about texture
3. Lello Musso Lussino 4080 Ice Cream Maker
An Italian-designed compressor machine in a stainless steel body, often named among top-tier home ice cream makers.
Suits: enthusiasts who care about texture. Strengths: a robust steel build. Weaknesses: a premium cost. Skip it if you only make ice cream once in a while.


Best for cooks who like control
4. Breville Smart Scoop Ice Cream Maker
A compressor machine with adjustable hardness settings and automatic features that sense when the mixture is ready.
Suits: cooks who like control. Strengths: hardness settings and a polished design. Weaknesses: takes room on the counter. Skip it if you want the simplest machine.

Best for small servings and flavor tests
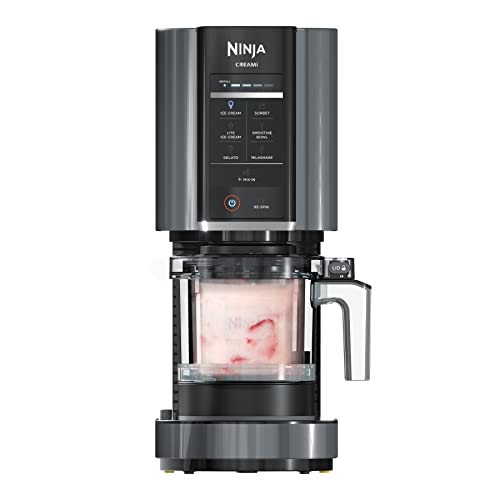
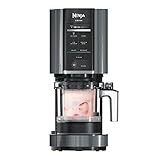
5. Ninja CREAMi Ice Cream Maker
A pint-based machine that spins a frozen base into ice cream, sorbet or milkshakes. It is not a compressor churner, but it is popular and easy to use.
Suits: small servings and flavor tests. Strengths: quick, mess-light prep. Weaknesses: bases must freeze first. Skip it if you need big batches.
Best for casual batches
6. Cuisinart ICE-21 Frozen Yogurt-Ice Cream Maker
A long-running freezer-bowl machine that is budget-friendly and simple. The bowl must be frozen ahead of time.
Suits: casual batches. Strengths: easy to use and store. Weaknesses: one batch at a time. Skip it if you serve crowds.
View Cuisinart ICE-21 on Amazon
Care and Setup
- Chill your base in the fridge before churning.
- Let a compressor machine rest upright before first use.
- Wash removable parts by hand with mild soap.
- Freeze the bowl fully on freezer-bowl models.
- Check the manual before running back-to-back batches.
- Keep the lid and paddle dry before storing so no odors build up.
Mistakes to Avoid
- Using a warm base and getting icy results.
- Overfilling the bowl so it cannot expand.
- Skipping the pre-freeze on bowl models.
- Assuming a home machine meets commercial code.
- Washing parts in a way the manual does not allow.
- Forgetting to freeze the bowl or base well ahead of time.
Planning Batch Size and Production Flow
Before comparing machines, work out how much ice cream you need and how often. A bowl that holds a batch worth a few servings suits a household or a taste test, while a shop that sells scoops all day needs either a large machine or a steady rhythm of smaller batches. The key difference is recovery time. Compressor machines can start a new batch soon after the last one, once the bowl has returned to a workable temperature, so they suit a production schedule. Freezer-bowl and pint-style machines are limited by how many bowls or pints you can pre-freeze.
Map out a typical day. Decide how many flavors you serve, how many batches per flavor and how much time each takes, including mixing the base, chilling it, churning and hardening in the freezer. Churning is only one step. Soft-serve texture from the machine needs further time in a freezer to firm up for scooping, so you need freezer space for tubs. Consider the machine’s maximum and minimum fill levels, since underfilled batches may not churn properly and overfilled ones overflow.
- Small batches and many flavors: pint-style units or a compact compressor model.
- Steady daily production: a compressor machine with a sizable bowl.
- Occasional events: a freezer-bowl model with a spare bowl.
If your demand grows, a second machine often gives more flexibility than replacing one with a larger one, because you can make two flavors at once and still have a backup if one needs service.
Base Preparation and Texture
The machine only freezes and churns what you give it, so the base largely decides the result. A cooked custard base, made with milk, cream, sugar and egg yolks, is rich and smooth. A Philadelphia-style base without eggs is lighter and shows off flavors like fruit or vanilla clearly. Gelato uses more milk relative to cream and is churned with less air, producing a denser texture. Sorbet relies on sugar and fruit, and the sugar level controls how soft or icy it is.
Chilling the base thoroughly before churning, ideally overnight in the refrigerator, helps it freeze faster and form smaller ice crystals, which feel smoother. Fat and sugar both affect texture, because too little leads to icy results and too much can stay soft. Stabilizers and emulsifiers are used in professional recipes to improve body and slow melting, and some cooks use small amounts of ingredients such as milk powder or corn syrup, so follow a tested recipe.
- Strain custards to remove cooked egg bits.
- Add mix-ins such as chocolate, nuts or cookie pieces near the end of churning.
- Do not overfill the bowl, since the mixture expands as air is whipped in.
- Stop when the texture looks like soft serve, then harden in the freezer.
Controls such as hardness settings or timers help you repeat results, but your recipe matters more than any setting. Keep notes on batches so you can reproduce good ones.
Food Safety and Selling What You Make
Ice cream sits in a risky category for food safety, because it contains dairy and often eggs, and it is eaten without further cooking. Keep the base cold, use clean equipment, and follow safe handling practices. If a recipe uses eggs, cook the custard to a safe temperature, or use pasteurized eggs. Chill the base quickly and store it covered in the refrigerator. Wash and sanitize the bowl, paddle and utensils between flavors, especially if allergens such as nuts, dairy or eggs are involved, to avoid cross-contact.
If you plan to sell, the rules are different from home use. Many places require a licensed commercial kitchen, a food business registration, an inspection and approved equipment. Some regulations ask that equipment be certified for commercial use, which a home-style machine may not meet, and some require pasteurization of dairy bases. Labeling rules and allergen declarations may also apply. These rules vary by region, so contact your local health department before you buy a machine for a business, and ask what documentation or certification they require.
- Keep records of recipes, ingredients and cleaning if inspectors ask.
- Store finished product at the proper freezer temperature.
- Label allergens clearly when serving others.
The product listing may not state any commercial rating, so check with the maker if certification matters to you.
Power, Space, Noise and Ventilation
Compressor machines are heavy and bulky, and they need a place to sit where they can breathe. The compressor produces heat, so leave clearance around vents, as the manual specifies, and keep the machine out of cramped cabinets and direct sunlight. A hot room reduces cooling efficiency and may trigger protective shutoffs, so look at the stated operating temperature range in the manual. Many compressor units should rest upright for a period after transport before running, so allow for that after delivery.
Check the electrical details on the listing: voltage, plug type and power draw. A dedicated outlet and a sensible cord path reduce the risk of overload, especially if other kitchen equipment shares the circuit. Avoid extension cords unless the maker approves them. In a business setting, consider whether your electrical supply and local rules allow the equipment.
Noise is another factor. Compressor machines hum and the paddle churns for a while, which can matter in an open kitchen or a shop floor. Freezer-bowl and pint-style machines are quick but can be loud for a short burst. Weight and size matter for storage as well. Measure your counter and the cabinet above it so you can open the lid fully.
- Check lid clearance and whether the bowl lifts out easily.
- Place the machine on a stable, level counter that can handle the weight.
- Keep the cord away from water and hot surfaces.
Cleaning, Upkeep and Signs to Replace
Good hygiene and regular care keep both the machine and the product in shape. After each batch, remove the paddle and bowl, and wash removable parts by hand with warm water and mild soap unless the manual says they are dishwasher safe. Rinse well and dry thoroughly. Do not immerse the base or the compressor housing, and wipe them with a damp cloth. Freezer bowls should be dried before freezing, and kept in a freezer in an upright position as directed.
Check wear points. Paddles and lids can crack or warp, gaskets can harden and bowls can scratch or dent. Replace worn parts with ones the maker recommends. For compressor units, keep the vents and filters free of dust, and do not block them with boxes or cloths. If the machine will sit unused, empty and dry it, and store it with the lid ajar to avoid odors.
Signs that it is time to repair or replace:
- Batches stay soft or never freeze properly, even with a cold base.
- The compressor runs constantly or shuts off often.
- The paddle stalls or the motor makes grinding sounds.
- Freezer bowl liquid leaks or the bowl no longer freezes evenly.
- Replacement parts are no longer available.
Regular cleaning, correct fill levels and a properly chilled base prevent most problems before they start.
Ice Cream Machine Terms for New Operators
Frozen dessert equipment brings its own vocabulary. A quick glossary helps when you compare specifications.
- Compressor: a built-in refrigeration system that cools the bowl so you can make batch after batch without pre-freezing.
- Freeze-in bowl: a removable bowl that must be frozen ahead of time before use.
- Dasher: the paddle that churns the mixture and scrapes the sides.
- Overrun: the air whipped into the mixture, which affects texture and volume.
- Batch freezer: a machine that makes one batch at a time, as opposed to continuous or soft-serve systems.
- Hopper: the container that holds the mix before it enters the freezing chamber on some machines.
- Cycle time: how long one batch takes from first pour to finished batch, as stated by the maker.
When a spec is unclear, ask the maker for a clear explanation before you buy.
Choosing a Machine by Operation Type
| Operation | Machine traits to look for | Questions to ask |
|---|---|---|
| Small cafe adding a dessert | Compressor model with a modest batch size | How many batches per day will you make? |
| Dedicated ice cream shop | Larger capacity, robust build | What power supply is available? |
| Catering or events | Portable, easy to clean | How will you transport and power it? |
| Restaurant with rotating flavors | Quick cleanup between batches | Are the parts easy to take apart? |
| Test kitchen or small-batch maker | Pint-size options with precise control | Can it make small trial runs? |
Think about the volume you actually plan to sell, and size the machine for your busiest day without overbuying for a slow week.
A Pre-Purchase Planning List
- Calculate your expected daily volume and peak-day volume.
- Confirm the available electrical supply, including voltage and circuit type, with a qualified electrician.
- Measure the counter or floor space, and allow clearance for ventilation as the maker states.
- Check the weight, since some machines are heavy and need a sturdy surface.
- Look at how the machine is cleaned and sanitized, and whether the parts come apart without tools.
- Find out where to source spare parts such as paddles, seals and bowls.
- Read the maker’s support details and any training materials.
- Plan storage for finished product, such as freezer space and containers.
A list like this keeps you from buying a machine that works well on paper but is awkward in your actual kitchen.
Regulations, Hygiene and When to Seek Professional Advice
If you sell ice cream to the public, local health regulations apply. Rules can cover equipment, cleaning, labeling, ingredient handling and the facility itself. Contact your local health authority before you purchase, and ask what they require for inspections, permits and records.
Follow the maker’s cleaning and sanitizing instructions for every part that touches the mix. Use only cleaning products that the maker and local rules allow. Electrical installation and ventilation should be carried out by qualified professionals according to local codes.
For ingredient handling, storage temperatures and allergen management, follow official food safety guidance and any training requirements in your area.
Thinking Through Flavors, Mixes and Menu Fit
Before you buy, sketch the menu you want to serve. A short list of reliable flavors lets you perfect each recipe, while a long rotating list demands faster cleaning and more storage. Think about whether you will make your own base or buy ready mixes, since each choice affects prep time, space and the training your team needs.
Consider add-ins such as nuts, fruit pieces or candy, and check what the maker says about adding them to the machine. Some machines handle chunks well, while others call for folding them in by hand after churning. Taste test small batches before you commit to a full menu.
Building a Workflow Around the Machine
Set up a station with room to prepare mixes, chill them and move finished product to the freezer. Keep a clean path between the machine and storage so staff are not crossing busy areas. Label containers with flavor and date, and rotate stock in the order it was made.
Train every team member on the cleaning routine, and keep the manual and a cleaning schedule posted near the machine. A little structure at the beginning makes service smoother and keeps quality consistent from one batch to the next.
Commercial Ice Cream Maker FAQ
What does a compressor do?
It chills the bowl itself, so you do not freeze a bowl ahead of time.
Are these truly commercial?
Most are heavy-duty home or prosumer models. Check the listing for any commercial rating.
Can I make gelato?
Many compressor models support gelato. Look for that in the product description.
Do I need to pre-freeze anything?
Compressor machines need little prep, pint-style units need a frozen base, and freezer-bowl models need the bowl frozen the day before.
Can these make gelato or sorbet?
Many can. Look in the listing for gelato, sorbet or frozen yogurt mentions, since texture and churn style differ by machine.
How long does a batch take to churn?
Churn time depends on the machine, the recipe and how cold the base is. The manual usually gives a range. Most batches are soft-serve consistency when they come out and need time in the freezer to firm up.
Why is my ice cream icy?
Large ice crystals often come from a warm base, too little fat or sugar, or a bowl that was not cold enough. Chill the base thoroughly, use a tested recipe and make sure the machine reaches proper cooling before pouring.
Can I make dairy-free ice cream?
Yes, with bases made from plant milks, coconut cream or other ingredients, though texture differs. Fat and sugar content affect results, so use a recipe designed for the type of base you choose.
Do I need to pre-chill the machine?
Some compressor machines have a pre-cool setting that helps start the batch at the right temperature. Follow the manual, and always chill the base itself in the refrigerator first.
How do I add mix-ins?
Add chunks such as chocolate, nuts or cookies during the last minute or two of churning so they mix in without breaking down. Chill them first if the recipe suggests it.
Can I run several batches in a row?
Compressor models are designed for back-to-back batches, but the manual may recommend a rest between them. Freezer-bowl models need the bowl refrozen, which takes much longer.
What should I do about allergens?
Wash and sanitize all parts between flavors, and keep allergen-containing recipes separate when serving others. Label products clearly and follow local food rules if you sell.
A Working Day With a Commercial Ice Cream Maker: Where It Helps and Where It Does Not
The buyers who get the most from a ice cream maker are restaurants, caterers and committed home makers. Their day rarely revolves around one perfect test dish. It revolves around churning batches for service, events and steady dessert menus, with ice cream bases, gelato mixes and frozen yogurt blends moving through in whatever order the day demands. Judged against that reality, the right ice cream maker is not the one with the longest feature list. It is the one whose size, controls and cleaning routine fit the rhythm of the work without asking anyone to reorganise their space or their habits around it.
At the busy end of the day the pattern is always the same: several jobs arrive at once, counter or floor space disappears, and the ice cream maker has to perform while people are tired and distracted. This is where honest capacity matters more than headline capacity. A ice cream maker that handles a realistic load of ice cream bases, gelato mixes and frozen yogurt blends in a steady, predictable way will serve restaurants, caterers and committed home makers better than a larger or fancier option that only shines when it is loaded carefully and watched constantly. Predictability is a feature, even though it never appears in a specification table.
The honest limitation is that no ice cream maker removes the work around the work. There is still prep before, attention during and cleaning after, and a model that is awkward to clean will slowly be used less, whatever its cooking or cooling performance. Before you buy, picture the least enjoyable job the ice cream maker will ask of you on a wet, busy evening, and check that the design makes that job short and simple. Buyers who think about the worst day, not the best one, are the buyers who stay satisfied in year two.
Comparing the Six Picks Above Without Guesswork
The six options reviewed in this guide are Cuisinart ICE-100 Compressor Ice Cream and Gelato Maker, Whynter ICM-201SB Ice Cream Maker, Lello Musso Lussino 4080 Ice Cream Maker, Breville Smart Scoop Ice Cream Maker, Ninja CREAMi Ice Cream Maker and Cuisinart ICE-21 Frozen Yogurt-Ice Cream Maker. Treat that order as a shortlist, not a league table. The reviews above describe each model in the same terms, so the fairest comparison is to line up the points that matter to your situation and ignore the rest. Start with the Specs at a Glance table, note which size class and control style each pick belongs to, and then read the individual reviews again with your own space and routine in mind.
A useful method is to cut the list in two passes. On the first pass, remove any pick that does not fit your measured space, your power or connection options, or the way you actually work with ice cream bases, gelato mixes and frozen yogurt blends. Fit problems do not improve with use, and a ice cream maker that fights its surroundings will annoy you daily. On the second pass, compare what is left on the softer points: how the controls feel, how the parts come apart for cleaning, and how the design handles dairy residue that turns quickly if it is left. Those details decide long-term satisfaction far more often than a small difference on a specification line.
If two picks still look equal after both passes, choose the one whose routine you understand better. Familiar controls, a cleaning process you can picture yourself repeating, and parts that look straightforward to replace are worth more than a feature you might use twice a year. And if none of the six fits, that is useful information too: it usually means your space, your volume or your budget assumption needs adjusting, not that you should force the closest match into service.
Setup Day: A Calm, Step-by-Step Routine for Your Commercial Ice Cream Maker
Before it comes out of the box
Measure the space one final time, including the route the ice cream maker will travel to reach it: doorways, corners, lift doors and the swing of any door or lid once it is in place. Clear the spot fully, clean it, and check the outlet or connection point is where the listing led you to expect. Keep the packaging until the ice cream maker has run through its first full job, because returns and exchanges are far simpler with the box and inserts intact, and photograph any transit damage before you throw anything away.
Positioning and first checks
Set the ice cream maker level and stable, with the clearance around it that the manual asks for, especially near vents, doors and anything that gets hot or cold in use. Wipe or wash the removable parts, run through the controls without a load so the buttons, dials and indicators make sense before food is involved, and confirm that doors, lids, trays or baskets move the way they should. Small checks now are cheap; the same checks after a week of use tend to turn into arguments about whether a fault was there from the start.
The first run and what to watch
Make the first job an easy one: a small, familiar load of ice cream bases, gelato mixes and frozen yogurt blends that you know well, so any odd behaviour is easy to spot and nothing important is at stake. Stay nearby, watch how the ice cream maker settles into its cycle, listen for sounds that seem strained or unusual, and note anything that surprises you while it is fresh. If the first run matches the description in the manual and in the review above, you can move on to normal use with confidence. If it does not, stop and resolve it while the purchase is new, rather than adapting your routine around a problem.
Cleaning and Care: A Rhythm for Daily, Weekly and Monthly Jobs
After every use
The daily job is short and non-negotiable: deal with the bowl, the dasher, the lid and the chute while the traces of the day are still easy to remove. Empty what needs emptying, wipe what needs wiping, and leave the ice cream maker dry and open or closed exactly as the manual recommends for storage between uses. Five unhurried minutes at this point prevent most of the dairy residue that turns quickly if it is left that later takes an hour of soaking and scrubbing, and it keeps flavours, odors or hygiene problems from carrying into the next batch of ice cream bases, gelato mixes and frozen yogurt blends.
Once a week
The weekly job goes one layer deeper. Remove the parts that come out, wash them properly rather than wiping them in place, and inspect the areas you cannot see during daily cleaning: seals, hinges, corners, filters and the places where dairy residue that turns quickly if it is left quietly accumulates. This is also the moment to check for wear while it is still cheap to address, such as a seal that no longer sits flat, a coating that is starting to lift, or a control that feels different from the others. Small faults found on a quiet weekly check rarely become emergencies.
Once a month and seasonally
Monthly care is about the surroundings as much as the machine. Pull the ice cream maker out if its design allows it, clean behind and beneath it, check cords, hoses or connections for damage, and confirm the space still gives it the airflow and clearance it started with. Kitchens drift: items migrate, vents get blocked and routines slip. A short monthly reset keeps the ice cream maker working in the conditions it was chosen for, and it is the simplest way to stretch the working life of any model on the list above, whichever one you picked.
Troubleshooting: Checks to Make Before You Blame the Ice cream maker
When results slip, the cause is usually one of four ordinary things rather than a failing machine. The first is loading: too much at once, pieces packed too tightly, or a load that is very different from the ice cream bases, gelato mixes and frozen yogurt blends the ice cream maker handles best. The second is cleaning, because dairy residue that turns quickly if it is left changes how surfaces heat, seal, drain or circulate air long before it becomes visible damage. Work through loading and cleaning first; they cost nothing and they explain most disappointments.
The third cause is placement. A ice cream maker that has been nudged against a wall, boxed in by stored items or moved to a warmer, colder or more crowded spot than it started in will behave like a different machine. Restore its original clearances and level footing before judging its performance. The fourth cause is expectation: comparing results with a different style of equipment, or with the first careful week of use when everything was new, clean and closely watched. Recreate those early conditions once, honestly, and see whether the gap closes.
There are also clear signs to stop troubleshooting and get help. Electrical smells, damaged cords, leaking connections, a door or lid that no longer seals or closes properly, and any fault that returns immediately after a thorough clean and a careful test run all deserve professional attention or a warranty conversation. Keep your proof of purchase and a short note of what you observed and when. A clear description gets a faster, better answer from any support team than a general complaint, and it protects you if the problem turns out to be a defect rather than wear.
Before You Order: A Short Decision Worksheet
Write down your real numbers first
Before comparing models, write down the numbers that describe your situation rather than the situation you imagine: the measured width, depth and height of the space, the distance to the nearest suitable outlet or connection, the number of people or orders involved on a normal day, and the busiest load you face in a normal week. These four figures settle most of the choice on their own. A ice cream maker that matches them will feel right from the first day, while one chosen from a showroom impression or a friend’s recommendation has to be forgiven daily, and forgiveness wears out.
Decide in advance what you will not compromise on
Every buyer has one point that matters more than the rest, whether it is a door or lid that must open a particular way, controls a particular person can use confidently, a cleaning step that must stay simple, or a footprint that cannot grow by even a small margin. Name that point before you shop and treat it as a filter, not a preference. The picks above that fail your filter are not bargains at any point in the range; they are future frustrations. The picks that pass it can then be compared calmly on everything else, including the details of how they handle ice cream bases, gelato mixes and frozen yogurt blends and how their parts come apart for cleaning.
Plan the first week, not just the first day
Finally, plan how the ice cream maker will be introduced. The first week should include one easy job, one normal job and one honest test at the busy end of your routine, followed by the first full clean while the steps are still fresh in your mind. That sequence teaches you more than a month of occasional use, and it surfaces any delivery damage, missing part or misunderstanding about the controls while the purchase is still new and easy to put right. Buyers who schedule that first week deliberately rarely join the group who discover a problem at the worst possible moment, months later, with a kitchen full of people waiting.
More Commercial Ice Cream Maker Questions Buyers Ask
How do I choose the right size of ice cream maker?
Work backwards from a real day rather than a special occasion. Count the people, portions or orders the ice cream maker must handle at the busiest moment you face regularly, then choose the size class that covers that moment without strain. Buying for a rare peak leaves you cleaning and storing an oversized machine all year, while buying for an average day leaves you short exactly when it matters. The size classes in the Specs at a Glance table above are the right starting point for that calculation.
Can a ice cream maker like this be used every day?
Yes, provided the daily routine in this guide is realistic for you: a sensible load, a short clean after use and a weekly check of the parts that wear. Daily use is usually kinder to a machine than occasional use followed by long, dirty storage, because problems are noticed early and moving parts, seals and surfaces stay in regular working order. The buyers who struggle with daily use are almost always the ones whose cleaning routine was designed for a quieter life than the one they actually lead.
What should I check on the day it arrives?
Check the exterior for transit damage before the courier leaves if you can, confirm that every part, tray, rack or accessory named on the listing is in the box, and run the ice cream maker once with a small, unimportant load before relying on it. Confirm that doors, lids and controls behave as described, and keep the packaging until that first run is done. Most problems with a new ice cream maker are delivery or completeness problems, and they are far easier to resolve in the first days than in the first month.
Which accessories are actually worth having?
Only the ones that match jobs you already do. A spare of the part you wash most, a tool shaped for the surface you clean most, and storage that protects the ice cream maker in your actual space are sensible purchases. Accessories bought for imaginary future habits usually join the drawer of good intentions. Read what each review above says about included parts first, because several picks already bundle the extras that other brands sell separately, and duplicating them adds cost and clutter without adding capability.
Should I pay extra for delivery or installation help?
It depends on the route between the street and the final spot. If the ice cream maker must travel up stairs, through narrow doors or into a fitted space, help is usually money well spent, because most early damage happens during moving rather than during use. Measure the route honestly, including corners and door swings, and decide before the delivery day rather than improvising with whoever happens to be present. If the route is short, level and wide, a careful self-install following the manual is perfectly reasonable for most models in this guide.
What if my household or business grows?
Growth usually shows up first as queuing: people waiting for the ice cream maker, loads being split more often, or cleaning being rushed because the machine is needed again immediately. Those are signs that the routine, not necessarily the machine, is under strain. Before replacing anything, check whether a second smaller unit, a change in prep habits or a simple rota solves the queue. If the strain survives those fixes, the size-class discussion in the reviews above will tell you honestly whether stepping up a class is justified or whether you were simply loading the current machine badly.
How do I know when a ice cream maker needs replacing rather than repairing?
Replace when the same fault returns after a proper clean and a careful test, when seals, coatings or safety-related parts have worn past the point where a replacement part restores them, or when the machine can no longer hold the steady performance your routine depends on. Repair when the fault is isolated, the part is available and the rest of the machine is sound. Age alone is a poor guide: a well-kept ice cream maker that has followed the care rhythm above will outlast a neglected newer one, which is why the weekly inspection matters.
Practical Notes for the First Month of Ownership
Teaching someone else to use it
Sooner or later someone else will run the ice cream maker: a colleague covering a shift, a partner helping with dinner, or a guest who insists on helping. The two-minute handover is worth doing properly. Show them the load you consider full, the control setting you use most, and the one cleaning job that must happen straight after use. Most damage and most disappointing results come from a well-meaning second user who was never told those three things, not from the machine itself.
Keeping a simple note of what works
Keep a short note, on paper or in a phone, of the settings and timings that worked for your regular jobs with ice cream bases, gelato mixes and frozen yogurt blends. Memory is unreliable across a busy month, and a written record turns second and third attempts into repeats of a success instead of new experiments. Note the load size as well as the setting, because the two travel together: a result you loved with a half load will not repeat exactly with a full one, and knowing that saves you blaming the ice cream maker for a difference you introduced yourself.
Planning around your busiest days
Every household and every kitchen has a predictable peak: a weekend gathering, a market day, a holiday morning. Plan the ice cream maker around it rather than discovering its limits during it. Prep what can be prepped the day before, clear the space around the machine, and make sure the cleaning supplies for the bowl, the dasher, the lid and the chute are actually in stock. A machine that copes easily on a planned busy day will feel far more capable than a technically stronger one that is always being improvised around.
Storing it well between uses
How a ice cream maker waits matters almost as much as how it works. Store it clean and dry, with cords, hoses or loose parts kept with it rather than scattered, and with nothing heavy resting on doors, lids or controls. If it will sit unused for a stretch, follow the manual’s guidance for that situation and give it a short test run before the next important job. Machines rarely fail at the moment of greatest need; they fail quietly in storage and are discovered at the moment of greatest need.
Being honest about running costs
The purchase is only the first cost. Energy or fuel, water, detergent or other consumables, replacement parts and the occasional accessory all belong in the real budget for a ice cream maker. None of this argues against buying; it argues for choosing a model whose ongoing needs you understand from the start. The reviews above note the connection and consumable requirements of each pick, so read those lines as running-cost information, not fine print, and factor them into the comparison before you decide.
Safety habits that become second nature
A few habits protect both the machine and the people around it. Keep cords and connections dry and visible rather than trapped behind the unit, give hot or cold surfaces the respect the manual describes, and never defeat a door, lid or guard that is there to keep hands away from harm. Teach these points to anyone who uses the ice cream maker, including guests and new staff, on their first use rather than after the first scare. Equipment used by several people needs shared habits, not private ones, and the time to agree them is before the busy day, not during it.
The seasonal deep clean
Twice a year, give the ice cream maker the clean that daily and weekly routines cannot reach: every removable part out and washed, every seal wiped and inspected, the area behind and beneath it cleared, and a full test run afterwards with a simple load of ice cream bases, gelato mixes and frozen yogurt blends. Seasonal cleaning is also the natural moment to replace worn small parts, restock cleaning supplies and reread the manual pages you skimmed on setup day. Owners who keep this appointment rarely meet the slow decline that makes a good machine feel tired before its time.
The Short Version
For a compressor starter, the Cuisinart ICE-100. For a stainless bowl, the Whynter. For a premium build, the Lello. For control, the Breville. For pints, the Ninja CREAMi. For a budget-friendly basic, the Cuisinart ICE-21. Compressor machines cost more and take space, but they remove the waiting between batches.
Related Guides
- 6 Best Ice Cream Makers: Compressor, Freezer Bowl, Pint (2026)
- 6 Best Commercial Ice Cream Makers for Cafes (2026)
- 6 Best Electric Ice Cream Makers with Built-In Freezers (2026)
- How to Choose the Best Commercial Ice Makers: A Buyer's Guide
- 6 Best Commercial Ice Makers for Bars: Cube, Nugget and Clear (2026)