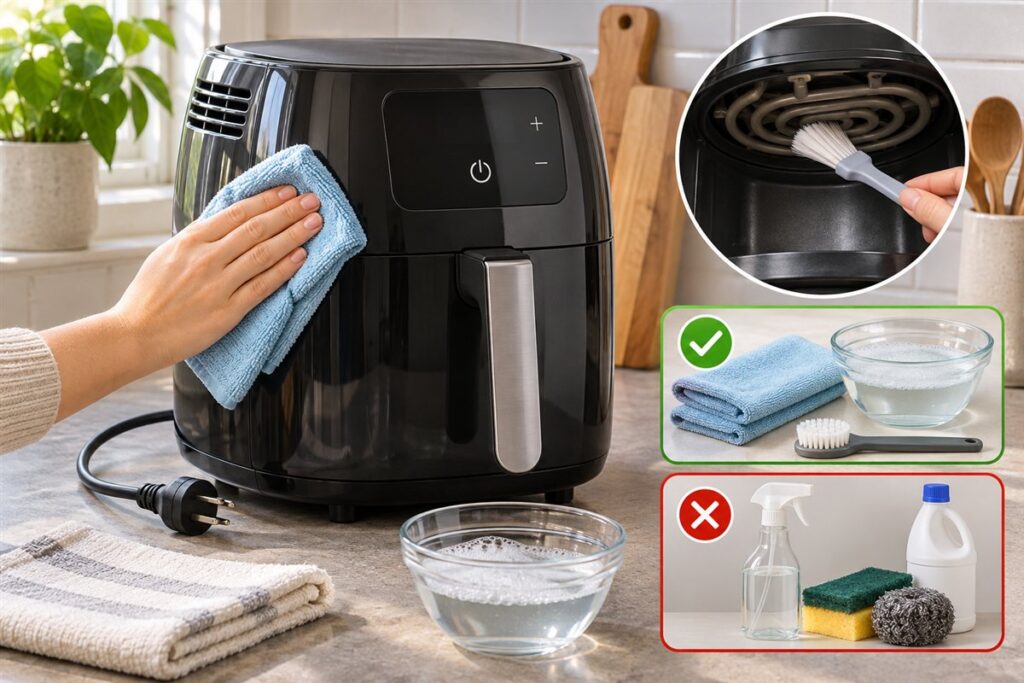
Clean the outside of an air fryer with a soft, slightly damp cloth once it is unplugged and cool. Keep liquid away from the vents, controls, and plug. A short wipe after use keeps the surface looking tidy and stops grease from baking on.
What You Need
- A soft cloth or microfiber towel.
- Mild dish soap and warm water.
- A dry cloth for buffing.
- A soft brush for seams and corners.
Cleaning Routine
- Switch the unit off, unplug it, and let it cool completely.
- Remove the basket and tray, and wash them separately.
- Dampen a cloth with soapy water and wring it out until it is barely wet.
- Wipe the outer shell, the handle, and the lid or front face.
- Go over the surfaces with a cloth dampened with plain water, to lift soap.
- Dry with a clean cloth and leave the unit open to air out for a while.
The Control Panel and Cord
Touch panels and dials do not like moisture. Wipe them with a cloth that is only just damp, then dry at once. Wipe the cord with the same cloth from the plug end toward the unit, keeping water away from the plug pins. Do not pull hard on the cord or bend it sharply.
Products and Habits to Avoid
| Avoid | Reason |
|---|---|
| Spraying cleaner directly on the unit | Liquid can get into vents and controls |
| Abrasive pads or powders | They can scratch and dull the finish |
| Submerging the body in water | Electrical parts are inside |
| Strong solvents or bleach | They may damage plastics and markings |
Keeping It Tidy Between Cleans
Wipe splatter soon after the unit cools, since fresh grease is much easier to remove than baked-on grease. Keep the unit on a clean, flat surface with space around the vents. If a stain will not shift, leave it rather than scrubbing hard.
Handles and buttons are the places that collect the most fingerprints and grease, so give them extra attention. A soft brush or a cotton swab, barely damp, can reach around buttons and seams without pushing moisture inside. Stainless and glossy finishes show marks easily, so buff them dry in the direction of the grain, if there is one. Over time, regular light cleaning keeps the finish looking good and spares you from harder scrubbing later.
Finally, let the unit dry in the open for several minutes after wiping, so no moisture remains near the seams, the vents, or the plug before you use it again.
Understanding Your Air Fryer’s Finish
Air fryers come in several exterior finishes, and each reacts differently to wiping, cleaning products and heat. Glossy plastic looks smooth but shows fingerprints and fine scratches easily. Matte or textured plastic hides marks better but can trap grease in tiny grooves. Brushed stainless steel panels resist wear but show smears and have a visible grain. Painted or coated metal may chip if rubbed hard, and printed icons or markings can fade with harsh products.
Knowing the finish tells you what to avoid. Abrasive pads can dull glossy plastics and scratch metal. Strong solvents can cloud plastic or lift printed markings. Acidic or alkaline cleaners may stain some coatings. When in doubt, test a product in a small, hidden area, or stick to mild soap and water.
- Check the manual for notes on the exterior material and recommended cleaning.
- Look for areas where the finish changes, such as around a metal trim or a display, and treat them gently.
- Note any decals or printed instructions that could wear away with rubbing.
If you are shopping, consider the finish. If you dislike wiping off marks, a matte or textured exterior may be more forgiving. If you prefer a sleek look, accept that glossy surfaces need frequent attention. Look at product photos closely and read the manual for care advice.
Dealing With Stubborn Marks Safely
Sometimes a damp cloth is not enough. Greasy fingerprints, dried splashes and yellowish film can build up around handles and the top surface. Start with the gentlest method and move up only if needed. A cloth dampened with warm water and a drop of mild dish soap, left on the mark for a short time so the soap can work, loosens many residues without scrubbing.
For a film that does not budge, repeat the soapy wipe rather than pressing harder. A soft toothbrush, kept for this purpose, can reach grooves and seams, provided it is only barely damp. A plastic scraper or an old card may lift dried drips from flat surfaces, but use it flat and with very light pressure to avoid scratches. Avoid metal tools.
Some people use a small amount of diluted white vinegar or a baking soda paste. These can be helpful on some surfaces but are not suitable for every finish, and the manual may advise against them. If you try anything beyond soap and water, test a hidden spot first, rinse with a clean damp cloth afterward and dry thoroughly.
Discoloration that will not shift may be permanent, caused by heat or aging of the plastic. Accept it rather than damaging the finish. Never use a product on a part that gets hot unless the maker says it is safe.
The Underside, Feet and Counter Contact
The base and feet are easy to forget, yet they are in contact with the counter, where drips, crumbs and moisture collect. Fat splatter from cooking can run down the sides and form a sticky ring under the unit. Grease on the feet can leave marks on the counter, and a dirty base can attract crumbs and pests.
When the unit is cool and unplugged, lift it carefully with both hands, supporting the base, and check underneath. Wipe the feet and base with a barely damp cloth, taking care not to push water into any vents on the bottom. Some units have intake openings under the body, so keep them clear and dry. Dry the area thoroughly before putting the unit back.
Wipe the counter surface under and around it too. A heat-tolerant mat or trivet can make this easier, as long as the maker allows it and it does not block base vents. Check that the unit sits flat and does not wobble, because an unstable appliance is a safety concern. If a foot is loose or missing, contact the maker instead of improvising a fix.
Keep the cord tidy as well, and make sure it does not rest in damp or greasy patches on the counter.
Choosing Cleaning Tools and Products
You do not need many products to keep the exterior clean. A soft microfiber cloth is the most useful tool, because it picks up grease and leaves little lint. Keep separate cloths for the exterior and for the inside, so grease is not spread around. A small soft brush, a cotton swab and a dry buffing cloth complete the set.
Mild dish soap is usually enough. Dilute it in warm water, and wring the cloth out well. Some makers sell their own cleaning products, which may be a reasonable choice if the manual recommends them. Read labels on any other product. General-purpose sprays are best avoided on the appliance itself, particularly near the controls. If you want to use one, spray it on the cloth, not the unit.
- Avoid abrasive powders, steel wool and scouring pads.
- Avoid products that leave a slippery or waxy residue on handles.
- Do not use heavy fragrances near food-contact areas.
- Wash cloths regularly so they do not smear old grease.
Whenever you are unsure, follow the manual. It is the best guide to your model’s materials, and it usually explains what is and is not suitable.
Spotting Damage While You Clean
Cleaning is a good time to inspect the exterior for problems. Run your cloth over the surface and notice cracks, warped plastic, melted patches, loose trim or discolored areas near the vents. These can point to heat or impact damage. Check the handle and any hinges for looseness, and make sure the basket release works smoothly.
Look at the cord and plug, especially near the unit and the plug head. Fraying, kinks, cuts, bent pins or discoloration are warning signs. Do not use a unit with a damaged cord. Check that the control panel is intact and that buttons respond as they should, without sticking or a cracked cover.
Smells matter too. A burning or electrical odor while cleaning or cooking is not normal. Stop using the unit, unplug it once it is safe to do so, and contact the maker. Do not open the housing.
If you find damage, keep a record with a photo and the date, and check your warranty details. Early contact with the maker may help you obtain a repair or replacement. Regular cleaning therefore does more than keep things tidy; it keeps you aware of the condition of the appliance.
FAQ
Can I use disinfectant wipes?
Check the manual. Some wipes leave residue or harm the finish, so a damp cloth with mild soap is the safer general choice.
How often should I wipe it down?
After any cook that splatters, and a fuller wipe weekly if you use it often.
Can I use vinegar on the outside of my air fryer?
Some people use diluted vinegar on sturdy surfaces, but it is not right for every finish. Check the manual and test a hidden spot first.
How do I remove sticky residue around the handle?
Use a cloth with warm soapy water and let it sit briefly on the residue, then wipe. A soft toothbrush can help with grooves.
Is it safe to clean the underside?
Yes, once the unit is unplugged and cool. Lift it carefully, wipe the base with a barely damp cloth and keep any vents dry.
What should I do if the plastic has turned yellow?
Discoloration is often permanent and caused by heat or age. Do not scrub hard, as that may scratch the finish.
Can I use a magic eraser type sponge?
These are mildly abrasive and can dull glossy finishes. Check the manual, and test on a hidden area if you decide to use one.
Do I need to clean the display or touch panel differently?
Yes. Use a cloth that is only just damp, wipe gently and dry right away, since moisture can harm electronics.
How do I stop fingerprints on a glossy air fryer?
Wipe with a dry microfiber cloth after use. Handling by the handle and not the body helps reduce marks.
The Short Version
Unplug, cool, and wipe with a barely damp cloth. Keep liquid out of vents and controls, and follow the manual.