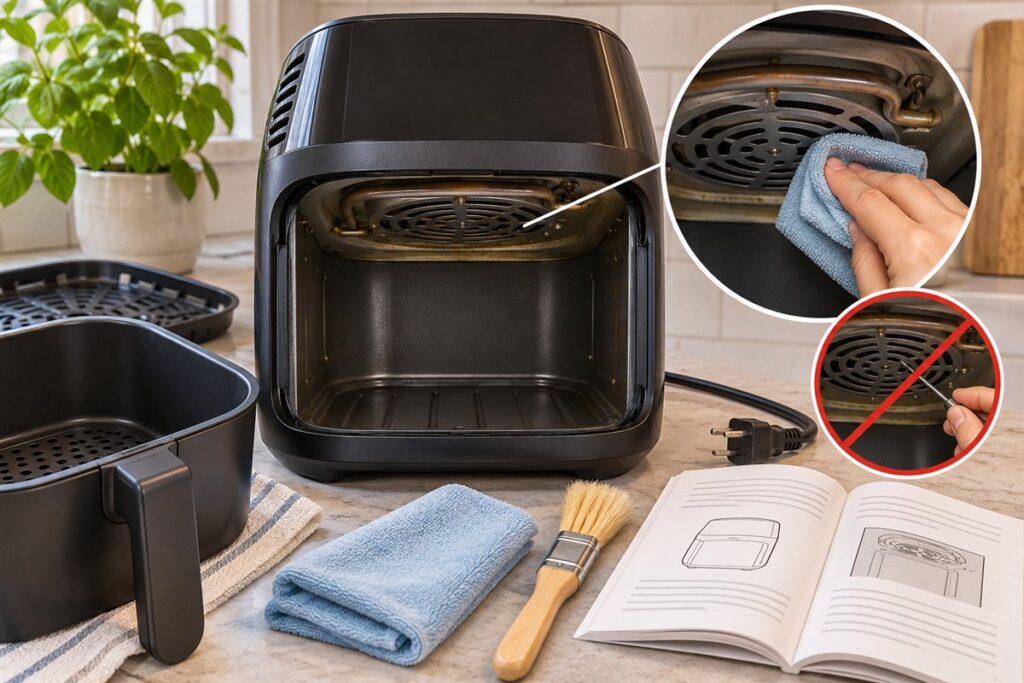
You can clean the reachable surfaces around an air fryer’s fan and vents with a dry or barely damp cloth once the unit is unplugged and cool. Do not take the unit apart or push tools into the fan. The manual is the guide for what you may touch.
What Collects Around the Fan
Air moves through the cooking space and past the vents, carrying fine grease and crumbs. Dust also settles on outer vents when the unit sits on a counter. A buildup can cause smells, smoke, or less airflow.
A Gentle Routine
- Switch off and unplug the unit, then let it cool completely.
- Remove the basket and tray, and set them aside for washing.
- Look inside the cooking chamber with a light to spot visible grease or crumbs.
- Wipe reachable surfaces with a soft cloth that is only slightly damp.
- Use a soft, dry brush or a gentle vacuum attachment on outer vent slots.
- Let everything dry before reassembling and plugging in.
Where to Be Careful
| Area | General guidance |
|---|---|
| Outer vent slots | Dry brush or light vacuum, with no liquid poured in |
| Inside the chamber | Soft, damp cloth after cooling |
| The fan itself | Do not poke or force anything into it |
| Controls and cord | Wipe only with a lightly damp cloth, keeping moisture away |
Preventing Build-Up
- Wash the basket and tray after each use so less grease reaches the vents.
- Keep the unit away from walls so air can move freely.
- Avoid cooking very greasy foods without a liner or tray the maker allows.
- Cover or store the unit when it is not in use, once it has cooled.
When to Leave It to the Maker
If the fan makes odd noises, rattles, or smells burnt, stop using the unit and contact the maker. Do not open the casing or attempt to fix the fan or its wiring.
Good habits make this job rarer. Cook with a clean, dry basket, avoid overfilling it with loose crumbs or flaky coatings, and shake crumbs into the bin before they drift into the chamber. A small dry brush kept with your kitchen tools is handy for the outer vents. If you ever see dust or grease thick enough to clump, work gently, and take your time so you never force anything into the unit. The manual often lists which areas the user may clean, and that list is the one to trust.
How Airflow Design Affects Build-Up
Where grease and crumbs end up depends on how the unit moves air. In most air fryers a heating element and a fan sit above the cooking space, and the fan pushes hot air down and around the food before drawing it back up. Fine droplets of grease and light particles are carried in that stream, and some land on the fan cover, the element guard and the nearby walls of the chamber.
Different layouts produce different patterns. In basket models, the fan area sits directly above the basket, so food that rises, such as flaky coatings and light crumbs, can reach it. In oven-style models, the fan is often at the back, with vents and a cover that can collect grease from the whole cooking space. Units with a top-mounted exhaust may deposit residue near the outer vents more than inside.
Understanding the path helps you know where to look. Check the area immediately around the fan cover or element guard, the interior ceiling and the vent slots. Residue tends to be thickest where airflow slows or turns, such as corners and edges. You are not expected to reach the fan blades themselves; the manual tells you which surfaces the user can clean. If a part is not described as user-accessible, treat it as off limits.
Spotting Early Signs of a Dirty Fan Area
Small changes in behavior can signal build-up before it becomes a bigger issue. Pay attention to smells, sounds and results. A faint smell of old grease or burning at the start of a cook, even when the basket is clean, suggests residue near the heating element or fan. Smoke from an empty preheat points the same way, provided no food or liner is involved.
Noise can change as dust and grease collect. A fan that sounds rougher, rattles or whines more than it used to may be struggling, although noise has other causes too. Food that cooks unevenly or takes longer than usual can point to reduced airflow. Check that the vents are clear and the unit has proper space around it.
- Look inside with a torch once the unit is cool and unplugged.
- Note dark, sticky patches on the ceiling or the cover.
- Check the outer vent slots for visible dust or grease threads.
- Pay attention to any new smells that last after the first minute of cooking.
If anything seems unusual and cleaning the reachable surfaces does not help, stop using the unit and consult the manual. Persistent symptoms may need a technician, not another round of scrubbing.
Tools for Reaching Tight Spots Safely
Narrow gaps around the fan area tempt people to use whatever fits, but the choice of tool matters. The goal is to lift grease and dust without pushing it deeper or damaging parts. A soft bristle brush with a long handle, such as a clean, dry paintbrush or a small cleaning brush, reaches into corners gently. A cloth wrapped around a blunt, flat tool such as a wooden spatula handle can follow the contours of the chamber, as long as you do not touch the element or fan.
A soft vacuum attachment, held a short distance from the vent slots, pulls loose dust away from outside openings. Compressed air can drive dust deeper into a unit or toward electronics, so only use it if the manual allows it. Do not use metal tools, wire brushes or sharp picks. These can scratch coatings, bend delicate parts or damage wiring.
- Use only tools that are clean and dry or barely damp.
- Never insert anything into the fan or past the guard.
- Do not spray cleaner into openings.
- Let everything dry in open air before use.
If an area is out of reach with these tools, leave it. Some residue is not worth the risk, and a maker may offer service for deeper cleaning. Pay attention to what the manual says is user-serviceable, and do not exceed it.
Choosing a Model With Easier Access
If you are shopping, consider how easy a model makes it to keep the fan area clean. Oven-style units with a smooth interior and few ledges are often easier to wipe than those with deep recesses. In basket models, a heating area that is visible and reachable from below, when the basket is out, is easier to check than one hidden behind a fixed cover.
Look for details in the manual, which is often available online before purchase. Does it describe how to clean the heating area and cover? Does it say whether any covers are removable by the user? A manual that gives clear, specific instructions is a good sign.
- Choose smooth surfaces over complex ridged ones.
- Check whether the unit has a removable splash guard or cover, if the maker allows it.
- Look at how easy it is to see inside with the basket removed.
- Consider whether outer vents are on the surface or hidden by trim.
Also think about how you cook. If you often make greasy foods, a model with good access and a tray that catches drips is more useful. If you mostly cook dry foods, access matters less. Check what the maker says about warranty coverage and cleaning access before you buy.
Cooking Habits That Keep the Fan Area Cleaner
Less residue means less cleaning, and small changes in how you cook make a big difference. Pat food dry before cooking to reduce spatter and steam. Trim excess fat from meat, and avoid cooking very fatty foods in large amounts without the tray the maker allows. Shake off loose crumbs and flaky coatings before they go in, since light particles are the ones carried upward.
Control the load. A basket packed too tightly forces air through narrow gaps, throwing more grease upward. Cook in smaller batches and leave room above the food. Do not overload with light, loose items such as leafy greens, small herbs or thin coatings that can lift in the airflow. Use a rack, a liner or a lid-style cover only if the manual says they are safe.
Control sticky coatings too. Sugary glazes and sauces can spit and bake onto surfaces near the heat. Add them near the end of cooking, or toss food in sauce afterward. After fatty cooks, give the interior a quick wipe once the unit has cooled to remove fresh grease before it bakes on. These small steps keep the fan area clear and cut down on smoke, smell and the need for deeper cleans.
FAQ
Can I spray cleaner into the vents?
No. Liquid can reach electrical parts, so keep sprays away and follow the manual.
How often should I clean this area?
A quick look every few weeks is reasonable. Adjust to how often you cook and how greasy the food is.
Can I take the fan cover off to clean it?
Only if the manual says the cover is user-removable. Otherwise, leave it in place and clean only the surfaces you can reach safely.
Is compressed air safe for cleaning vents?
It can push dust deeper or toward electronics, so use it only if your manual allows it. A soft brush or gentle vacuum is the safer default.
Why does my air fryer smell when I preheat it empty?
Old grease or residue near the heating area is a likely cause, or it may be the first-use smell on a new unit. Clean the reachable surfaces and check the manual.
How can I tell if airflow is reduced?
Food cooking unevenly or taking longer than usual can be a sign. Check that vents are clear and the unit has space around it.
Does a liner stop grease from reaching the fan?
No. A liner catches drips below but does not stop airborne grease. It also must never block airflow, so follow the manual.
Should I clean the fan area more often if I cook bacon or sausages?
Yes, greasy foods create more residue. Wipe the reachable chamber surfaces after cooling and check the vents regularly.
Can I use a hairdryer to dry the vents?
It is better to let parts air dry, since a hairdryer may blow dust or push moisture inward. Check the manual for advice.
The Short Version
Unplug, cool, and clean only what you can reach with a soft cloth or brush. Leave the fan itself, and any fault, to the maker.