Stage lighting shapes how a performance looks to the audience, from a school play to a band night. We have not used these products ourselves, so this guide does not rank anything. It shows how to compare fixtures, control options and mounting so you can plan a rig that suits your space.
Begin with the room and the type of event. A small stage with a low ceiling needs compact fixtures and tight cable runs, while a hall may need wider coverage and truss mounting. Decide whether you want washes, spots or moving effects, and how many channels your controller can drive. Many modern fixtures use DMX control, which lets one desk run an entire rig. Consider heat, noise and power draw too, since several fixtures on one circuit can add up. Think about who will operate the lights. A volunteer crew may prefer simple presets, while a technician might want full manual control. The table below turns these ideas into a checklist. It is also wise to plan for growth. A rig that begins with a few wash fixtures often gains spots and effects later, so choose a controller with spare channels and a power plan with room to add more units.
As an Amazon Associate we earn from qualifying purchases. Links on this site are affiliate links, and they do not change the information we give.
In this guide
Quick Picks
| Pick | Product | Best For |
|---|---|---|
| Best Compact Wash | CHAUVET DJ SlimPAR 56 | Slim, silent LED par for uplighting |
| Best High-Output Par Set | BETOPPER 54x4W RGBW Par Light 4-Pack | Bright wash with CRI above 90 |
| Best Compact Moving Wash | BETOPPER Mini Moving Head Light 2-Pack | Moving colour for small rigs |
| Best Gobo Spot | U’King Spot Moving Head Light 2-Pack | Gobos and colours for effects |
| Best Big-Room Beam | U’King 150W Beam Moving Head Light | Prism beam effects for larger venues |
Our Picks

1. CHAUVET DJ SlimPAR 56 — Best for compact, silent washes
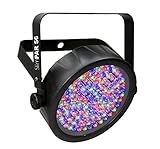
The CHAUVET DJ SlimPAR 56 is the compact wash light that small rigs are built around. Its 108 LEDs (36 each of red, green and blue) sit in a housing only about 2.2 inches deep, so it fits inside truss sections and tight uplighting spots where a full-size par can will not go. Control is by DMX in 3 or 7 channel modes over 3-pin XLR, or you can run built-in automatic and sound-activated programs without a console. With no fan and no moving parts it is effectively silent, which suits ceremonies, speeches and video work, and up to 50 units can be power-linked at 120V to cut down cable runs. The 14-degree beam is narrow for a wash light, so it works best at short throw distances. Pick it for uplighting and small-stage washes where space and silence matter.
2. BETOPPER 54x4W RGBW Par Light 4-Pack — Best for bright, high-CRI wash
BETOPPER’s 54x4W par is the output pick: each fixture packs 54 four-watt RGBW 4-in-1 LEDs, and this listing is a four-pack, giving you a matched set of high-output pars for a full stage wash in one purchase. BETOPPER rates the output at up to 5500 lumens with a colour rendering index above 90, which matters when skin tones and costumes need to look right rather than just bright. Control runs over DMX in 4 or 8 channel modes, with automatic, sound-activated and master-slave operation for nights when no lighting operator is available. Four-in-one RGBW chips mix colour inside a single lens, avoiding the multicoloured shadows cheaper RGB fixtures can throw. Choose this pack if you need real wash brightness for bands, church stages or larger dance floors and want colour quality to match.
View BETOPPER 54x4W RGBW Par Light 4-Pack on Amazon

3. BETOPPER Mini Moving Head Light 2-Pack — Best for moving colour on small rigs
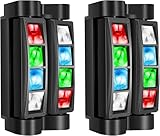
The BETOPPER LM70SR mini moving head adds motion to a small rig without the bulk of a professional mover. Each unit runs seven 8W RGBW LEDs as a moving wash, and this listing pairs two of them so you can run mirrored effects either side of a DJ booth or stage. Control options cover DMX in 9 or 14 channel modes, master-slave linking, automatic and sound-activated programs, plus the included remote for quick colour and pattern changes without a console. The compact head suits truss totems, mobile DJ setups and small club installs where a full-size moving head would overwhelm the room. As a wash-style mover it spreads light rather than projecting gobos, so pair it with a spot fixture if you need shapes as well as movement. Pick the LM70SR pair for affordable moving colour at parties and small venues.
4. U’King Spot Moving Head Light 2-Pack — Best for gobo effects
The U’King spot moving head is the effects pick of this list: a 25W LED spot sold as a pair, with eight gobos and eight colours on board, so it projects patterns as well as beams. It runs DMX in 9 or 11 channel modes with 3-pin XLR in and out for daisy-chaining, alongside sound-activated, automatic and master-slave modes for console-free operation. The maker lists a cool colour temperature range around 8000–9000K, which gives the beams a crisp, icy look that cuts through wash lighting. At 25W it is aimed at weddings, house parties and small dance floors rather than long-throw concert work. Choose the U’King pair if your rig already has wash covered and you want affordable gobo spots to add movement, texture and aerial effects above the crowd.
View U’King Spot Moving Head Light 2-Pack on Amazon
5. U’King 150W Beam Moving Head Light — Best for large-room beams
The U’King 150W beam is the step-up mover for bigger rooms. Its 150W LED source drives a tight beam that stays visible across a hall, and an 18-facet prism splits that beam into a spread of rays for aerial effects. Eight gobos and eight colours are on board, and the fixture can work across beam, spot and wash style effects, with strobe available. DMX control with sound-activated, automatic and master-slave modes covers both programmed shows and plug-and-play nights. This is a single, larger fixture rather than a pair, so budget for two if you want symmetrical effects on a wide stage. Pick it if smaller 25W-class movers would get lost in your venue and you need one strong centrepiece beam per side.
View U’King 150W Beam Moving Head Light on Amazon
What to Look For
| Factor | Why it matters | What to check |
|---|---|---|
| Fixture type | Wash, spot and moving head fixtures do different jobs. | Match the type to what you want to light and how. |
| Light source | LED fixtures run cooler and use less power than older lamps. | Read the maker’s notes on source type and color range. |
| Control | DMX allows one desk to run many units. | Check channel modes, DMX ports and any built-in programs. |
| Beam angle | A narrow beam highlights a person, while a wide one covers an area. | Compare listed angles and whether zoom is offered. |
| Mounting | Clamps, stands and trusses suit different venues. | Look at the bracket supplied and the hanging method. |
| Cooling and noise | Fans can be audible in quiet scenes. | Check the maker’s notes on fan control or fanless design. |
Setup and Care Tips
- Plan the layout on paper before hanging any fixture.
- Label each DMX address on the unit and on your plot.
- Follow the maker’s guidance on mounting hardware and backup hanging cables.
- Dust lenses and vents regularly with a soft brush.
- Coil cables loosely and store them dry.
Mistakes to Avoid
- Overloading a single power circuit.
- Mixing up DMX addresses between units.
- Ignoring ceiling height when choosing beam angle.
- Buying fixtures without a plan for the controller.
- Letting dust build up inside vents.
Planning a Rig From the Audience Backward
Most lighting plans go wrong because they begin with the gear instead of the view. Stand where the audience will sit and ask what they need to see. Faces, mainly. After faces come the backdrop, the floor and the moments of drama. When you work backward from those needs, buying decisions become clearer and a lot less random.
Sketch the stage as a simple rectangle. Mark where performers stand, where speakers and instruments sit, and where the audience looks from. Then note the ceiling height, any beams or low points and the places where you can safely attach hardware. A rough drawing on paper often reveals a problem, such as a pole in the way or a window that will wash out your effects, long before you spend anything.
The Classic Three-Point Idea Applied to a Stage
Photographers and filmmakers talk about key, fill and back light, and the same logic helps on stage. A front light from one side shapes the face. A softer light from the opposite side keeps shadows from turning harsh. A light from behind and above separates the performer from the backdrop and gives a clean outline.
Why Angles Matter
Lights placed too high create dark eye sockets. Lights placed straight at eye level flatten the face and can dazzle performers. A front position of roughly forty-five degrees above and to the side is a popular first position, then you adjust by eye.
Scaling the Idea
On a small stage, one fixture per position may be enough. On a large one, you might use several fixtures per zone so that performers stay lit as they move.
Control Basics: From Simple Modes to DMX
Fixtures can be controlled in several ways, and the listing usually tells you which. Many include built-in programs, sound activation and an automatic mode that need no extra equipment. These are fine for casual events. For precise cues you will want a controller that speaks DMX, a widely used lighting control protocol.
In a DMX setup, each fixture receives an address and occupies a number of channels. A simple wash may use a handful of channels for colour and dimming, while a moving head can use many more for position, gobo, focus and speed. Add up the channels before you buy so that your controller and addresses can handle the full rig. Check each fixture’s manual for its channel modes, since many offer more than one.
Colour Mixing Without Muddy Results
Fixtures that mix red, green, blue and sometimes white or amber can produce a huge range of colours, but very intense colour on skin can look odd. Most designers use strong colour on backdrops and floors, and gentler tones near faces. Warm, pale tints flatter people more reliably than deep blues and greens.
- Keep one steady, neutral-looking wash on performers.
- Let accent fixtures carry the bold colours.
- Avoid mixing too many different hues in one moment.
- Match colour changes to the music, not to the clock.
If you record video of the event, remember that cameras react to colour and flicker differently from eyes. Check the maker’s information about dimming and refresh behaviour if filming matters to you.
Moving Heads, Gobos and Beams: When Effects Help
Moving heads add motion, patterns and drama. A beam fixture produces a tight, bright shaft of light, a spot fixture can project patterns through a gobo, and a wash fixture spreads colour. Each does a different job, and a rig that tries to do everything with one type usually ends up compromised.
Effects work best with a little atmosphere. A small amount of haze, used in line with the venue’s rules and the maker’s guidance for the haze product, makes beams visible. Without it, the same beams can look weak. Check with the venue before using any haze or fog, since some alarms and policies forbid it.
Throw Distance and Beam Angle in a Small Room
A fixture lights a larger circle the farther it sits from the subject, and a wider beam angle spreads that circle faster. In a low-ceilinged room, a wide beam placed close to the stage can cover a whole band, while a narrow beam would light only one person. In a tall hall, the opposite can be true: a narrow beam travels a long way and stays punchy, but a wide beam from the same distance may look weak.
Listings usually state the beam angle, and some give a field angle as well. Compare these with the distance from fixture to stage in your venue. If you cannot find the figure in the listing, ask the seller or check the maker’s documentation instead of guessing.
- Short distances favour wider beams.
- Long distances favour narrower beams.
- Zoom or focus controls add flexibility when your venue changes.
Spending Wisely on a Limited Rig
Few people can buy everything at once. When the rig must stay small, put the first fixtures where they matter most. Front light on performers deserves priority, because an audience that cannot see faces tends to lose interest no matter how many effects are running behind.
- Light the performers evenly from the front.
- Add a backdrop wash for depth and colour.
- Bring in back light to separate people from the background.
- Add moving effects last.
This order keeps the rig useful at every stage of growth. A pair of good washes and a simple controller will serve you better than a single flashy moving head with nothing else around it.
Building and Rehearsing Cues
A cue is a saved look, such as a warm wash for a quiet song or a bright colour scene for the finale. Even a basic controller lets you store several. Build your cues in the venue if you can, with performers on stage, because lights always look different on people than on empty boards.
Keep It Simple
Begin with three or four dependable looks: a general working light, a warm look, a bold look and a blackout. Add extras only when you know the show well.
Rehearse the Transitions
Quick snaps can feel jarring, while slow fades can feel sleepy. Try different fade times until the change matches the energy of the music. Write the cue order on a sheet beside the controller so a helper can run the show if you step away.
Heat, Fan Noise and Ventilation
Fixtures generate warmth, and many use cooling fans. In a lively venue the sound is lost in the music, but in a theatre or a quiet ceremony it can be noticeable. Product listings sometimes mention fanless or quiet designs, and those can suit calm spaces better. Leave space around each fixture for airflow, keep vents clear of fabric and decorations, and follow the maker’s notes on operating conditions. Let fixtures cool before you pack them away, as the instructions advise.
Dealing With Mixed Light Sources
Venues are rarely fully dark. Windows, house lamps and exit signs all compete with your rig. Close curtains where you can, dim or switch off house lights that the venue allows you to control, and aim fixtures so that they do not shine directly into the audience’s eyes. If daylight is unavoidable, strong front light helps performers stand out against it. Keep in mind that different lamp types can show slightly different whites, so a quick look from the back of the room tells you more than a glance from the stage.
Talking to the Venue and Sound Crew
Share your plan early. Ask the venue about rigging points, power access, haze rules and load-in times, and agree who controls the house lights. If there is a sound engineer, agree on set times and sightlines so that your stands do not block speakers or cameras. A friendly ten-minute chat before the event avoids most last-minute surprises.
Packing, Transport and Storage
Good habits protect your investment. Wrap lenses and cables, use padded cases for moving heads, and store gear in a dry place away from extreme temperatures. Keep clamps, safety cables and spare fuses together in a labelled box so nothing goes missing between events. A short inventory list taped inside each case helps you spot anything left behind at the venue.
Power Planning and Cable Routes
Every fixture draws power, and a rig can add up faster than you expect. Read the power rating in each product listing, total them, and compare the figure to the circuit available at your venue. Do not guess about electrical capacity. If you are unsure, ask the venue operator or a qualified electrician.
Plan cables carefully:
- Keep power and control cables apart where possible to limit interference.
- Use proper cable covers or tape across walkways.
- Label each end of every run.
- Leave a little slack at each fixture for adjustment.
Tidy cabling also makes pack-up faster and reduces the chance of damage.
Mounting Safely
Fixtures hang above people, so mounting is a serious matter. Use only mounting hardware designed for the purpose, follow the maker’s instructions, and add a safety cable where the instructions or venue rules call for one. Check the load rating of any stand, truss or bar against the combined weight of what you attach. If the structure belongs to a building, ask the owner or a qualified professional before fixing anything to it. When in doubt, choose a floor stand instead of a risky overhead point.
Matching Gear to Event Type
| Event | Main need | Useful fixture types |
|---|---|---|
| School play | Clear, even light on faces | Wash fixtures from the front |
| Live band in a small room | Mood and colour with modest space | Compact washes and a pair of moving heads |
| Dance party | Motion and strong effects | Moving heads, beams, haze where allowed |
| Speaker or ceremony | Steady, flattering light | Warm front washes |
| Church or hall | Quiet operation and simple control | Silent fixtures with simple presets |
Fixing Typical Problems
Flicker on Camera
Some fixtures show flicker in video at certain settings. Try different dimming levels or modes and read the maker’s notes.
Fixtures Not Responding
Check addresses, cable connections and the channel mode first. A duplicated address makes two fixtures behave as one.
Uneven Light
Overlap beams so each performer sits within the glow of at least two fixtures.
A Brief Glossary
- Wash: a broad, soft spread of light.
- Gobo: a stencil that shapes projected patterns.
- DMX: a digital control signal for lighting.
- Channel: one control line on a fixture.
- Beam angle: how wide the light spreads.
- Truss: a framework for hanging fixtures.
Final Checklist Before You Choose
- Draw the stage and note mounting points.
- List what the audience must see.
- Count the channels your controller can handle.
- Total the power ratings and check the venue circuit.
- Decide whether noise matters in your space.
- Confirm that your mounting hardware suits the weight.
With these answers written down, comparing listings becomes straightforward, and your rig is far more likely to suit the room you actually have.
Choosing With Confidence: A Deeper Look at What Separates the Picks
By the time most readers reach this point in the guide, they have a shortlist — and the real question is no longer which stage lighting exist, but which one will still feel like the right choice a year from now. That answer rarely comes from a single feature. It comes from how the whole product fits your space, your routine and your expectations. This section slows the decision down and walks through the judgment calls that experienced owners make, so you can apply the same thinking to the picks above.
Start with the job, stated plainly. A stage lighting fixture bought for small stages lives a very different life from one bought for DJs and community theatre. Write down your main scenario in one sentence before you compare anything. Every feature, material and design choice in this category should be judged against that sentence. Options that serve your main scenario well and everything else adequately are almost always better buys than options that are brilliant at a scenario you will rarely face and merely acceptable at the one you face every week.
Next, look at the fundamentals that this guide keeps returning to: mounting, beam, color mixing, control, cables, haze and venue size. These are not marketing talking points; they are the parts you will interact with every single time you use the product. When you read the individual reviews above, pay closest attention to what each pick does with these fundamentals. A product that gets them right feels effortless in daily use. A product that cuts corners here will remind you of it constantly, no matter how appealing its extra features looked in a feature list.
Matching the pick to your space and routine
Measure and observe before you buy. Check the physical space the stage lighting fixture has to live in or work in, including clearance to move around it, access for cleaning, and how it interacts with what is already there. Then walk through your actual routine: when do you reach for it, how much setup patience do you honestly have, and who else will use it? A pick that suits a careful single user can frustrate a busy household, and a pick designed for a busy household can feel like overkill for one person. The reviews above flag these differences; use them.
Also think about the unglamorous moments: putting it away, cleaning it after a messy job, moving it, or storing it during the season when it sees less use. Products earn their keep in those moments. If a design makes the routine easy, you will use it more and maintain it better. If every use ends with an awkward cleanup or a storage puzzle, even an excellent product slowly becomes a burden. When two picks look close on performance, choose the one with the easier routine.
Reading the trade-offs honestly
Every pick in this guide involves a trade-off, and the reviews name them rather than hiding them. One option trades convenience for durability, another trades a lower commitment for fewer refinements, another is specialized in a way that makes it superb for one scenario and ordinary for others. None of those trade-offs is automatically wrong. The mistake is choosing a trade-off without noticing it. As you compare, ask of each pick: what did the maker prioritize, what did they deprioritize, and does that priority order match mine? When the answer is yes, you have found your pick, even if another option scores better on a feature you care about less.
Budget deserves the same honesty. Set the amount you are comfortable spending before you fall in love with a flagship, and judge value inside that boundary. Within any tier in this guide there is a pick that represents the tier well. Overspending on capabilities you will not use does not buy satisfaction; it buys a quieter version of regret. Underspending has its own cost when the product sees heavy use: more friction, earlier replacement, and money spent twice. The middle path — the pick whose strengths match your main scenario at a tier you can justify by how often you will use it — is where most satisfied owners land.
Real-World Scenarios: Putting the Picks to Work
Specifications and feature lists only tell half the story. The scenarios below describe the situations readers most often describe when they write about stage lighting — small stages, school productions, houses of worship, DJs and community theatre. Thinking through which of them sounds most like your life is the fastest way to narrow the shortlist to one confident choice.
In the first scenario, the stage lighting fixture is a daily workhorse. It gets used early, often and without ceremony, and it has to tolerate being handled by people who are in a hurry. For this life, prioritize the fundamentals — especially mounting and beam — over refinement. Durability and an easy routine beat clever extras, because the product will be judged a hundred times a month on whether it simply works.
In the second scenario, the stage lighting fixture is a specialist brought out for a particular job done properly. Here, the specialized pick in the lineup earns its place: the design choices that look narrow on paper turn out to be exactly what the job demands. If this is you, do not talk yourself into the generalist out of a vague feeling that versatility is safer. A specialist used for its specialty is satisfying every time; a generalist asked to do a specialist job is a compromise every time.
In the third scenario, space or storage is the binding constraint. The stage lighting fixture has to fit a smaller footprint, share its home with other gear, or be set up and put away repeatedly. Judge the picks by their real occupied space and their setup routine, not by their capability list. Owners in this scenario consistently say the same thing afterwards: the best product was the one that fit their space gracefully, because a product that fights your space loses even when it wins on features.
In the fourth scenario, the stage lighting fixture is shared — by a household, a team, a class or a crew. Shared use rewards intuitive design, forgiving construction and easy cleaning, and it punishes fiddly routines that only one person understands. If several people will use yours, weight the reviews accordingly: look for the picks described as straightforward and robust, and be skeptical of any option whose routine depends on one careful owner’s habits.
Getting the Most From Your Stage lighting fixture: Use, Care and Long-Term Ownership
Ownership done well is a skill, and it is mostly a collection of small habits. The first habit is a proper first week. Unbox and inspect everything, confirm that all parts and accessories described in the guide and the product documentation are present, and run through the basic routine once at a calm moment rather than debuting the product under pressure. Note anything that feels loose, rough or not as described while the fix is still simple.
The second habit is cleaning as you go. Most wear on stage lighting is not dramatic damage; it is the slow accumulation of grit, moisture and residue in exactly the places nobody wipes. After use, give the surfaces and contact points a quick clean appropriate to the materials, let anything damp dry fully before storage, and keep an eye on haze and venue size — the detail owners most often mention when a product ages early. The care guidance earlier in this guide covers the specifics; this is about rhythm. Small, frequent care beats occasional deep rescue almost every time.
The third habit is a short periodic inspection. Once in a while — monthly for daily-use items, seasonally for occasional ones — spend a few minutes checking fasteners, moving parts, wear surfaces and anything that flexes, seals or locks. Tighten what has loosened, clean what has built up, and address small issues while they are still small. This is also the moment to reconsider storage: a stage lighting fixture stored dry, supported properly and out of punishing conditions will outlast a neglected one by years, whatever tier it came from.
Mistakes that shorten the life of stage lighting
Beyond the mistakes covered earlier in this guide, a few ownership errors show up again and again. The first is using the product outside the job it was chosen for — asking a light-duty pick to do heavy-duty work, or a specialist to be a generalist — and then blaming the product. The second is skipping the boring setup steps: proper fitting, leveling, anchoring, charging, sealing or breaking in, depending on the category, exists because it prevents the failures that follow. The third is storing the product in the worst available place — damp, crushing, sun-baked or buried under other gear — for months at a time. Avoid those three, and you have avoided most premature replacements.
Finally, know the difference between wear and failure. Cosmetic marks from honest use are not a verdict on your purchase; they are evidence the product is doing its job. What matters is function: does it still do the thing you bought it for, safely and without growing frustration? Judged that way, a well chosen stage lighting fixture has a long useful life, and the decision framework in this guide — main scenario first, fundamentals second, trade-offs made knowingly — is what gets you there.
Head to Head: How the Picks in This Guide Differ in Practice
Readers often ask for a plain-language comparison of the shortlisted options, so here is how the picks above separate when you live with them rather than line them up on paper. None of these notes introduce new claims about the products; they simply draw out the positioning already described in the reviews, so you can match each pick to the scenario it was chosen for.
Consider the U’King 150W Beam Moving Head Light — described in this guide as best for large-room beams — if its role in the lineup matches how you actually live with stage lighting. The strongest reason to choose it is fit for purpose rather than any single headline feature: check it against the mounting, the beam, and the space or routine it has to fit into. If those line up with your priorities, it is a sensible pick; if you find yourself making excuses for a mismatch on the basics, one of the other options in this guide will almost certainly serve you better.
Consider the BETOPPER Mini Moving Head Light 2-Pack — described in this guide as best for moving colour on small rigs — if its role in the lineup matches how you actually live with stage lighting. The strongest reason to choose it is fit for purpose rather than any single headline feature: check it against the mounting, the beam, and the space or routine it has to fit into. If those line up with your priorities, it is a sensible pick; if you find yourself making excuses for a mismatch on the basics, one of the other options in this guide will almost certainly serve you better.
Consider the U’King Spot Moving Head Light 2-Pack — described in this guide as best for gobo effects — if its role in the lineup matches how you actually live with stage lighting. The strongest reason to choose it is fit for purpose rather than any single headline feature: check it against the mounting, the beam, and the space or routine it has to fit into. If those line up with your priorities, it is a sensible pick; if you find yourself making excuses for a mismatch on the basics, one of the other options in this guide will almost certainly serve you better.
Consider the BETOPPER 54x4W RGBW Par Light 4-Pack — described in this guide as best for bright, high-cri wash — if its role in the lineup matches how you actually live with stage lighting. The strongest reason to choose it is fit for purpose rather than any single headline feature: check it against the mounting, the beam, and the space or routine it has to fit into. If those line up with your priorities, it is a sensible pick; if you find yourself making excuses for a mismatch on the basics, one of the other options in this guide will almost certainly serve you better.
Consider the CHAUVET DJ SlimPAR 56 — described in this guide as best for compact, silent washes — if its role in the lineup matches how you actually live with stage lighting. The strongest reason to choose it is fit for purpose rather than any single headline feature: check it against the mounting, the beam, and the space or routine it has to fit into. If those line up with your priorities, it is a sensible pick; if you find yourself making excuses for a mismatch on the basics, one of the other options in this guide will almost certainly serve you better.
The pattern across all of them is the same one this guide has followed from the start: there is no single winner, only a best match. Identify your main scenario, weigh the fundamentals that you will touch every day, accept the trade-off that costs you least, and the right choice usually becomes obvious. If you are still torn between two, choose the one with the easier daily routine — it is the tiebreaker satisfied owners mention most.
One more ownership note for stage lighting: keep the original documentation and any spare parts together in one place, and revisit your choice after the first season of use. Needs change, routines settle, and the owners who stay happiest with stage lighting are the ones who adjust placement, accessories or routine once they know their real pattern, instead of expecting the first setup to be perfect forever. That small review — what worked, what annoyed, what to change — turns a good purchase into a long term fit, and it costs nothing but ten honest minutes of attention.
One more ownership note for stage lighting: keep the original documentation and any spare parts together in one place, and revisit your choice after the first season of use. Needs change, routines settle, and the owners who stay happiest with stage lighting are the ones who adjust placement, accessories or routine once they know their real pattern, instead of expecting the first setup to be perfect forever. That small review — what worked, what annoyed, what to change — turns a good purchase into a long term fit, and it costs nothing but ten honest minutes of attention.
FAQ
Do I need a lighting desk?
Some fixtures run on built-in programs or sound control, but a desk gives you precise control. Consider it if you run more than a few units.
Are LED fixtures better than older lamps?
They tend to run cooler and use less power, but color and output differ between models. Check the maker’s details.
Should I buy a stage lighting fixture now or wait for a newer model?
For most buyers, waiting rarely changes the outcome. The fundamentals of a good stage lighting fixture — sound construction around mounting, sensible design, and a good match for your use — change slowly. Buy when you have a real need and a pick in this guide matches it; a product that solves your problem today is worth more than a rumored improvement that may never matter to you.
Can one stage lighting fixture handle several different jobs well?
Often yes, within limits. Versatile options in this guide are designed to cover the common scenarios — small stages, school productions, houses of worship, DJs and community theatre — without major compromise. Where a single choice struggles is at the extremes: the heaviest duty task, the tightest space, or a very specific requirement. If one scenario matters far more than the rest, choose for that scenario and let the others be a bonus.
What should I check in the first week of owning a new stage lighting fixture?
Use the first week to confirm fit and function while returning or exchanging is still easy. Check that it works with your existing setup, that nothing about mounting feels off in real use, and that the day to day routine — setting it up, using it, putting it away — is as easy as you expected. Small annoyances in week one tend to become big annoyances by month six, so take them seriously.
How long should a good stage lighting fixture last with regular use?
Longevity depends far more on care and conditions than on the badge. A well chosen stage lighting fixture that is used as intended, cleaned on a sensible schedule, and stored or protected properly between uses should give years of service. The parts that usually age first are the wear points connected to mounting and haze and venue size, so inspect those regularly and deal with small issues early rather than waiting for a failure.
What maintenance do most owners of stage lighting forget?
The unglamorous basics: wiping down surfaces before grit or moisture does quiet damage, checking fasteners and moving parts for looseness, and storing the stage lighting fixture in the conditions the maker intends rather than wherever space happens to be free. Ten minutes of routine care after heavy use prevents most of the wear that owners later blame on build quality.
How do I know if a stage lighting fixture is the wrong choice for me?
The clearest signs are friction and workarounds: you avoid using it, you have to adapt your routine around its weaknesses, or the mismatch is with something fundamental like size, placement or the way it handles beam. Features can be learned, but a basic mismatch in fit or purpose rarely improves, which is why matching the pick to your main use case matters more than chasing the longest feature list.
Is it worth paying more for a stage lighting fixture, or is a basic one enough?
It depends on how often and how hard you will use it. If your stage lighting fixture will see occasional, light use, a simpler option from this guide is often plenty. If it will be used daily, shared by several people, or relied on in demanding conditions, stepping up usually buys better materials, smoother operation and less frustration over time. The honest test is cost per use: frequent users feel the difference, occasional users rarely do.
How do I get the most value from a stage lighting fixture over its life?
Value comes from use and care in equal measure. Choose the pick that fits your main scenario, learn its routine properly in the first few weeks, keep up the simple cleaning and inspection habits covered in this guide, and avoid the common mistakes that shorten service life. Owners who do those four things consistently report the fewest regrets, whatever tier they bought at.
The Short Version
Plan around your room, choose fixture types for the jobs you need, and check control, beam angle and mounting. A simple layout and careful labeling make the rig easier to run.
Related Guides
- How to Choose the Best Stage Lighting Packages: A Buyer's Guide
- How to Choose the Best Stage Lighting Stands: A Buyer's Guide
- How to Choose the Best Two Stage Snow Blowers: A Buyer's Guide
- How to Choose the Best Deck Lighting: Buyer's Guide (2026)
- How to Choose the Best Landscape Lighting: Buyer's Guide (2026)