A budget-friendly garbage disposal usually means a lighter motor and fewer comfort features, such as less sound insulation. That is fine for many households, since a half to three-quarter horsepower unit handles everyday scraps. The trade-offs are noise, grinding power and sometimes missing parts you must buy separately. Reading the listing for included hardware is the single best way to avoid a surprise at the hardware store.
The six disposals below are entry-level to mid-range continuous feed units from familiar brands. We have not used these products ourselves, so confirm horsepower, included parts and current pricing on the listing before buying, as prices change. The links open Amazon searches rather than a single listing.
As an Amazon Associate we earn from qualifying purchases. Links below are affiliate links, and they do not change the product information we give.
What to Look For
| Feature | Why it matters |
|---|---|
| Included parts | Check for a mounting kit, a cord and a stopper |
| Power | Half to three-quarter horsepower covers most needs |
| Noise | Entry-level models usually have less insulation |
| Warranty | Check the stated term on the listing |
| Install cost | A cordless unit may need an electrician or a cord kit |
In this guide
Specs at a Glance
| Product | Type | Key trait | Note |
|---|---|---|---|
| InSinkErator Badger 1 | 1/3 HP, continuous feed | Entry-level, light unit | Basic grinding power |
| Waste King L-2600 | 1/2 HP, continuous feed | Light duty | Confirm cord included |
| Waste King L-3200 | 3/4 HP, continuous feed | Middle power | Confirm cord included |
| GE GFC520V | 1/2 HP, continuous feed | Light to moderate use | Confirm included parts |
| Moen Prep Series GX50C | 1/2 HP, continuous feed | Entry-tier Moen | Light-duty power |
| InSinkErator Badger 5 | 1/2 HP, continuous feed | Common replacement | Widely stocked parts |
The 6 Best Budget-Friendly Garbage Disposals

Top pickBest for light daily scraps
1. InSinkErator Badger 1
A long-running entry-level InSinkErator, generally listed at 1/3 horsepower with continuous feed. It is a small, light unit aimed at everyday scraps and simple swap-in replacements.
Suits: light daily scraps. Strengths: a known brand at an entry level. Weaknesses: basic grinding power only. Skip it if you cook large meals often.

Best for a plug-in style budget swap
2. Waste King L-2600
A 1/2 horsepower continuous feed unit from Waste King, a light-duty option that is often sold with a power cord for plug-in installation. Check the listing to confirm.
Suits: a plug-in style budget swap. Strengths: a modest motor in a simple unit. Weaknesses: limited power for tough scraps. Skip it if you need a confirmed cord on arrival.

Best for more power on a budget
3. Waste King L-3200
A 3/4 horsepower continuous feed Waste King that sits between the light-duty and heavy-duty models in its range, with a similar plug-in style setup.
Suits: more power on a budget. Strengths: three-quarter horsepower from Waste King. Weaknesses: fewer premium features. Skip it if you want a quiet unit.

Best for light to moderate use
4. GE GFC520V
A 1/2 horsepower continuous feed disposer from GE, aimed at light to moderate daily use. Confirm on the listing what mounting hardware and cord are included.
Suits: light to moderate use. Strengths: a familiar appliance brand. Weaknesses: included hardware varies by listing. Skip it if you do not want to buy extra parts.
Best for a basic replacement
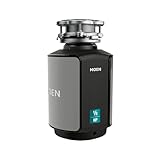
5. Moen Prep Series GX50C
A 1/2 horsepower continuous feed unit from Moen, whose Prep Series is its entry tier. It comes from a faucet maker many owners already know.
Suits: a basic replacement. Strengths: a recognized faucet-brand name. Weaknesses: light-duty power only. Skip it if you grind fibrous scraps often.

Best for an everyday budget mainstay
6. InSinkErator Badger 5
A long-running InSinkErator mainstay, generally listed at 1/2 horsepower with continuous feed. It handles ordinary food scraps and has a large following among installers.
Suits: an everyday budget mainstay. Strengths: a long track record and common parts. Weaknesses: more noise than insulated units. Skip it if you want the quietest option.

Care and Setup
- Confirm the listing includes a mounting kit and any needed cord.
- Run cold water before, during and after each use.
- Grind soft scraps only to protect a lighter motor.
- Keep the warranty paperwork in a safe place.
- Test the unit briefly with water running after installation, then look under it for drips.
- Clean the splash guard regularly so odors do not build up in a lighter, less insulated unit.
Mistakes to Avoid
- Choosing on price alone without checking included parts.
- Forgetting that a cord or an electrician may add to your costs.
- Expecting a budget unit to be quiet.
- Asking a light motor to grind bones or fibrous scraps.
Horsepower and Real-World Grinding
Horsepower is the number most listings lead with, and on a budget disposal it does matter, though not in a simple way. A one-third horsepower unit like the Badger 1 is built for soft scraps in small amounts. A half horsepower unit such as the Badger 5, the GE GFC520V or the Moen Prep Series covers typical weeknight cooking. A three-quarter horsepower unit, like the Waste King L-3200, gives the motor more headroom for fibrous peels and bigger loads.
More power generally means the motor strains less and grinds more finely, which also helps drains stay clear. But two units with the same horsepower rating can differ in grinding components, jam resistance and noise, so treat the figure as a starting point and read the rest of the listing. Features such as the type of grind chamber and any anti-jam measures vary by model, so check each one rather than assuming.
Match the motor to your habits. If you cook once a day for one or two people and mostly rinse plates, a light unit is a sensible, economical fit. If you prepare fresh vegetables daily, host often or have a larger family, step up to the more powerful choice even on a tight budget. Paying a little more for headroom usually costs less than replacing an overworked unit early. Whatever the rating, soft food waste is what these disposals are designed for.
Measuring Your Sink and Plumbing Before Ordering
Most disposals bolt to the sink flange using a standard three-bolt mounting system, which is why swap-in replacements are so common. Still, take a few minutes to check your setup before you order. A mismatch discovered after the old unit is out of the cabinet is frustrating, especially with water shut off.
- Existing mount: Look at the current assembly under the sink. If it is a compatible style, the new unit may attach directly. If not, you may need a different mounting kit or flange.
- Under-sink clearance: Measure from the underside of the sink to the cabinet floor and note any pipes, a water filter or a dishwasher hose in the way. Compare to the height and width on the listing.
- Discharge position: The drain outlet on the side of the unit needs to line up with your trap. Small differences can need a new elbow or extension.
- Dishwasher connection: If you have a dishwasher, the unit needs a dishwasher inlet, and the knockout plug usually must be removed before connecting the hose.
- Single or double bowl: Either works, but double-bowl sinks have the drain in a different spot, so check your plumbing layout.
Take a photo of the existing assembly and the cabinet interior to bring along or compare against the listing images.
Wiring and the Power Cord Question
This is the most common budget surprise. Some disposals ship with a power cord attached or included, while others arrive ready to be wired directly into a junction box under the sink. The listing and manual should say which applies. If it does not, ask the seller before you buy.
Look at what you have now. If an outlet sits inside the cabinet, you want a unit with a cord or a separately sold cord kit that fits. If the old disposal was hardwired, you may be able to wire the new one the same way, or you may add a switch or plug. Because this involves household electrical connections, many people hire an electrician or a licensed plumber for the job, and local codes sometimes require it.
Always switch off power at the breaker, not just at the wall switch, before disconnecting anything, and confirm with a tester that the wires are dead. Check what kind of switch controls the unit: a wall switch for a continuous feed disposal is standard. When comparing prices, add the cost of any cord kit, extra mounting hardware, drain fittings and labor, since the lowest sticker price is not always the lowest total cost. If you are not confident working with electricity, hire a pro.
Keeping Noise and Odors Under Control
Budget disposals usually have less sound insulation, so they are louder than premium models. You can reduce the effect without spending much. A snug install with a properly seated mounting ring cuts rattles, and a rubber splash guard that fits well also dampens sound. Check that the unit is not touching pipes or cabinet walls, since contact transmits vibration into the cabinet.
Use habits that shorten run time. Cut larger scraps into smaller pieces before dropping them in, feed material gradually rather than all at once, and run the unit only until the grinding sound changes and clears. Letting it run on empty adds noise without benefit.
For odors, the splash guard is the usual culprit, because food collects on its underside. Scrub it with a brush and dish soap. Occasionally grinding a handful of ice cubes can knock loose residue from the chamber walls, and a small amount of citrus peel may leave a fresher smell, though it is not required. Avoid pouring harsh chemical drain cleaners through the unit, since they can damage seals and fittings. If a smell persists after cleaning, check the trap and the drain line for buildup, because the disposal is not always the source.
Signs a Budget Unit Needs Replacing
Knowing the signs helps you decide between repairing and replacing. A hum with no grinding usually points to a jam, which can often be cleared by following the maker’s steps, such as using the hex socket on the bottom and pressing the reset button. A disposal that jams repeatedly, trips its overload often or leaves large chunks in the drain is losing effectiveness.
Leaks are the clearest replacement signal. A drip from the unit body or from the seam between housing sections usually means the seals have failed, and this tends not to be fixable at home. Slow, damp spots in the cabinet floor are worth investigating early, before they damage the wood. Rust-colored stains, a motor that sounds rough, and a persistently foul odor after cleaning also suggest the end is near.
Consider the age of the unit against the warranty on the listing, and keep your receipt. Replacing a light-duty unit with a slightly stronger model if you find yourself pushing its limits is a reasonable upgrade. If you are repeatedly unclogging, also check that scraps you grind are suitable, since the habit may be as important as the hardware.
Budget-Friendly Disposal Terms Explained
A basic garbage disposal is a straightforward appliance, but the listings still use terms that deserve explanation. The glossary below covers the words you will meet, so you can compare simple models by what they do and how they fit your sink.
- Horsepower: the size of the motor. A smaller motor can suit light daily scraps, while larger ones handle more.
- Grind chamber: the area where food scraps are broken down.
- Continuous feed: the unit runs when you flip a switch, and you add scraps as it runs.
- Batch feed: the unit runs only when its lid or stopper is in place.
- Sink flange and mounting ring: the pieces that hold the disposal to the sink opening.
- Dishwasher inlet: a connection point where the dishwasher drain hose can attach.
- Stainless or galvanized parts: the materials of grinding components, which affect resistance to rust.
Choosing a Disposal for Your Household
A small household with light use
A basic motor may be sufficient for soft scraps and plate leftovers. Make sure the unit fits the cabinet beneath your sink.
A busy family kitchen
You may want a stronger motor and a larger chamber. Even basic models vary, so read the maker’s description of what the unit can handle.
A rental or temporary home
Check with your landlord before changing anything under the sink, and ask whether a licensed plumber should handle installation.
A home with a septic system
Disposals add organic matter to the system. Ask a septic professional and read the maker’s instructions before installing one.
Light-Duty and Heavy-Duty Compared
| Question | Light-duty | Heavy-duty |
|---|---|---|
| Motor size | Smaller | Larger |
| Suited to | Occasional scraps | Daily family use |
| Noise and vibration | Varies, often louder | Often has more insulation |
| Cabinet space | Compact | Taller and heavier |
Measuring, Plumbing and Electrical Checks
Before you order, measure the space beneath the sink, including the height from the sink opening to the cabinet floor and the room for the drain pipe. Check the type of sink flange you have, and make sure the new disposal’s mounting system is compatible. Look at the electrical arrangement: most disposals plug into an outlet under the sink or are wired in, and a switch controls them. Changes to wiring belong to a licensed electrician.
Plumbing connections must be tight and leak-free. If you are not comfortable cutting and fitting drain pipes, hire a licensed plumber. Always disconnect the power before working under the sink, and follow the maker’s installation instructions.
Using a Disposal Wisely
Run cold water before, during and after grinding, and feed scraps gradually. Avoid putting in bones, large pits, fibrous stalks like celery and corn husks, grease, coffee grounds in bulk and non-food items. Never put your hand in the disposal, and use tongs or the maker’s recommended tool to remove stuck items. If the unit jams, switch it off and follow the maker’s steps for freeing it.
A bad smell often comes from food residue, and the maker’s cleaning advice is the best guide. Many people choose to compost certain scraps instead of grinding them, which can reduce the load on the unit.
Reading a Disposal Listing
Check the horsepower, the feed type and the materials of the grinding parts. Read the dimensions and the mounting details, plus the included hardware such as a power cord or a splash guard. See what the warranty covers, and for how long. Look at notes on noise and insulation, and treat vague claims with care. Confirm the dishwasher inlet is available if you need it. Finally, check the return terms, which are useful if the unit does not fit your sink. A simple, well-matched disposal will do its job quietly in the background for years.
Mistakes That Shorten a Disposal’s Life
Basic disposals work well when treated kindly. Running the unit without water causes extra wear and smells, so keep the tap on throughout. Feeding in large amounts at once strains the motor, and fibrous or stringy scraps can wrap around the grinding parts. Pouring grease down the drain is another habit to avoid, since it can solidify and clog pipes.
Many people also ignore small warning signs. A humming sound with no grinding, a slow drain or a persistent odor all point to a problem that the manual can help you diagnose. Do not use harsh chemical drain cleaners in the disposal unless the maker allows them, since they can damage parts and are hazardous to handle.
A little routine care, such as running cold water after each use and occasionally grinding a small amount of ice or citrus peels if the maker approves, can keep the chamber fresher between cleanings.
Choosing With Confidence: The Criteria That Actually Decide It
Choosing a garbage disposal is mostly about matching the machine to your plumbing, your cooking and your cabinet — in that order. Start under the sink: measure the space, note the position of the drain and the dishwasher connection if you have one, and check whether there is an electrical outlet in the cabinet or whether the unit will need to be hardwired. A disposal that does not fit the cabinet geometry, or that leaves no room for the trap and the cleaning bottles that also live there, is the wrong disposal no matter how well it grinds.
Motor power and grind stages decide how the machine copes with your real waste. Light-duty cooking — vegetable peelings, plate scrapings, the occasional lemon half — is handled comfortably by the smaller motors. Households that cook from scratch daily, deal with fibrous vegetables, or regularly clear several plates at once will feel the difference in a stronger motor and a finer, multi-stage grind, which reduces the load on your pipes as well as the noise of struggle. Buy for your heaviest normal week, not for the single toughest item you can imagine, because no domestic disposal is built for bones by the bucketful or a pan of grease.
Feed type is a genuine fork in the road. Continuous-feed models run while you feed them, controlled by a switch, and suit households that clear up in volume. Batch-feed models only run with their stopper in place and a twist to start, which some households prefer for safety around children and for the discipline it imposes on feeding speed. Neither is better in the abstract; the right choice follows who uses the kitchen and how your household actually clears plates after a meal.
Noise, materials and warranty finish the decision. Grind components in stainless steel resist corrosion far better than plainer metals, and sound insulation varies enormously between a basic unit that announces itself through the floor and a well-insulated model you can talk over. Since a disposal is plumbed in and slightly awkward to swap, the warranty length is a useful proxy for how long the maker expects it to live — and a longer warranty on the specific model you are comparing is real information, not marketing noise.
Real Homes, Real Routines
Everyday family clearing-up
The disposal’s busiest moment is the ten minutes after a family meal: plates scraped, pans soaked, small spills of everything. A machine that starts instantly, takes a steady stream of mixed scraps with cold water running, and clears without drama is what this pattern needs. Power in reserve matters here less for any single item than for the total volume moving through in a short window without the sink backing up.
keen cooks and from-scratch kitchens
Cooking from scratch generates the fibrous, stringy, starchy waste that tests a disposal: celery strings, onion skins, herb stems, potato peelings in quantity. The lessons are technique as much as hardware — feed fibrous waste gradually, mixed with sturdier scraps, keep cold water running throughout and for a short while after, and let the machine finish each mouthful before the next. A finer grind stage helps, but feeding discipline is what separates a happy disposal from a jammed one.
Light-use and second kitchens
In a utility room, a granny flat, a holiday home or a garage sink, the disposal may run twice a week and sit idle between visits. For these, simplicity and corrosion resistance outrank raw power: a straightforward unit, flushed with cold water at each use and run briefly on every visit so seals stay wet and moving parts stay free, will outlast a powerful machine neglected in the same spot. Idle disposals fail from stillness, not work.
Use, Cleaning and Day-to-Day Care
Daily care is three habits. Always run cold water — before, during and for a short run after grinding — because cold water keeps fats solid so they are chopped and flushed rather than melted onto pipe walls further down. Feed in small amounts and let the machine clear between handfuls. And run the disposal regularly even in quiet weeks; a machine that sits unused for months can seize, and its seals dry out, so a brief weekly run with water is genuine maintenance, not superstition.
Cleaning is simple and needs no special products. A tray of ice cubes ground with cold water scours the grind chamber walls; citrus peel run through occasionally leaves the sink smelling like a kitchen rather than a bin. For a deeper freshen, a small amount of bicarbonate followed by a gentle vinegar rinse is the traditional routine — let it foam, flush well with cold water, and never mix chemical drain cleaners with a disposal, which can splash dangerously and damage seals and components. Never pour bleach or caustic cleaners into the unit.
Know the two classic faults and their safe fixes. A humming unit that does not spin has usually jammed on something hard: switch off at the wall, check for an overload reset button on the unit’s underside, and free the plate only with the maker’s tool or an appropriate hex key in the underside socket, turning it back and forth — never with your fingers inside the chamber, ever, even with the power off. A leak needs locating before tightening: leaks at the top flange, the dishwasher inlet and the discharge elbow each have different causes, and a drip ignored becomes a cabinet floor ruined quietly over months.
Where Buyers Commonly Go Wrong
The most expensive mistake is treating the disposal as a bin. Grease poured in warm sets in the pipes beyond the unit; rice, pasta and coffee grounds swell or settle into a sludge that traps other waste; stringy fibres wrap the works. The disposal is for the residue that clings to plates and boards after the bin has taken the bulk — scrape to the bin first, then let the machine handle what is left, and both the unit and your drains will live longer.
Installation mistakes cause the other half of regrets: a flange sealed carelessly that leaks from day one, a dishwasher knock-out plug left in so the dishwasher floods the counter, a discharge pipe aligned so the unit vibrates against the cabinet. If you are fitting it yourself, work slowly through the maker’s sequence, test with water and a torch before the first grind, and check again a week later. If any part of the job involves altering wiring or pipework you are unsure of, that is the moment for a plumber or electrician, not for optimism.
Running a Disposal Well: A Step-by-Step Routine
Step 1: Start with cold water
Turn on a strong stream of cold water before the disposal starts, every time, without exception. Cold water is the system’s transport and its protection: it carries ground waste through the trap and keeps any fat in the waste firm enough to be chopped and flushed rather than melted onto your pipes. Making this the first move of a fixed sequence is how it becomes automatic for everyone in the household.
Step 2: Switch on, then feed slowly
Start the motor before food goes in, and feed in small handfuls, letting each clear before the next. A disposal fed gradually grinds finer, runs quieter and never faces the solid plug of waste that causes jams and sink back-ups. Think of it as feeding a machine at the speed it eats, not emptying a plate at the speed you tip it — the difference is a few seconds and a great deal of plumbing.
Step 3: Keep the bulk for the bin
Before the plate reaches the sink, the bin should already have taken the bones, the bulk peelings, the cooking fat and anything stringy in quantity. The disposal’s job is the residue — what clings, what is left, what would otherwise be rinsed down an unprotected drain. Households that scrape first use their disposals for a decade without a jam; households that treat the unit as a bin meet their plumber on a first-name basis.
Step 4: Flush after the grind
When the chamber sounds clear, keep the motor and the cold water running briefly, then water alone for a few more seconds, so ground particles are carried well past the trap into the main run. Switching everything off the moment the noise stops leaves a slurry sitting in the trap to ferment quietly. The flush is the step everyone skips and the one that decides whether the sink smells like a kitchen or a drain.
Step 5: Freshen weekly, inspect monthly
Once a week, grind a tray of ice with cold water and follow it with citrus peel if you have it; the ice scours the chamber and the citrus leaves the sink honest. Once a month, scrub the splash guard top and underside, and shine a torch under the unit to check for the first beading of a leak. Caught at a drip, a leak is a washer; caught at a warped cabinet floor, it is a renovation.
How the Picks on This List Compare
Six products made this list of garbage disposals under 100, and they are not six versions of the same idea. The reviews above judge each one on its own terms; this section is about the shape of the list as a whole, so you can see where your own priorities land before you commit. Read it alongside the individual reviews and the specs table near the top of the page, which together contain every fact you need — this comparison adds no new claims about the products, it simply arranges the decision.
The list opens with InSinkErator Badger 1 and Waste King L-2600. These are the two the editors put first, and for most readers the honest shortlist starts here: read their two reviews back to back and note which one’s strengths match the job you described in the buying criteria above. If either fits your space, your habits and your constraints, you can stop early with confidence — the rest of the list exists for readers whose situation is more specific.
The remaining picks — Waste King L-3200, GE GFC520V, Moen Prep Series GX50C, InSinkErator Badger 5 — earn their places by serving narrower briefs: a tighter space, a heavier workload, a particular installation, a preference for one design approach over another. That is not a polite way of saying they are worse. For the reader whose kitchen matches one of those briefs, the fourth or sixth pick may be the only correct answer on the page, while the top pick would be a daily frustration. Matching the brief matters more than matching the ranking.
A practical way to finish the decision: take the two or three criteria that the earlier sections identified as decisive for garbage disposals under 100 — the measurements, the capacity question, the one feature your household will use daily — and score only your shortlist against only those. Buyers who compare everything against everything end up with a spreadsheet and no decision; buyers who compare their shortlist against their own two or three decisive criteria end up with the right product and a quiet kitchen.
What Using It Day to Day Is Really Like
Shopping in this budget tier is an exercise in priorities rather than compromise-hunting. What the money must buy is a sound motor, corrosion-resistant grind components and a mounting system that seals properly; what it can cheerfully skip is heavy sound insulation, premium finishes and extended feature lists. Judge listings in this tier by the fundamentals and the warranty, and be wary of unknown names with no service network — a disposal is plumbed in, and aftercare matters. Fitted carefully and used with the usual cold-water discipline, a budget unit handles ordinary household waste for years; the tier only disappoints buyers who expected flagship quietness at an entry price.
Whatever the brochures promise, ownership of the right choice for garbage disposals under 100 settles into a routine within a month: the features you use daily become invisible, the one compromise you accepted becomes the thing you plan around, and the details that decided the purchase — a measurement, a control you liked, a layout that fit your habits — quietly prove themselves several times a day. That is why this guide weights fit and habits so heavily over headline specifications. A product that matches your routine disappears into your life in the best way; a product that fights it will be renegotiated at every use, and no specification on a box makes up for that.
A Final Checklist Before You Buy
Before you order, run through this short list. It takes five minutes and prevents most of the regrets readers write in about garbage disposals under 100.
- Measure the space — and the route to it — one final time, and compare the numbers against the specific model, not the category average.
- Write down the two or three jobs your choice for garbage disposals under 100 must do weekly, and confirm the model you picked is the one whose review answers those jobs.
- Check what the installation needs — power, plumbing, ventilation, clearances — and decide honestly which parts are DIY and which are a professional’s.
- Confirm what is included and what is not, so any fitting, cord, connector or accessory the job needs is ordered with the product, not discovered without it.
- Read the warranty terms for the specific model and keep the paperwork somewhere findable; a decade-long appliance deserves a filed receipt.
- Plan the first week: where it goes, what it replaces, and the one habit — cleaning, checking, rotating — that will keep it at its best.
Long-Term Ownership: What Year Three Looks Like
Products for garbage disposals under 100 are rarely replaced on a schedule; they are replaced when a small annoyance becomes a daily one. Planning for year three at the buying stage means asking unglamorous questions now: which parts wear, which parts are replaceable, and whether the maker supports the model with spares and a service network you can actually reach. A product whose wearing parts are cheap and available stays young for a decade; one built as a sealed mystery becomes landfill at the first tired component, however well it performed in month one.
Keep the paperwork and the habits that protect the purchase. Register the warranty, keep the receipt somewhere findable, and note the model details in your phone. Then run the simple maintenance rhythm the care sections above describe — none of it is heroic, and that is the point. Almost every premature failure in this category traces back to skipped basics: a filter never changed, a seal never cleaned, a small leak left to become a big one. Ten minutes on a schedule outperforms a weekend of rescue work every single time.
Finally, judge the purchase by the routine it creates. The right choice for garbage disposals under 100 disappears into daily life: it is used without thought, cleaned without dread and trusted without checking. If, a month in, you are still working around your purchase — still measuring twice, still apologising for it to guests, still keeping the old workaround alive — that is information worth acting on while returns and warranties are still on your side. Good buying is not just choosing well; it is noticing early when you have not.
Budget-Friendly Garbage Disposals FAQ
Is a cheap disposal worth it?
For light daily use, often yes. For heavy cooking, a stronger motor may last longer.
What costs extra on a budget unit?
Possible extras include a cord, a power kit, a drain adapter and installation help.
How do I tell what is included?
Read the listing carefully and compare it with your current setup.
Do budget units last as long?
Lifespan varies by model and care. Check the maker’s warranty on the listing.
Can I install a budget disposal myself?
Many handy homeowners do, since mounting systems are fairly standard. The electrical connection and plumbing connections are where mistakes happen. If you are unsure about wiring or leaks, hire a plumber or electrician.
What do I do if my disposal hums but will not grind?
Turn off power first. Follow the manual to clear the jam, which often involves turning the motor by hand with a hex key from underneath, then pressing the reset button. If it keeps jamming, check what you are grinding.
Is 1/3 horsepower enough?
It can be for one or two people who generate small amounts of soft scraps. If you cook often or grind firmer vegetable trimmings, a half or three-quarter horsepower unit is a safer fit.
Do I need a special switch?
A continuous feed disposal is normally controlled by a wall switch, which you may already have. Check the manual and local codes. If there is no switch, you may need one installed.
Which scraps should I never put in a cheap disposal?
Bones, fruit pits, grease, coffee grounds in large amounts, stringy or very fibrous items, and non-food objects are best kept out. Lighter motors are especially sensitive to these.
How long should I run cold water?
Run it while grinding and for a short time afterward so material clears the trap. Cold water helps keep fats from coating the pipes.
Should I buy an extended warranty?
That is a personal choice. Compare the stated warranty on the listing with what an add-on would cover and cost, and consider how much the unit costs to replace.
What should I do if the disposal stops mid-grind?
Turn the switch off and let the motor stop completely. Check whether the overload protector has tripped — many units have a small reset button underneath — and press it once the unit has cooled. If the plate is jammed, free it with the maker’s wrench or hex key from underneath, remove the obstruction with tongs, then restore power and test with cold water running. If it trips repeatedly, the cause is mechanical or electrical and deserves a professional look.
Can I run hot water while grinding?
Use cold water for grinding, always. Cold water keeps any fats in the waste firm so the machine chops them into particles small enough to flush away. Hot water melts fat into a liquid that coats the inside of your pipes further along, where it cools, sets and gradually narrows the pipe — the classic slow blockage that appears months later and gets blamed on everything except the habit that caused it.
How long should I run the water afterwards?
Keep cold water running for a short while after the grinding sound clears — long enough to carry the ground particles past the trap and into the main drain run. Turning everything off the instant the chamber empties leaves ground waste sitting in the trap, where it decomposes and smells. A brief flush is cheap insurance against both odours and build-up.
Are disposals safe around children?
They are as safe as the household’s habits. The chamber has no exposed blades — food is ground by centrifugal force against a serrated ring — but fingers should never enter it, and children should be taught that the disposal is an adult tool like the oven. Batch-feed models, which only run with the stopper locked in, give some families extra peace of mind, and switching at the wall adds another layer.
Why does my sink gurgle or drain slowly after installing a disposal?
Slow drainage after an installation usually points to alignment: the discharge run should fall steadily away from the unit without dips where ground waste can settle, and the trap should be correctly seated. Gurgling can also mean the venting of the drain run is being asked to cope with a new appliance. Check the simple alignment issues first; persistent problems are a plumber’s ten-minute diagnosis and worth paying for before they become a blockage.
Can a disposal handle ice and citrus?
Yes — both are traditional maintenance foods. Ice cubes scour the grind chamber as they shatter, and citrus peel freshens the unit as it is ground. Neither substitutes for the cold-water habit, and neither should be fed in huge quantities at once. Bones and very hard items are a different matter: follow the maker’s guidance for your model rather than testing its limits for entertainment.
What does a disposal need electrically?
It needs a suitable supply in or near the cabinet — either an outlet for a corded model or a hardwired connection made by someone competent — and a switch arrangement that suits your kitchen, whether a wall switch, an air switch in the worktop, or a batch-feed stopper that does the job. If your cabinet has no power at all, that installation step, not the unit choice, is what to arrange first.
How do I keep the splash guard from smelling?
The rubber splash guard at the sink opening is the most neglected part of the whole system: its underside collects a film of ground food that never gets rinsed. Lift the flaps and scrub them with a brush and soapy water as part of your weekly clean, top and bottom. Most ‘disposal smells’ that survive ice and citrus live exactly there, inches from your nose.
Can I grind eggshells and coffee grounds?
Occasional eggshells pass through without drama, but the folk belief that they sharpen anything is a myth — the grind plate has no blades to sharpen. Coffee grounds are better kept out as a habit: they do not harm the unit itself, but they settle in traps and low spots in pipework and contribute to the sludge that causes slow drains. The bin and the compost are the right homes for both in quantity.
Why does the disposal smell like a drain some days?
Because, in part, it is one: the chamber and trap hold a film of past meals. The routine that fixes it is mechanical, not chemical — ice ground with cold water, the splash guard scrubbed top and underside, and a proper flush after every use so waste does not sit in the trap. Smells that survive that routine usually live further down the pipe run and deserve a plumber’s camera rather than another bottle of anything.
Is it normal for the unit to vibrate?
A hum of working vibration is normal; shaking that rattles the sink or walks objects across the counter is not. Excess vibration usually means an unbalanced load — something hard being thrown around the chamber — a loose mounting, or a worn unit nearing its end. Stop, clear the chamber safely, check the mounting is snug, and if the shaking persists on ordinary waste, have it looked at before it loosens its own seals.
What happens if a utensil falls in?
Switch off immediately and retrieve it with tongs or pliers — never fingers, even with the power off, because a loaded plate can shift. Inspect the utensil and, if it was ground against, check the unit runs freely by turning the plate from beneath with the maker’s tool before restoring power. Most utensil incidents end with a bent fork and no damage, provided the machine was stopped fast.
How do I prepare the disposal for a holiday?
Run it clean before you leave: a good grind of ice, a long cold-water flush, and the splash guard scrubbed, so nothing is left to ripen in the trap while the house is empty. Leave the cabinet dry and the unit switched off at the wall if that is your household’s practice for appliances. On return, run cold water and the unit briefly before the first real load, to rewet seals and confirm all is well.
The Short Version
For entry level, the Badger 1. For plug-in style simplicity, the Waste King L-2600. For more power on a budget, the Waste King L-3200. For a GE option, the GFC520V. For a Moen basic, the Prep Series GX50C. For a mainstay, the Badger 5.
Related Guides
- 6 Best Budget-Friendly Continuous Feed Garbage Disposals
- 6 Best Budget Garbage Disposals: Quiet and Compact (2026)
- 6 Best Quiet Garbage Disposals: Low-Noise Motors Compared (2026)
- 6 Best Continuous Feed Garbage Disposals for Home Kitchens
- 6 Best Garbage Disposals for Apartments: Compact Picks (2026)