A Dutch oven is a heavy lidded pot that goes from stovetop to oven. Enameled cast iron is a common choice because the glossy coating needs no seasoning and the thick walls hold heat for braises, stews, soups and bread. Sizes here run from 6 to 7.25 quarts, a typical family capacity.
The six pots below range from a house-brand pot to French-made cookware. Capacities, materials and cooktop notes come from each product’s listing page. We have not used these pots ourselves. Performance statements are the makers’ own.
As an Amazon Associate we earn from qualifying purchases. Links below are affiliate links, and they do not change the product information we give.
What to Look For
| Feature | Why it matters |
|---|---|
| Capacity | 6 to 7 quarts suits stews and a whole chicken |
| Shape | Round fits burners; oval suits long roasts |
| Lid design | Some lids have raised nodes or spikes that return moisture to the food |
| Cooktop support | Induction users should confirm it in the listing |
| Oven limit | Listings state a top temperature, sometimes different for the lid |
In this guide
Specs at a Glance
| Pot | Capacity and shape | Maker claims | Notes |
|---|---|---|---|
| Mueller DuraCast | 6 quarts; round | Self-basting lid nodes; oven use up to 500°F | Gas, electric, ceramic, halogen and induction per the listing |
| Amazon Basics | 6 quarts; round | Oven use up to 500°F | Dual handles; hand wash per the listing |
| Le Creuset | 7.25 qt (6.7 L); round | All cooktops; oven use up to 500°F | Limited lifetime warranty per the listing |
| STAUB | Listed as 7 qt (6.7 L); round | Lid spikes; oven use up to 900°F without the lid | Made in France; nickel steel knob |
| Lodge oval | 7 quarts; oval | Oven use up to 500°F; induction compatible | Hand wash only per the listing |
| Crock-Pot Artisan | 7 quarts; round | Porcelain enamel finish | Hand wash only per the listing |
The 6 Best Dutch Ovens for Home Cooks

Top pickBest for bread baking and braising
1. Mueller DuraCast 6 Quart Dutch Oven
A 6 quart enameled cast iron pot from Mueller Home. The maker describes a lid with raised condensation nodes that return steam to the food, a glossy interior enamel that needs no seasoning, and use on gas, electric, ceramic, halogen and induction cooktops.
Suits: bread baking and braising. Strengths: a self-basting lid design and wide cooktop support. Weaknesses: the listing gives no outside dimensions. Skip it if you want a long-established cookware name.

View Mueller DuraCast 6 Quart Enameled Cast Iron Dutch Oven Pot with Lid on Amazon

Best for a plain everyday pot
2. Amazon Basics Enameled Cast Iron Dutch Oven, 6-Quart
A round 6 quart pot with dual handles in blue enamel. The listing describes oven use up to 500 degrees Fahrenheit and says it serves 4 to 6 people. The capacity field shows 5.7 liters, which matches 6 quarts.
Suits: a plain everyday pot. Strengths: a simple round design with dual handles. Weaknesses: the listing says to avoid citrus-based cleaners and metal utensils. Skip it if you want a lid with moisture-return features.

View Amazon Basics Enameled Cast Iron Dutch Oven 6-Quart on Amazon

Best for a long-term kitchen pot
3. Le Creuset Enameled Cast Iron Round Dutch Oven, 7.25 qt.
A 7.25 quart round oven in Cerise. The maker says the enamel resists dulling, staining, chipping and cracking, that the lid is designed to circulate steam, and that it works on all cooktops with oven use up to 500°F. The listing shows a limited lifetime warranty.
Suits: a long-term kitchen pot. Strengths: a light interior for watching browning and a lifetime warranty. Weaknesses: the listing mentions dishwasher use while other enamel listings here say hand wash only, so confirm with the maker. Skip it if you want a smaller pot.

View Le Creuset Enameled Cast Iron Round Dutch Oven 7.25 qt on Amazon

Best for high-heat oven work
4. STAUB Cast Iron 7-qt Round Cocotte
A French-made enameled cocotte in Grenadine. The maker says spikes on the lid return juices to the food, and lists oven use to 900°F without the lid and 500°F for the lid. The listing has a conflict: the title says 7 qt, the included components say 6.25 quarts, and the capacity shows 6.7 liters.
Suits: high-heat oven work. Strengths: a high oven limit without the lid and a nickel steel knob. Weaknesses: the size is not stated consistently. Skip it if you need an exact quart figure.

Best for roasts and big batches
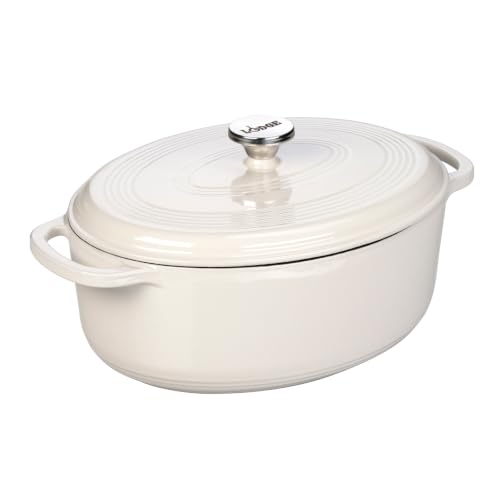
5. Lodge Enameled Cast Iron Oval Dutch Oven, 7 Quart
A 7 quart oval pot in Oyster White. The listing describes dual handles, a fitted lid, use on stovetops and induction, oven use up to 500 degrees Fahrenheit and hand washing. The oval shape suits longer roasts.
Suits: roasts and big batches. Strengths: an oval shape with 7 quarts. Weaknesses: an oval shape does not match a round burner. Skip it if you cook mostly on a small burner.
View Lodge Enameled Cast Iron Oval Dutch Oven 7 Quart on Amazon

Best for large stews
6. Crock-Pot Artisan 7-Quart Round Dutch Oven
A 7 quart round pot in Slate Gray with a porcelain enamel finish. The listing recommends hand washing and calls it good for slow cooking, simmering, braising and baking. Its finish field says Non Stick even though the pot is described as enameled, so treat that as the seller’s wording.
Suits: large stews. Strengths: 7 quarts in a round shape. Weaknesses: the listing text we read gives no oven or cooktop limits. Skip it if you need those limits stated.

View Crock-Pot Artisan 7-Quart Round Enameled Cast Iron Dutch Oven on Amazon
Care and Setup
- Several listings here say hand wash only.
- The Amazon Basics listing says to avoid metal utensils and citrus cleaners.
- Check the maker’s page for the lid’s separate oven limit.
- Confirm the cooktop type in the listing if you use induction.
Mistakes to Avoid
- Buying on quart size alone when the shape matters for your burner.
- Assuming a lid knob has the same limit as the pot.
- Ignoring conflicting size figures in a listing.
- Choosing a 7 quart pot for small portions.
Enameled vs. Bare Cast Iron
Most pots in this guide are enameled, meaning the iron is covered in a glassy coating. Bare cast iron is a different product, and the two behave differently in the kitchen, so it helps to know which one you are shopping for.
Enameled pots do not need seasoning, do not react with acidic foods such as tomato sauce or wine-based braises, and are usually easier to clean. The coating can chip if the pot is struck or dropped, and it can stain or dull over time. Bare cast iron can be seasoned and is very tough, but acidic, long-simmered dishes can strip seasoning and pick up a metallic taste, and it needs oiling after washing.
- Choose enameled if you cook soups, sauces, braises and bread and want low upkeep.
- Choose bare if you mostly sear, fry, or cook over a campfire and do not mind seasoning care.
Also look at the interior color. Light interiors make it easier to judge browning but show stains more. Darker interiors hide marks. Neither is better for cooking; it is a matter of preference. Check the listing for what the interior coating is, since details vary between makers.
Lid, Knob and Handle Details
Small parts decide how pleasant a heavy pot is to use every day. A Dutch oven can weigh a lot when full, so handles matter more than they seem to on a product page.
- Handle size: Loop handles should be large enough to grip with oven mitts on. Check listing photos for the gap between handle and pot body.
- Knob material: Knobs differ between pots, and the oven limit for the lid can be lower than for the pot itself. Read the listing to see whether the knob has its own temperature limit.
- Lid fit: A snug lid keeps moisture in during long braises. Some lids have features meant to return moisture to the food, which are the makers’ own claims.
- Rim: An enameled rim is less prone to rust than a bare rim, but any exposed iron edge deserves a light oil wipe after drying.
If you have limited wrist strength or small hands, consider the empty weight listed on the product page before the capacity, since the heaviest pots can be awkward to lift from an oven rack.
Matching the Pot to What You Cook
A Dutch oven earns its place by doing several jobs. Think about your usual recipes before you choose a capacity or shape.
For soups, stews and chili, a round pot in the mid-sized range gives enough room to stir without splashing. For no-knead bread, many bakers like a round pot because the loaf rises evenly, though a pot of any shape will work if the loaf fits. For long roasts or a whole fish, an oval pot may hold the food more easily, but it can overhang a burner and heat unevenly on the stovetop.
Small households can find a very large pot hard to store and slow to heat. Large families or batch cookers may prefer more room so that food is not packed tight, which causes steaming instead of browning. If you want to freeze portions, a bigger pot makes this easier.
Think about the shelf or cabinet where it will live. A heavy pot stored high is a hazard. Many cooks keep it on the stovetop or a low shelf.
Budget Tiers and What They Usually Mean
Dutch ovens span a wide range of cost, and the posts above include house-brand, mid-range and premium makers. Without quoting prices, here is how the tiers tend to differ.
- Lower cost: Often a good fit for occasional use. Check how the enamel is described, whether the lid fits well, and whether the maker states an oven limit. Coatings and finishing may differ from premium pots.
- Mid-range: Typically adds more finish options, accessories, or warranty details. Compare what the listing actually promises.
- Premium: Often priced for long-term use, with warranty terms and made-in details stated by the maker. Read the warranty wording before you rely on it.
A higher price does not guarantee better results for every dish. If you cook with a Dutch oven weekly for years, finish and warranty may be worth paying for. If you want one for a few winter braises, a simpler pot can do the job. Judge by the listing details, not by the name alone.
Signs It Is Time to Replace It
Enameled cast iron lasts for a long time, but it does not last forever. Retire or replace a pot when you see the following.
- Chips or cracks in the cooking surface, especially where bare iron is exposed to food.
- A cracked or loose knob, or a lid that rocks and no longer seals.
- A warped base that no longer sits flat, which can matter on glass or induction cooktops.
- Crazing (a fine web of lines) that is spreading, or rough patches that food sticks to no matter how you clean.
Small chips on the outer rim or exterior are mostly cosmetic. Chips inside the pot are a different matter, because flakes could end up in food. If you are unsure, contact the maker and ask what they recommend for your pot.
A Quick Checklist for First-Time Dutch Oven Owners
A Dutch oven is a long-term kitchen partner, and a few good habits at the beginning save you from damaging it. Run through this list before your first meal.
- Wash and dry the pot and lid before the first use.
- Check the manual for the maximum oven temperature, especially for the lid knob.
- Choose wooden, silicone or nylon utensils to protect enamel.
- Match the burner size to the pot and preheat gently.
- Always use thick, dry oven mitts, since handles and lids stay hot long after cooking.
- Make space on the counter for a trivet before you lift the pot.
The listed pots, from the Mueller DuraCast and Amazon Basics to the Le Creuset, Staub, Lodge and Crock-Pot Artisan, all share this basic care. Treat the pot kindly in the first few weeks and it will reward you for years.
Which Recipe Calls for Which Pot
Different dishes favor different shapes and sizes. Use this table as a guide for what to cook.
| Dish | Helpful pot features | Notes |
|---|---|---|
| No-knead bread | Round pot with a tight lid | Check that the lid knob suits the baking temperature |
| Stews and chili | Wide base, six to seven quarts | Good heat retention |
| Whole chicken or roast | Oval pot such as the Lodge oval | Room for the shape of the meat |
| Soups and stocks | Deep pot, sturdy handles | Mind the weight when full |
| Braised short ribs | Heavy lid, enameled interior | Slow oven heat suits it well |
If you only want one pot, a round six to seven quart size covers a large range of everyday cooking for most households.
Mistakes That Chip Enamel or Crack Lids
Enameled cast iron is tough but not indestructible. Avoid these common errors.
- Heating an empty pot on high. This can damage the enamel and the cast iron.
- Dropping or banging the lid. Rims chip when they hit hard surfaces.
- Using metal tools. Scratches build up and can lead to chips.
- Quenching a hot pot with cold water. Let it cool first.
- Stacking other cookware inside it. Use a cloth or paper towel as a buffer.
- Ignoring burnt-on food. Soak in warm water and clean gently.
If the enamel inside the pot cracks, flakes or wears through, check the maker’s guidance on whether to keep using it.
How to Read a Dutch Oven Listing
Look past the color name and the lifestyle photo. Check the capacity in quarts, the outer dimensions, and the weight. Note the interior color, since light interiors show the cooking progress but may stain. Read the details on lid knob material, handle size and oven limits. Check whether the pot is suitable for your cooktop type, including induction if you have it.
Pay attention to the warranty and the return policy for heavy cast iron. A pot arriving chipped is annoying, and a clear return path makes the purchase less stressful. Compare products on the same measures, not on marketing words.
Food Safety and Following the Maker
For safe cooking temperatures, storage times and leftovers, rely on official food safety guidance and use a thermometer. Follow the maker’s rules for oven limits, stovetop use, cleaning agents and dishwasher suitability. Cast iron is heavy, so if you have mobility concerns, choose a smaller pot or ask for help when lifting. Do not use a cracked pot in the oven, as it may fail under heat.
Storage and Everyday Care
Dry the pot completely and store it in a place where it will not be knocked. Put a paper towel or cloth between the pot and lid so air moves and no moisture traps. Avoid stacking heavy items on the lid. Check the underside for rough spots, and use a trivet so the pot does not mark your counter. A little care at the end of each meal keeps the pot looking good.
Size and Cupboard Planning
Measure the cupboard shelf where the pot will live. Large pots can be taller than expected with the lid on, and the handles add width. Think about whether you can lift it onto a high shelf safely. If space is tight, consider keeping the pot on a low shelf or even on the stovetop, where it is always ready for use.
Glossary of Dutch Oven Terms
- Enameled: cast iron coated with a glass-like finish that needs no seasoning.
- Cocotte: the French word for a lidded casserole, often used for round Dutch ovens.
- Self-basting lid: a lid with bumps or ridges that drip condensation back onto the food.
- Braise: to brown food, then cook it slowly in a small amount of liquid.
- Trivet: a heat-safe stand that protects the counter or table.
Knowing these words makes recipes and listings easier to understand, and it helps you ask better questions about a pot before you buy it.
Matching Cooktops to Cast Iron
Cast iron works on gas, electric and induction cooktops, but the details vary. On glass-top ranges, lift the pot rather than sliding it, and check that the base is smooth. On induction, the pot should be magnetic, which cast iron is, and the maker will note any special advice. On gas, keep the flame from licking up the sides of the pot, which can damage handles.
Choosing Dutch Ovens for Home Cooks for Your Actual Routine
Most buying guides, this one included, start with features. Real life starts somewhere else: with the routine the product has to fit. Before you settle on any of the picks above, picture the most ordinary version of using it, not the best day. Picture it on the stovetop for searing and then in the oven for the long, slow finish. Picture who else will use it, who will clean it, and where it will live on the days nobody touches it. A product that suits that ordinary day will almost always serve you better than one that only shines in a demonstration.
Think through the settings where it will actually earn its place: a Sunday braise, a pot of soup for the week, a loaf of crusty bread, or a one-pot dinner that feeds a table of guests. Each of those scenes makes a slightly different demand. One rewards speed, another rewards capacity, another rewards how quietly or gently the product does its job. When you read the descriptions above, match them against your most frequent scene first, and only then against the occasional one. Buying for the rare case is the most common reason a good product ends up resented and replaced.
It also helps to decide, in advance, what you are willing to trade. Almost every category involves the same quiet bargains: size against storage space, power against noise or running effort, a longer list of included extras against a simpler design that is easier to clean and repair. None of those bargains is wrong in itself. The mistake is letting the listing make the bargain for you. Choose the trade-off that fits your household, your space and your patience, and the shortlist above becomes much easier to read.
Finally, check the unglamorous details before you order. Measure the space where the product will sit and the doorway or cupboard it has to pass through. Look at what you already own that it must work alongside, and confirm the two are compatible using the information in the listing above rather than an assumption. Read the description of your favorite pick one more time with a skeptical eye, looking specifically for the limitation the guide already flags. If that limitation still sounds acceptable on an ordinary day, you have probably found your product.
A Practical Setup and First-Use Walkthrough
Good setup is unhurried setup. When the product arrives, resist the urge to put it straight to work. Unpack it somewhere with room to lay everything out, check the contents against the description above, and keep the packaging until you are sure nothing is missing or damaged. Read the included instructions fully once, even if the product looks self-explanatory. The step people skip is usually the step that explains the one behavior that later looks like a fault.
Set the product up on the stovetop for searing and then in the oven for the long, slow finish. Give yourself clear access on the sides you will actually use, keep anything that should stay dry well away from anything wet, and make sure cords, hoses, handles or moving parts, whichever your product has, can move through their full range without catching. If the product needs assembling, tighten and fit everything in the order the instructions give, and then check the whole assembly once more before the first real use. A minute spent wobbling, aligning and re-checking now prevents most early disappointments.
For the first use, start smaller and simpler than you intend to work in the long run. Treat it as a rehearsal. Notice how the product feels, sounds and responds when nothing important depends on the outcome. Adjust the settings, position or arrangement in small steps rather than all at once, so you can tell which change made the difference. Write down, on your phone or on paper kept with the product, the arrangement that worked. That small note is worth more than any number of forum posts when you come back to the task weeks later.
End the first session by putting everything back properly: clean what needs cleaning while it is still easy, return accessories to their place, and note anything that surprised you. Products rarely fail people in the first week. They fail in the third month, when a setup shortcut has quietly become the habit. A calm first session sets the pattern that keeps the product pleasant to live with.
How the Picks in This Guide Compare in Day-to-Day Use
Side-by-side tables are useful, but they flatten the differences that actually decide ownership. The picks above differ less in whether they can do the job and more in how they ask you to work: how much space they want, how much attention they need, how forgiving they are of a rushed setup, and how much cleaning or assembly they leave you with afterwards. The paragraphs below walk through each pick in turn. They add no new specifications; instead, they show you how to use the information already in this guide to compare honestly.
Mueller DuraCast 6 Quart Dutch Oven. Re-read the description of this pick above and underline, mentally, the single strength the guide credits to it and the single limitation it flags. Then ask which of those two facts will matter more in your routine. If the strength matches your most frequent use and the limitation touches something you rarely do, it belongs on your shortlist. If the reverse is true, keep moving, however appealing the headline features look.
Amazon Basics Enameled Cast Iron Dutch Oven, 6-Quart. Re-read the description of this pick above and underline, mentally, the single strength the guide credits to it and the single limitation it flags. Then ask which of those two facts will matter more in your routine. If the strength matches your most frequent use and the limitation touches something you rarely do, it belongs on your shortlist. If the reverse is true, keep moving, however appealing the headline features look.
Le Creuset Enameled Cast Iron Round Dutch Oven, 7.25 qt.. Re-read the description of this pick above and underline, mentally, the single strength the guide credits to it and the single limitation it flags. Then ask which of those two facts will matter more in your routine. If the strength matches your most frequent use and the limitation touches something you rarely do, it belongs on your shortlist. If the reverse is true, keep moving, however appealing the headline features look.
STAUB Cast Iron 7-qt Round Cocotte. Re-read the description of this pick above and underline, mentally, the single strength the guide credits to it and the single limitation it flags. Then ask which of those two facts will matter more in your routine. If the strength matches your most frequent use and the limitation touches something you rarely do, it belongs on your shortlist. If the reverse is true, keep moving, however appealing the headline features look.
Lodge Enameled Cast Iron Oval Dutch Oven, 7 Quart. Re-read the description of this pick above and underline, mentally, the single strength the guide credits to it and the single limitation it flags. Then ask which of those two facts will matter more in your routine. If the strength matches your most frequent use and the limitation touches something you rarely do, it belongs on your shortlist. If the reverse is true, keep moving, however appealing the headline features look.
Crock-Pot Artisan 7-Quart Round Dutch Oven. Re-read the description of this pick above and underline, mentally, the single strength the guide credits to it and the single limitation it flags. Then ask which of those two facts will matter more in your routine. If the strength matches your most frequent use and the limitation touches something you rarely do, it belongs on your shortlist. If the reverse is true, keep moving, however appealing the headline features look.
Once you have done that exercise for each pick, a pattern usually appears. Two or three picks will feel like they were described with your routine in mind, and the rest will feel like good products for somebody else. Trust that feeling, but verify it against the practical checks: the space you measured, the accessories you already own, and the cleaning and storage routine you are genuinely willing to keep. The right choice is the pick whose strengths, weaknesses and daily demands all point the same way.
Care, Cleaning and Looking After It
Longevity in this category is rarely about luck. It is about a short list of small habits repeated without drama. The core routine here is washing by hand once the pot has cooled, drying it fully, and avoiding sudden temperature shocks that can stress the enamel. None of that takes long on its own. It becomes a burden only when it is left until several jobs have stacked up, so attach the routine to something you already do: the end of the session, the weekly tidy, or the moment the product goes back into storage.
Clean gently and clean appropriately. Use the mildest method that does the job, follow any care directions given in the listing or the included instructions, and avoid improvising with harsh chemicals, abrasive pads or excessive force on parts that were never designed for them. If a part can be removed for cleaning, remove it rather than working around it, and let everything dry fully before reassembly. Trapped moisture and trapped grime cause more quiet damage than honest wear ever does.
Inspect while you clean. Cleaning puts your hands and eyes on every surface, which makes it the natural moment to spot a crack starting, a fitting loosening, a surface wearing smooth, or a moving part beginning to stiffen. Caught at that stage, most issues are a tightening, a replacement consumable or a small adjustment. Left alone, the same issue becomes the reason the product is replaced. Keep any small spares and the tools that fit the product together, so a minor fix never waits on finding a screwdriver or a spare part.
Storage matters as much as cleaning. As a rule, store the pot with the lid slightly ajar or with a cloth between lid and base so the rim is protected. Keep the product away from extremes of heat and damp, do not rest heavy items on it, and store accessories with the main unit rather than in a separate place you will forget. If the product will sit unused for a long stretch, give it one last clean and check before it goes away, and one quick check when it comes back out. That pair of habits, more than any extended warranty, is what separates products that last for years from products that mysteriously disappoint in their second season.
When Something Seems Wrong: Simple Checks First
Sooner or later, most owners meet some version of the same worry: food sticking during the sear, a stained interior after a tomato sauce, or a lid that no longer sits evenly. Before concluding the product is faulty, work through the simple causes in a calm order. Many apparent faults turn out to be setup, environment or a consumable that has reached the end of its life, and each of those has a straightforward remedy.
Start by returning to the basics. Switch off, unplug, empty, unfold or disassemble, whichever applies, and set the product up again from the beginning, exactly as the instructions describe. Check every connection and fitting by hand. Confirm that nothing is blocked, kinked, overfilled, underfilled, misaligned or assembled in the wrong order. It is mildly embarrassing how often a careful reset solves the problem, and that embarrassment is far cheaper than a return or a replacement.
If the problem survives a careful reset, change one variable at a time. Move the product to a different spot. Try it with a different accessory, a lighter load, a fresh consumable or a simpler task. Each single change tells you something. Change three things at once and you may fix the problem without learning what caused it, which means it will be back. Keep notes as you go, especially if the product is still under warranty, because a clear description of what you tried is the fastest route to useful help from the maker.
Know, too, when to stop. If there is damage to a structural part, an electrical smell, a leak where no leak should be, or anything that makes the product feel unsafe, stop using it and contact the maker or seller. The descriptions above note the warranty information given in each listing, and a genuine fault handled early is normally a simple conversation. Persisting with a damaged product, on the other hand, can turn a warranty matter into damage the warranty will not cover.
Getting More From It: Habits of Satisfied Owners
Talk to people who are quietly happy with a purchase in this category and a pattern emerges. They use the product regularly rather than saving it for special occasions, because regular use keeps seals, mechanisms, skills and habits in good order. They keep the setup consistent, so results are repeatable and problems are easy to spot. And they learn the product’s preferences: the load it likes, the pace it likes, the arrangement that gives the result they wanted when they bought it.
Build your own small routine around the scenes that matter to you, whether that is a Sunday braise, a pot of soup for the week, a loaf of crusty bread, or a one-pot dinner that feeds a table of guests. Prepare what you need before you start, work in a steady order, and finish with the quick clean and check described earlier. A routine sounds dull, but it is what turns a product from a possession into a capability. Within a few sessions you will stop thinking about the product at all, which is the surest sign it is doing its job.
It is also worth revisiting your purchase once you have real experience. Re-read the guide above after a month of use and you will read it differently: limitations that sounded serious may never have appeared, while a small strength you barely noticed may have become the thing you value most. That perspective helps you buy better next time, lend better advice to friends, and, if you do decide to upgrade or add an accessory, choose based on a gap you have actually felt rather than one a listing suggested to you.
Above all, judge the product against the job you bought it for, not against perfection. Every pick in this guide involves compromises, and the guide has tried to state them plainly. A product that does your job reliably, cleans up without a battle and fits the space you have is a good product, even if another model somewhere does one thing better. Contentment, in this category, is a feature.
More Questions Buyers Ask
How long should dutch ovens for home cooks realistically last?
That depends far more on care and frequency of use than on the badge on the box. A product that is cleaned after use, stored dry and not routinely pushed past what it was designed to do will normally serve for a long stretch, while the same product neglected can disappoint quickly. Treat the first signs of wear, a loosening fitting, a tired consumable or a surface losing its finish, as prompts for maintenance rather than as announcements of failure, and you will usually extend the useful life considerably.
Is the biggest or most fully featured option always the safest buy?
No. Larger and more elaborate options bring real advantages for people whose routine genuinely needs them, but they also ask for more space, more setup and more cleaning, and they can be less forgiving of occasional use. If your typical task is modest, a simpler pick from the list above will often feel better to live with. Buy for the load you actually handle most weeks, and let the rare big occasion be the exception you manage rather than the standard you purchase around.
What should I check first if results are disappointing?
Check the setup before you blame the product. Confirm it is positioned, assembled and loaded the way the instructions and this guide describe, that consumables are fresh and correctly fitted, and that you are giving it the time its process needs. Then repeat the task with a smaller, simpler load and change only one thing at a time. Most disappointing results in this category trace back to a hurried setup, an overloaded first attempt or a skipped preparation step, all of which are free to fix.
Can I share or lend this kind of product to someone else?
Usually, yes, provided the other person gets the same quick briefing you would want yourself: how it goes together, what not to force, and how it should be cleaned before it comes back. Most damage done by borrowers is accidental and comes from not knowing the one fragile step. A minute of explanation, and asking for it back clean and complete with its accessories, protects both the product and the friendship.
When is it worth replacing rather than repairing?
Replace when a structural or safety-related part is damaged, when the same fault keeps returning after honest maintenance, or when the product no longer fits the routine you actually have, for example because your household, space or the size of the job has changed. Repair or maintain when the issue is a consumable, a fitting or a habit. A useful test is whether you would happily buy the same product again in its repaired state. If yes, repair it. If you hesitate, the hesitation is your answer.
Do accessories and extras really matter?
Only the ones that match your routine. An accessory you use every session quickly becomes part of the product, while a box of extras you never touch is just storage you have paid for. When comparing the picks above, count the included extras you would genuinely use in your first month, and ignore the rest of the list. That simple discipline explains many price and size differences between kits and models, and it stops an impressive-sounding bundle from outscoring a simpler product that suits you better.
One more practical thought on dutch ovens for home cooks: keep the manual, any spare parts and a note of where you bought the product together in one place. Months later, when a small question arises, that little bundle answers it in minutes. Owners rarely regret being organized; they often regret the half hour spent hunting for a booklet they were sure they had kept.
Seasonal changes are worth planning for as well. Heat, cold, damp and heavy use periods all ask slightly different things of dutch ovens for home cooks, whether that means a different storage spot, a more frequent clean, or simply checking condition before the busy period rather than during it. A short check at the turn of each season keeps small issues from arriving at the exact moment you need the product most.
If more than one person in the household uses it, agree on one shared way of setting it up, cleaning it and putting it away. Most wear blamed on a product is really the accumulated result of several well-meant but different routines. One shared routine, written down if necessary, keeps the product consistent and makes any change in how it behaves easy to notice and easy to explain.
Dutch Oven FAQ
What size is typical?
The six here run from 6 to about 7.25 quarts, and the makers describe them as family size.
Are round or oval pots better?
Round suits most burners. Oval suits long cuts, as the Lodge listing describes.
Can I use a Dutch oven on an induction cooktop?
Many are compatible because they are made of iron, but not every listing says so. Check the product listing or manual for induction support and confirm the base is flat.
Can I bake bread in an enameled Dutch oven?
Many cooks do, as long as the pot and lid are rated for the oven temperature you need. Check the maker's stated limit for both the pot and the knob before you preheat.
Do I need to preheat the pot?
It depends on the recipe. Many bread recipes call for a preheated pot, while stews usually start on the stovetop. Follow the maker's guidance, since heating an empty pot too hot can harm some coatings.
Can I put cold food into a hot pot?
Sudden temperature swings can stress enamel and iron. Let the pot warm gradually and let it cool before washing, and check the manual for the maker's advice.
Is it safe to use metal utensils?
Many makers recommend wood, silicone or nylon tools to avoid scratching the enamel. Check the care notes in the listing or manual for your pot.
Why is my pot's interior stained?
Staining is common with enameled interiors and is often cosmetic. Soaking in warm water and using a non-abrasive cleaner usually helps, but follow the maker's care instructions.
Is a heavier pot always better?
Not necessarily. Weight reflects thick walls that hold heat, but it also makes the pot harder to handle. Choose a weight you can lift safely when full.
The Short Version
For a self-basting lid, the Mueller. For a plain 6 quart pot, the Amazon Basics. For a long-term name, the Le Creuset. For a high oven limit, the STAUB. For an oval shape, the Lodge. For 7 quarts in round, the Crock-Pot.