If you have never baked pizza at high heat, the best oven is the one that is easy to light, easy to read and hard to ruin. Gas models start with a knob. Pellet and wood ovens ask for more practice, but they reward it.
The six ovens below were chosen for approachable setup, from small gas domes to a stovetop kit and a stove attachment. We have not used these ovens ourselves, so confirm sizes, fuel and what is included on the current listing before buying. Heat claims are the makers’ own.
As an Amazon Associate we earn from qualifying purchases. Links below are affiliate links, and they do not change the product information we give.
What to Look For
| Feature | Why it matters |
|---|---|
| Ignition | A simple gas start removes a lot of beginner worry |
| Size | Twelve inch ovens are easier to launch and to handle |
| Heat gauge | A built-in thermometer or clear heat range helps timing |
| Fuel | Choose the fuel you already have or can easily buy |
| Learning curve | Open-front ovens let you watch and turn the pizza |
In this guide
Specs at a Glance
| Oven | Fuel | Style | Notes |
|---|---|---|---|
| Ooni Koda 12 | Propane | Compact gas dome | Light and easy to carry |
| Ooni Fyra 12 | Wood pellets | Portable pellet oven | Hopper feeds fuel; no gas needed |
| Gozney Roccbox | Propane or wood options | Insulated portable | Built-in thermometer |
| Pizzacraft Pizzeria Pronto | Stovetop, uses your burner | Stove-top kit | Low hassle; no extra fuel |
| Cuisinart 3-in-1 Pizza Oven Plus | Propane | Portable multi-use | Extra functions, per the maker |
| Camp Chef Artisan Pizza Oven | Fits a Camp Chef stove | Stove attachment | Uses your existing burners |
The 6 Best Pizza Ovens for Beginners
Top pickBest for first-time buyers
1. Ooni Koda 12 Gas Pizza Oven
A light propane oven that lights with a turn of a knob. The twelve inch size is the usual starting point for new bakers, and it needs no assembly beyond attaching a gas line.
Suits: first-time buyers. Strengths: ease of use and quick heat-up. Weaknesses: only twelve inch pies. Skip it if you want to cook for a crowd.
Best for buyers who want wood flavor
2. Ooni Fyra 12 Wood Pellet Pizza Oven
A portable oven that burns hardwood pellets through a top hopper. It offers a wood-fired taste without splitting logs, and the pellets are easy to find.
Suits: buyers who want wood flavor. Strengths: simple pellet fuel and low weight. Weaknesses: needs refills and watching. Skip it if you want a push-button gas start.

Best for buyers who want a polished first oven
3. Gozney Roccbox
An insulated portable oven with a thermometer built into the lid. It is well known for steady results and is a common pick for people who want a premium start.
Suits: buyers who want a polished first oven. Strengths: good insulation and clear heat reading. Weaknesses: sits at the higher end of the cost range. Skip it if you want the cheapest way in.

Best for small budgets and shared yards
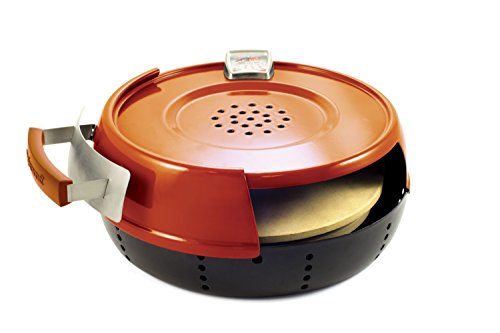
4. Pizzacraft PizzaQue Pizzeria Pronto Stovetop Pizza Oven
A stovetop kit that sits over a gas burner, with a stone and a hood to trap heat. It is a low-commitment way to learn dough handling.
Suits: small budgets and shared yards. Strengths: uses a burner you already own. Weaknesses: less heat than a true oven. Skip it if you want a wood-fired crust.
Best for multi-use buyers
5. Cuisinart 3-in-1 Pizza Oven Plus
A propane oven from a familiar housewares brand that doubles as a griddle and a grill, per the maker. It appeals to those who want flexibility more than pure pizza focus.
Suits: multi-use buyers. Strengths: brand support and added functions. Weaknesses: not as pizza-focused as dedicated ovens. Skip it if you only want pizza.
View Cuisinart Pizza Oven Plus on Amazon
Best for camp Chef stove owners
6. Camp Chef Artisan Pizza Oven
An oven attachment that sits on a compatible Camp Chef stove and uses its burners. It adds a pizza oven without buying a separate fuel setup.
Suits: Camp Chef stove owners. Strengths: uses your existing stove. Weaknesses: needs a compatible stove. Skip it if you do not own a Camp Chef stove.
View Camp Chef Artisan on Amazon
Care and Setup
- Practice with small dough balls before a big night.
- Use a thin, lightly floured peel to avoid sticking.
- Let the oven cool completely before covering it.
- Keep a spare gas canister or bag of pellets on hand.
Mistakes to Avoid
- Using wet dough that clings to the peel.
- Opening the oven constantly and losing heat.
- Overloading the pizza with toppings.
- Starting with the biggest oven before learning the basics.
Starting With a Forgiving Dough
A beginner’s first disappointment with a pizza oven often comes from the dough, not the oven. Very wet dough is hard to stretch and sticks to the peel, while overly dry dough turns tough and cracker-like. For your first bakes, choose a recipe described as beginner-friendly, with moderate hydration, which means a balanced ratio of water to flour that handles easily and does not cling to your hands.
Give the dough time. A rest of several hours, or a slow rise in the refrigerator, develops flavor and makes the dough easier to stretch. Take it out of the fridge in time to come to room temperature before shaping, since cold dough springs back. Divide it into balls sized to fit your oven. If you use a twelve inch oven, keep the dough balls modest so the stretched pizza does not overhang the stone.
Flour matters. Many bakers use a bread flour or a finely milled pizza flour, which has a protein level suited to stretching. All-purpose flour works for early practice, but results vary. Dust the work surface lightly, and do not drown the dough in flour, which can burn on a hot stone.
Stretch by hand rather than using a rolling pin, which pushes out the air that makes a puffy edge. Practice shaping on the counter before the oven is hot. Keep toppings simple on early attempts, since too many wet ingredients make launching difficult.
Launching, Turning and Retrieving the Pizza
The peel is the tool that most affects your confidence. A thin wooden or metal peel lets you slide a pizza into the oven in one motion. Lightly dust the peel with flour or semolina so the dough slides freely, and build the pizza quickly on it. A pizza left too long on the peel will stick, so work fast and shake the peel gently before launching to check that the dough moves.
Launch with a confident, smooth push, pulling the peel back quickly so the pizza stays on the stone. Hesitation or a slow pull often leads to folded dough. If a pizza sticks, lift an edge and puff a little flour underneath, rather than forcing it.
High-heat ovens cook fast, so watch from the first moment. Many bakes need turning partway so the side nearest the flame does not burn. Use a smaller turning peel or tongs to rotate the pizza a quarter or half turn, depending on the oven, and keep the oven door or opening in mind so you do not lose too much heat. Open-front ovens let you see and reach the pizza easily.
Retrieve the pizza when the crust is golden and the cheese bubbles, and slide it onto a board or tray. Let it rest briefly before slicing. Keep a heat-resistant glove and tools nearby, and never lean over the opening.
Understanding Heat, Preheating and Timing
Pizza ovens work because the stone and the chamber are very hot, and preheating is the step beginners rush. The stone must be fully heated through, not just the air in the oven. Follow the maker’s preheat guidance, and wait until the stone reaches the temperature recommended in the manual before launching. If your oven has a built-in thermometer, use it. If it does not, an infrared thermometer pointed at the stone gives a quick reading.
Heat varies across the stone. The area nearest the flame is hottest, and the back may be cooler, which is why turning matters. Between pizzas, let the stone recover its heat, because launching several in a row cools it. Some ovens recover faster than others, so check the maker’s guidance and be patient.
Control the flame. On gas ovens, adjust the knob to keep a steady heat, turning it down if the crust is browning faster than the toppings cook. On pellet or wood ovens, feed small amounts regularly and keep an eye on the flame, since a dying fire lowers temperature quickly. Wind affects open-front ovens, so shelter the oven if the air is moving.
Keep notes on what works: how long you preheated, the setting and how many seconds the pizza needed. These records turn trial and error into a repeatable routine.
Setup, Space and Safe Placement
Pizza ovens get very hot on the outside as well as the inside, so where you put them matters. Use a sturdy, heat-resistant table or stand rated for the weight and heat, and keep the oven level. Do not set a portable oven on a wooden or plastic table that could scorch or melt, and keep it away from walls, railings, awnings and overhanging branches. Follow the manual’s clearance distances.
Use the oven outdoors in an open area with good airflow. Gas, pellets and wood produce combustion gases, including carbon monoxide, so never use these ovens in a garage, tent or enclosed space. Stovetop kits and stove attachments follow the rules for the stove they use, so check the manual for ventilation and compatibility.
With gas ovens, connect the cylinder as instructed and check the hose and connection for leaks before the first use, using soapy water and watching for bubbles. Keep spare cylinders outdoors and upright. With pellet ovens, store pellets dry, and keep a metal container for ash. Let ash cool completely before disposal.
Think about the work area. A side table for dough, toppings, a board and tools keeps you from juggling. Keep children and pets away, use long-handled tools and wear closed-toe shoes. Have a bucket of water or a suitable extinguisher nearby for stray embers or flare-ups.
Cleaning, Storage and Your First Pizza Night
Cleaning a pizza oven is simpler than cleaning most cookers, but it has rules. Let the oven cool completely first. Brush loose flour and debris off the stone with a dry brush. Do not use water or soap on a pizza stone, because stone is porous and can crack from thermal shock or absorb flavors. Stains on the stone are normal and do not usually affect performance.
Wipe the exterior with a damp cloth, once cool, and check gas connections, pellet hoppers and vents for blockage. Store the oven in a dry place or under a fitted cover, and make sure it is cool and dry before covering to avoid trapped moisture.
Plan your first pizza night. Start with a small group, so you are not under pressure. Prepare dough balls ahead and have toppings prepped, since there is no time to chop once the oven is hot. Use a few restrained toppings, and plan to make one or two test pizzas for yourself before guests arrive.
Expect the first pizza to be imperfect. Torn, misshapen or burnt pizzas are part of the learning curve, and they still taste fine. Adjust one thing at a time, such as dough thickness, flame height or turning timing. Over a few sessions, you will build a feel for it. Keep the manual handy for care instructions and replacement parts, and check the warranty if something seems off.
Easy Gas and Stovetop Ovens: Which Path Is Simpler
For a first pizza oven, two styles stand out for simplicity. A portable gas oven connects to a propane tank and heats a stone or steel to a high temperature, usually in several minutes. There is no wood to split and no coals to manage, and the heat is easy to adjust with a knob. A stovetop oven, by contrast, sits on a burner or a grill and uses your existing heat source. It is compact and costs less, though it may not reach the same heat as a dedicated oven. Both can make good pizza at home, and each fits a different kitchen or yard.
| Style | Easier because | Think about |
|---|---|---|
| Portable gas oven | Dial in the heat, ready fast | Tank storage and safe outdoor placement |
| Stovetop oven | Uses your own burner, compact | Lower heat and indoor ventilation |
| Electric countertop | No flame, plug in | Heat ceiling and outlet needs |
For gas ovens, follow the maker’s instructions for connecting the tank and checking the connection. Use the oven outdoors, in a place with good ventilation. Do not use a fuel burning oven in a garage or enclosed space.
Your First Pizza: A Walkthrough
A good first session follows a calm sequence. Preheat the oven for the full time the manual advises, since a stone that is not hot enough gives pale, floppy crust. While it heats, shape the dough on a floured surface, stretching it gently by hand instead of using a rolling pin if you can. Dust a peel with flour or semolina, place the dough on it, add a light layer of sauce, cheese and toppings, and give the peel a small shake to check that the pizza slides freely.
- Preheat the oven and stone fully.
- Shape the dough and keep toppings light.
- Slide the pizza in with a quick motion.
- Turn the pizza every thirty seconds or so for even cooking.
- Remove it when the crust is browned and the cheese is bubbling.
- Rest it briefly before slicing.
Expect the first one or two pies to be imperfect. The stone needs time to recover between pizzas, and you will learn how your oven behaves.
Dough Basics for Beginners
Dough is simple: flour, water, yeast and salt. A slow rise in the refrigerator for a day or two improves flavor and texture. Let the dough come to room temperature before shaping. Handle it gently and use enough flour to prevent sticking, but not so much that it dries. Many beginners start with store bought dough, which is a sensible way to practice the oven side of things first.
More on Mistakes to Avoid
Overloading toppings, skipping preheat and sticking dough to the peel are the top problems. Keep fingers away from hot surfaces, and let the oven cool before cleaning.
Beginner Pizza Night Checklist
Pizza ovens heat to high temperatures, so preparation matters more than anything else. Use this list for your first few sessions.
- Read the manual first. Learn how to light the oven, set the heat and shut it down safely.
- Choose a stable, non-flammable surface. Keep it away from walls, fences and overhanging branches.
- Prepare the dough ahead. Dough that has rested is easier to stretch and tends to be more forgiving.
- Set out your toppings. Keep them light, since piles of wet toppings can make a soggy centre.
- Preheat for the time stated. A fully hot stone is the secret to a crisp base.
- Keep a peel and tongs handy. Launch and turn the pizza quickly.
- Let it cool fully before moving or covering the oven.
Use outdoor cooking equipment only in open, well-ventilated spaces, following the maker’s fuel and clearance instructions.
Common Beginner Mistakes
Most early problems come from a few simple causes.
| Problem | Likely cause | What to try |
|---|---|---|
| Pizza sticks to the peel | Too much moisture or a slow launch | Dust the peel with flour or semolina and move quickly |
| Burnt base, raw top | Floor much hotter than the air | Rotate the pizza and let the oven settle between pies |
| Soggy middle | Too many wet toppings or low heat | Use fewer toppings and wait for full heat |
| Dough tears | Cold or overworked dough | Let it rest and stretch gently |
| Uneven cooking | Hot spots | Turn the pizza partway through |
Practise with simple recipes and keep notes about timing for your oven. A small infrared thermometer can help you check the stone temperature if the maker approves of its use.
What This Shortlist Is Really Solving
Guides to pizza ovens for beginners often read like a catalogue, but the decision underneath is personal: how you cook, how much space you can give the equipment, and how much involvement you want while food is on. This shortlist was built around that decision. The opening picks, including Ooni Koda 12 Gas Pizza Oven, Ooni Fyra 12 Wood Pellet Pizza Oven, Gozney Roccbox, represent the directions most buyers in this category actually take, and the sections below are written to help you recognize which direction is yours before you commit.
Read the product descriptions above once for features, then read them again for fit. A model whose strengths match your ordinary week, rather than your most ambitious imagined weekend, is almost always the one that stays in service for years. The extra guidance that follows digs into the criteria, routines and small mistakes that decide satisfaction long after the first cook, and it applies whichever of these picks you choose.
Reading the Picks Side by Side
The full line-up here is: Ooni Koda 12 Gas Pizza Oven; Ooni Fyra 12 Wood Pellet Pizza Oven; Gozney Roccbox; Pizzacraft PizzaQue Pizzeria Pronto Stovetop Pizza Oven; Cuisinart 3-in-1 Pizza Oven Plus; Camp Chef Artisan Pizza Oven. Rather than ranking them by a single number, compare them in pairs against the job you have in mind. The first pick in the list is the guide’s general answer for pizza ovens for beginners; the picks that follow trade emphasis, leaning toward particular sizes, styles or kinds of cook. Where two descriptions sound similar, the deciding detail is usually in how each one handles the ordinary work: setup, control during a real cook, cleaning afterward and the support behind it.
A useful exercise is to write one sentence about your typical session, including who is eating and how hands-on you want to be, then read each description and ask whether that sentence sounds easy or effortful with that model. The pick that makes your sentence sound easy is rarely the wrong choice. Keep that sentence in mind through the sections below, because every criterion that follows is really a way of testing the same fit from a different angle.
Heat Is Only Half the Story: Stone, Flame and Timing
Great pizza is a balancing act between the heat hitting the top of the pie and the heat stored in the stone or deck beneath it. An oven can roar impressively and still bake unevenly if the stone is underheated, because the crust needs that stored energy the moment the pizza lands. When you compare the picks above, read how each design delivers heat: some rely on a rolling flame over the dome, some on a burner beneath or behind the stone, and indoor models on carefully managed electric elements. Each approach can produce excellent pizza once you learn its rhythm of preheating, launching and turning.
Build a simple routine around that rhythm. Preheat until the stone is properly hot, not just the air, checking with an infrared thermometer if you have one. Launch the pizza decisively, then leave it alone for the first stretch so the base sets before you attempt a turn. Turn in small increments for even color, and watch the rim rather than the clock. Between pizzas, give the stone a short recovery pause so the next base crisps instead of steaming. These habits matter more than small differences between ovens, and they transfer to every model in this list.
Dough Choices That Make Any Oven Look Good
Most disappointing pizza nights are dough problems wearing an oven costume. A dough that is too cold tears and bakes up dense; one that is over-proofed collapses and sticks. Let your dough come to room temperature before stretching, handle it gently to keep the air in the rim, and use just enough flour or semolina on the peel to let the pizza slide. Stretch on the counter rather than with a rolling pin when you can, because the pin crushes the very bubbles you waited hours to grow.
Match hydration and topping weight to your oven’s heat. Very hot ovens reward lean toppings and a restrained hand with sauce and cheese, since a loaded pie steams before it crisps. Wetter toppings such as fresh mozzarella benefit from a quick drain or a pat dry. Keep a house dough recipe you trust and change one thing at a time: a longer cold ferment for flavor, a touch more oil for tenderness, a different flour blend for chew. A consistent dough turns your oven into a reliable instrument instead of a weekly experiment.
Launching, Turning and Retrieving Without Drama
The launch is the moment beginners fear, and it is mostly technique. Assemble the pizza on a lightly dusted peel, give the peel a short shake to confirm the pie moves freely, then commit: angle the peel, touch the far edge down and pull back smoothly while the pizza slides forward. Hesitation folds more pizzas than heat ever ruins. If a pie does stick, lift an edge, add a pinch of flour beneath and try again rather than forcing it.
Turning keeps the bake even because the side nearest the flame colors faster. A small turning peel lets you rotate the pizza in place without dragging it out of the oven and losing heat. Work in small turns, watch the rim puff and spot, and pull the pizza when the base is set and the top is bubbling with light char at the edges. Rest the finished pie on a rack for a brief moment so steam escapes from beneath the crust, then slice. A rack rest is a tiny step that keeps the bottom crisp on the plate.
Placement, Fuel and Care for Outdoor and Indoor Models Alike
Where the oven sits shapes how often you use it. Outdoor models need a stable, heat-safe surface, sensible clearance from walls and overhangs, and a spot sheltered enough that wind does not bully the flame. Indoor models need counter depth, ventilation awareness and a home for their heat near an outlet. In both cases, follow the manual’s placement guidance exactly, keep children and pets clear of hot surfaces, and never move an oven until it has cooled fully.
Care is refreshingly simple. Brush the stone while warm and let spills bake off and brush away rather than soaking or soaping the stone, which absorbs water and detergents. Empty ash or check burners as the maker directs, keep gas connections and pellets dry and correctly stored, and cover outdoor ovens once cold. Wipe exteriors with a damp cloth and inspect the ignition and hoses or cords periodically. A clean, dry, covered oven lights reliably and tastes of pizza rather than of last month’s spills.
From First Pie to a Signature Style
Every pizza oven owner develops a signature, usually by accident first and by design later. The accident stage is the first dozen pies, where you learn your oven’s true preheat time, its hot side and the exact moment a base is ready to turn. The design stage begins when you start choosing: a preferred dough style, a house sauce, two or three topping combinations your household requests by name. Keeping a few notes per bake, even just dough, timing and one observation, is what moves you from one stage to the other.
Resist the urge to change dough, sauce and technique in the same week. Pizza has many variables and only one dinner to judge them by, so change one thing, bake twice and then decide. Owners who work this way end up with a small set of pies they can produce on demand at gathering quality, which is a more satisfying outcome than a large repertoire of unpredictable experiments. Your oven’s personality, learned patiently, becomes part of the recipe.
Entertaining With a Pizza Oven Without Losing the Evening
A pizza oven can anchor a gathering or consume its host, and the difference is preparation. Set the oven where guests can gather near it without crowding the launch zone, and arrange a simple topping station so people can build their own pies while you run the oven. That division of labor turns the cooking into the entertainment: guests participate, pies emerge in a steady rhythm, and nobody waits long with an empty plate.
Pace the bakes deliberately. Small pizzas cook quickly and keep the rhythm lively, while a constant queue of large, heavily topped pies slows everything and stresses the stone’s recovery. Bake a plain or simple pie first as a warm-up for both oven and cook, keep a finished pie on the table at all times if you can, and let the last bake be the experimental one. When the evening ends, the routine is simple: let the oven cool fully, brush the stone and cover or store it as the maker directs, while the compliments are still fresh.
Troubleshooting Bakes That Miss the Mark
When a pizza disappoints, the evidence is printed on the crust. A pale, soft base with a done top means the stone was not ready, whatever the air temperature claimed. A burnt rim with a raw center suggests the pie sat too long near the flame without turning, or the dough was too cold and thick in the middle. Cheese that separates and oils off usually met too much heat for too long, or simply too much cheese. Read the pie before you eat the evidence, and the next bake improves.
Change one variable per bake and keep the sequence honest. Preheat longer, launch a leaner pie, turn earlier, stretch thinner: each correction isolates a cause. Pizza punishes cooks who change everything at once, because improvement arrives anonymously and cannot be repeated. Methodical bakers look like talented bakers within a month, purely because their successes are documented well enough to happen again on purpose.
Bread, Roasts and the Oven’s Second Life
A hot pizza oven is wasted on pizza alone. Flatbreads bake in moments and teach heat management deliciously. Cast iron pans turn the oven into a searing station for steaks, chops and vegetables, with the intense top heat finishing what the pan starts. As the oven cools after a pizza session, it passes through perfect temperatures for roasting and then for baking, and many owners plan a tray of vegetables or a dessert to ride that falling heat.
Respect the equipment’s limits while exploring: use cookware rated for the temperatures involved, follow the maker’s guidance on what may go inside, and remember that residual heat lingers far longer than intuition suggests. A pair of good gloves and a plan for where hot pans land are part of every recipe. Used this way, the oven stops being a single-dish appliance and becomes the hardest-working heat source in your outdoor kitchen.
Practical Details Worth a Second Look
Safety around very hot ovens is mostly about choreography. Decide who launches and who turns, keep handles pointed away from traffic, use heat-resistant gloves where the maker recommends them and give the oven a clear cooling zone afterward. Announce hot peels the way kitchen staff announce hot pans. A relaxed routine keeps the focus on the food.
Vegetables behave differently at pizza heat. Thin slices of onion, pepper or mushroom cook through happily, while thick or watery vegetables need a head start in a pan or a very thin cut. Roasted leftovers make superb toppings because their moisture is already gone. Matching topping prep to the oven’s speed prevents the raw-center, burnt-edge combination that frustrates new owners.
When a bake disappoints, diagnose in order: stone heat, dough condition, topping load, then oven settings. Most problems live in the first three. Resist changing everything at once, because one calm correction per pizza night builds real skill. Keep the notes, trust the routine and remember that even the imperfect pies from a home oven are usually very good eating.
Cheese strategy deserves the same attention as dough. Low-moisture mozzarella melts evenly and browns without flooding the pie, while fresh mozzarella brings a milky richness that needs draining and a lighter hand. Blend in a harder grating cheese for a salty edge. Add delicate cheeses after baking when their flavor would be lost to the heat, and let the oven’s intensity decide how much topping a pie can carry.
Sauce is seasoning, not soup. A thin, even layer leaves room for the crust to bake and the cheese to do its work. Whether you prefer a raw crushed-tomato sauce or a briefly cooked one, keep it spread to near the rim and resist pooling in the center. A soggy middle almost always traces back to sauce, wet toppings or an underheated stone rather than to the oven itself.
Plan pizza nights like a small production line. Dough balls resting, sauce ready, toppings prepped and portioned, a landing zone for finished pies and a clear path between counter and oven. When several people are eating, bake in a steady rhythm and serve pies as they come out rather than holding them; fresh from the stone is the whole point, and guests happily eat in waves.
Weather changes outdoor pizza cooking more than beginners expect. Cold air chills the stone between pies, wind disturbs exposed flames and rain makes for miserable launches. Give the oven longer to recover between pizzas on cold nights, shelter it within the manual’s clearances and keep dough and toppings indoors until the moment they are needed. A calm setup produces calm results.
Leftovers reheat best with dry heat. A hot pan or a short return to a hot oven revives the crust, while a microwave softens everything it touches. If you know some pizza will be saved, underbake the final pie very slightly so its second heat finishes it gently. Cool leftovers promptly, refrigerate them in a sealed container and reheat until steaming.
Flour choice is a quiet lever on texture. Bread flour gives chew and structure, while softer flours bake up tender. Many home bakers blend flours or add a small amount of whole grain for flavor. Whatever you choose, weigh ingredients when you can; consistent dough makes your oven’s behavior readable, and readable behavior is how good pizza becomes repeatable pizza.
Keep the first bakes simple on a new oven. A plain cheese pizza shows you the stone’s hot spots, the flame’s reach and the true preheat time without hiding anything under toppings. Take notes on timing and turns. Two or three plain pies teach more than a month of elaborate recipes cooked blind, and the notes become your setup sheet for every future pizza night.
Seasonality is worth a thought as well. Equipment bought for summer may be asked to perform in autumn rain or winter cold, and storage space that is free in June may be precious in December. Reading the picks above with the whole year in mind, rather than the current month, quietly improves the odds that the choice still feels right in every season.
One underrated step before buying is to picture the second month of ownership, not the first weekend. Novelty carries the early cooks; routine carries the rest. Ask where the equipment will stand, where its supplies will live, and which ten minutes of setup or cleaning you will repeat every time. If those ten minutes sound pleasant with the pick you are leaning toward, you have probably found the right one.
Keep the packaging and paperwork until the equipment has survived a few real cooks. Manuals hide genuinely useful details in their later pages, including care schedules, troubleshooting charts and the exact names of replaceable parts. A folder, physical or digital, with the manual and your purchase record turns any future question into a five-minute answer instead of an afternoon of searching.
Households cook together, so let the other cooks vote. The person who will clean the equipment, carry supplies or cook on the nights you are away has practical knowledge no comparison table holds. A short conversation about routines and pet peeves before buying prevents the slow resentment that builds when a well-reviewed machine fits only one person’s habits.
There is also pleasure in restraint. A category like pizza ovens for beginners invites collecting, upgrading and second-guessing, yet the cooks who enjoy their equipment most tend to settle, learn and cook. Let the first season be about meals rather than modifications. If a genuine limitation appears again and again in your notes, address it then, with evidence. Until it does, the equipment you have is almost certainly enough.
Finally, take a moment after the first successful session to set up the habits that protect all the later ones: supplies stored properly, tools back in their places, a note made of anything you would change, and the equipment left clean and ready. Future you, arriving home tired on a weeknight and finding everything ready to cook, will be grateful for that small act of housekeeping more than for any feature on the original listing.
Comparison fatigue is real in a category with this many good options, and it helps to remember what the decision actually costs when it is wrong by a little. Every pick above was chosen because it serves its kind of buyer well, so a near miss still cooks dinner admirably for years. Decide with the information you have, commit warmly, and let your growing skill close whatever small gap remains between your pick and the theoretical perfect one.
It is worth saying plainly what experienced buyers of pizza ovens for beginners already know: the differences between good options in this category are smaller than the differences between careful and careless ownership. Setup done properly, supplies kept in good condition and a cleaning routine that survives busy weeks will move your results further than any single feature on a comparison chart. Choose a pick you can live with easily, then invest your attention in using it well.
A Simple Decision Path
If you are still torn after the detail above, decide in this order. First, eliminate any pick whose size or setup does not fit your space, using the descriptions and your own measurements. Second, eliminate any pick whose routine, cleaning or fuel and supply needs you know you will not keep up. Third, among what remains, choose by the cook you will make most often, not the most impressive one you can imagine. That order works because the first two filters remove the choices that fail in daily life, leaving only models you would genuinely be happy using.
It is also fine to let the end of the list make the case: Camp Chef Artisan Pizza Oven earned its place by serving a particular kind of buyer well, and if that description sounds like you, a later position in the list means nothing. Shortlists are maps, not podiums. The right outcome of this guide is not the most popular model for pizza ovens for beginners; it is the model whose strengths you will still be appreciating, cook after cook, long after the comparison charts are forgotten.
More Questions Buyers Ask
How long should I preheat the oven?
Until the cooking stone or deck is fully heat-soaked, which takes longer than the air temperature suggests. Follow the maker’s guidance and, if you have one, confirm the stone with an infrared thermometer. An underheated stone is the most common cause of a pale, soft base.
Why does my pizza stick to the peel?
Usually too little dusting flour, a wet dough left sitting on the peel, or slow assembly that lets moisture soak through. Dust the peel lightly, build the pizza quickly, and shake the peel gently to confirm the pie moves before you walk to the oven.
How often should I turn the pizza?
Turn once the base has set enough to move without tearing, then in small increments to even out the color. The side nearest the flame or element cooks fastest. Watch the rim and the base rather than a timer, since every oven and dough behaves a little differently.
Can I cook other foods in a pizza oven?
Most pizza ovens happily roast vegetables, bake flatbreads, sear steaks in a cast iron pan and finish casseroles. Respect the maker’s guidance on cookware and placement, and remember the intense top heat browns food quickly, so check earlier than a conventional oven recipe suggests.
What should I do with a cracked or stained stone?
Stains are cosmetic and normal; burnt-on spills usually bake off and brush away. A crack matters if it catches the peel or shifts during cooking, so follow the maker’s advice on replacement. Never soak a hot stone in water, and let it cool gradually to avoid thermal shock.
How do I keep the crust crisp after baking?
Rest the pizza briefly on a wire rack instead of a solid board so steam escapes from underneath, then slice and serve promptly. Avoid stacking hot pizzas or covering them, which traps steam and softens the base you worked to crisp.
Beginner Pizza Oven FAQ
Which fuel is easiest?
Gas, because you control the flame with a knob. Pellets and wood take more practice.
What size should a beginner pick?
Twelve inch ovens are easiest to launch and to turn. Larger ones suit confident cooks who plan to cook for crowds, but they ask for more skill with the peel and more space on the table.
Do I need a pizza peel?
Yes. A peel lets you slide pizza on and off the stone safely. Some ovens bundle one.
How long does it take to heat a pizza oven?
It depends on the oven and fuel, so check the maker's guidance. Most need a good preheat to fully heat the stone, and the stone matters more than the air temperature.
Can I use parchment paper on the peel?
Some people do to help with launching, but high heat can burn paper. Check the maker's guidance, and consider dusting the peel with flour or semolina instead.
Why does my pizza stick to the peel?
Wet dough, too much time on the peel and too little flour are common causes. Build the pizza quickly and shake the peel to check it moves before launching.
Why is the bottom burning while the top is undercooked?
The stone may be too hot, or the toppings too heavy and moist. Let the stone cool slightly, lower the flame or turn the pizza more often.
Can I cook things other than pizza?
Many ovens can handle flatbreads, vegetables, and small cast iron dishes, if the maker allows. Check the manual for what is safe.
Do I need an infrared thermometer?
It is not required, but it helps you read the stone temperature, particularly on ovens without a built-in gauge.
How do I store leftover dough?
Keep it covered in the refrigerator for a short time or follow trusted guidance for freezing. Bring it to room temperature before shaping.
The Short Version
For a simple gas start, the Ooni Koda 12. For pellet fuel, the Ooni Fyra 12. For insulation, the Gozney Roccbox. For a stovetop trial, the Pizzacraft Pronto. For flexibility, the Cuisinart. For stove owners, the Camp Chef Artisan.