A pot rack lifts cookware off shelves and puts it within reach. Wall racks hold pans on hooks along a wall, while ceiling racks hang over an island or stove. Either type needs a solid anchor, so the mounting method matters as much as the size of the rack.
The six racks below include three wall-mounted racks and three ceiling-hung racks. Sizes, hook counts and load figures come from each product’s listing page, and the load numbers are the makers’ own. We have not used these racks ourselves.
As an Amazon Associate we earn from qualifying purchases. Links below are affiliate links, and they do not change the product information we give.
What to Look For
| Feature | Why it matters |
|---|---|
| Mount type | Wall racks need studs or solid wall; ceiling racks need joists |
| Maker load figure | Compare it with the weight of your cast iron and plan to spread the load |
| Hooks | More hooks hold more pans, lids and tools |
| Shelf | A grid or guard rail adds room for lids or small items |
| Size | Check the wall width or ceiling height and clearance |
In this guide
Specs at a Glance
| Rack | Mount and material | Size | Notes |
|---|---|---|---|
| KES 30 inch | Wall; metal | 29.9 W x 9.8 D x 20.5 H in | 12 hooks; two tiers with a guard rail; maker says up to 100 lb on solid concrete |
| KES 34 inch oval | Ceiling; iron | 33.5 W x 15.8 D x 39.4 H in | 20 hooks; chain adjusts for 8 to 10 ft ceilings; maker says 100 lb |
| 32 inch with wood shelf | Ceiling; alloy steel and engineered wood | About 32 x 15.7 in (listing varies) | 16 S hooks; maker says 100 lb |
| KES 150 lb | Wall; iron | 34.8 W x 11 D x 22.3 H in | 20 hooks; two tiers with lid space; drilling template; maker says 150 lb |
| Expandable 2-tier | Wall; carbon steel | 30 W x 12 D x 17 H in; expands from 19 in | 10 hooks; 5 lid dividers; removable trays |
| CHOEZON | Ceiling; engineered wood and iron | 24 W x 13 D x 2.4 H in | 12 hooks; four chains; maker says 44 lb |
The 6 Best Pot Racks

Top pickBest for a wall with studs
1. KES 30-Inch Wall Mounted 2-Tier Pot Rack
A matte black grid shelf, 29.9 inches wide and 9.8 deep, with 12 movable S hooks and a guard rail. Two mounting holes 16 inches apart line up with wall studs. The maker says up to 100 pounds when screwed into solid concrete.
Suits: a wall with studs. Strengths: a guard rail and stud-ready holes. Weaknesses: the 100 pound figure applies to solid concrete. Skip it if you want a ceiling rack.


Best for hanging over an island or stove
2. KES 34-Inch Ceiling Pot Rack
An oval matte black rack, 33.5 inches wide and 15.8 deep, with 20 S hooks and chains that adjust for ceilings 8 to 10 feet high. The maker says it supports 100 pounds when fixed into 16 or 24 inch joists.
Suits: hanging over an island or stove. Strengths: 20 hooks and adjustable chains. Weaknesses: it needs joists in the right place. Skip it if you cannot drill into the ceiling.

View KES Ceiling Pot Rack 34-Inch Oval Hanging Pot Rack with 20 S Hooks, Matte Black on Amazon

Best for a rack with an extra shelf on top
3. 32-Inch Ceiling Pot Rack With Wood Shelf
A ceiling-hung rack with a black steel frame, a mesh shelf, an upper wood shelf and 16 detachable S hooks. The maker says it supports 100 pounds. Listed size is about 32 by 15.7 inches, but the page gives two slightly different lengths.
Suits: a rack with an extra shelf on top. Strengths: a wood shelf and 16 hooks. Weaknesses: inconsistent size figures and no brand name. Skip it if you want a known maker.

Best for heavy cast iron on a wall
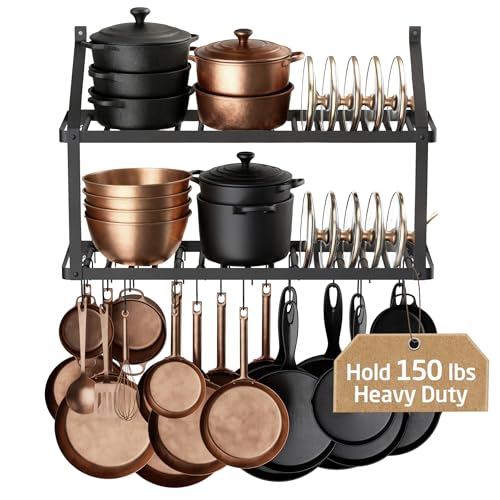
4. KES 150 lb Wall Mounted Pot Rack
A 34.8 inch wide, two-tier wall rack in black iron with 20 S hooks and lid space. The maker says a one-piece steel frame holds up to 150 pounds, and it includes a drilling template.
Suits: heavy cast iron on a wall. Strengths: the highest maker figure of the six and a template. Weaknesses: it is wide and needs wall space. Skip it if you have a small wall.

View KES 150 lb High-Capacity Pot Rack Wall Mounted with Pot Lid Holder, 34 Inch on Amazon
Best for a small or odd-width wall
5. Expandable 2-Tier Wall Pot Rack
A carbon steel wall rack that expands from 19 to 30 inches, with two removable trays, five lid dividers and 10 movable hooks. Overall size is about 30 by 12 by 17 inches. We could not read a load figure on the listing.
Suits: a small or odd-width wall. Strengths: adjustable length and lid dividers. Weaknesses: no load figure that we could confirm. Skip it if you want a stated load for cast iron.

Best for a light cookware set
6. CHOEZON Vintage Ceiling Pot Rack
A rustic brown and black ceiling rack, 24 inches wide and 13 deep, with a mesh iron frame, 12 S hooks and four iron chains. The maker says up to 44 pounds, and the listing names particleboard and iron.
Suits: a light cookware set. Strengths: a compact rustic look. Weaknesses: the lowest maker figure here. Skip it if you own heavy cast iron.

Care and Setup
- Find studs or joists before you buy.
- Use the screws and anchors that match your wall type.
- Hang heavier pans over the supports.
- Wipe the metal clean of grease.
Mistakes to Avoid
- Mounting into drywall alone.
- Adding up cookware weight without checking.
- Ignoring ceiling height and head clearance.
- Putting all the weight on one side.
Adding Up Your Cookware Weight Before Choosing
The most important number for a pot rack is not on the rack. It is the combined weight of everything you plan to hang. Cast iron skillets, enameled Dutch ovens and large stainless pots can weigh several pounds each, and a dozen hooks can add up fast. Weigh your pans on a kitchen or bathroom scale, add the total, and compare it to the maker’s load figure. Keep a wide margin below that figure, because the figure describes ideal conditions rather than your wall or ceiling.
Think about which pieces truly need to hang. Light pans, lids, ladles and utensils suit a rack well. Very heavy pieces may be better kept on a shelf or in a cabinet, or placed on the strongest part of the rack, close to the mounting points. A rack with a high maker load figure still depends entirely on how it is attached.
Also remember that loads shift. Taking down a pan and swinging it can jolt the rack, and a rack that is loaded unevenly puts extra stress on one fastener. Spread weight across the length and keep the heaviest items nearest to the anchors. If you are not sure your plan is safe, hang less, or ask a qualified person to assess the mounting before you load it fully.
Wall Versus Ceiling Installation Compared
Wall racks fix to a vertical surface and keep pans near a cooking area, which suits kitchens with a free stretch of wall. Ceiling racks hang above an island or a work area and free the walls, but they hang lower and can reduce head room. Choose based on layout, not just looks.
A wall rack needs to be anchored into studs or masonry, depending on your wall. Drywall alone cannot carry a heavy load, and wall anchors vary in strength, so follow the hardware guidance in the manual and pick fasteners suited to your wall type. Locate studs with a stud finder, mark the spots, and use a level so the rack hangs straight. A drilling template, if included, makes layout easier.
A ceiling rack needs to be fixed into joists or other solid structure above the ceiling, and the position of joists limits where the rack can go. Chains can often be adjusted for ceiling height, so check the range against your kitchen. If your ceiling is vaulted, concrete or unusual, ask a professional.
- Measure ceiling height and leave enough clearance so people can walk beneath hanging pans without hitting them.
- Check for pipes, wiring or ducts before drilling, using a detector or a professional where needed.
- If you rent, get permission before drilling.
Hooks, Shelves, Grids and Layout Details
Hook count tells only part of the story. Look at how far apart hooks can sit, whether they slide along a rail, and how deep they are. Movable S hooks let you adapt the layout as your cookware changes, while fixed hooks are simpler but less flexible. Wide pan handles need space between hooks, so a rack with many hooks may not hold as many pans as the number suggests.
Many racks add a shelf, grid or rail. A grid or shelf can hold lids, spices or small items, while a guard rail stops things sliding off. Lid dividers or a tray help with organization if you have many lids. Check whether the shelf is removable, how it is attached and what weight it can carry.
Consider access. Can you reach the hooks without a step stool? Hang the heavy and frequently used items within comfortable reach and the lightest or rarely used pieces higher. Keep hot or fragile items away from where you walk or work.
Finally, consider noise and wear. Metal pans can clank on metal hooks, and hanging pots may scratch each other. Some people add small pads or keep similar pans together. Check whether hooks have rounded ends so they do not catch on pan handles or scratch finishes.
Finish, Grease and Where the Rack Hangs
A pot rack in a kitchen faces heat, steam and cooking grease. Racks over a stove collect grease on the hooks and pans, which then collects dust. If you hang pans above a range, expect to wash them before use and wipe the rack regularly. Racks placed a little away from the stove, such as over an island, stay cleaner.
Finishes vary. Painted or powder-coated metal resists rust better than bare metal, but scratches can expose the metal underneath. Wood parts can absorb grease and moisture, so a wood shelf needs gentle cleaning and should stay dry. Check the listing for material details, and be cautious about assuming a finish is rustproof.
- Wipe the frame and hooks with a damp cloth and mild soap, then dry them.
- Do not use abrasive pads on coated surfaces.
- Look for rust spots near joints, hooks and chains, and treat or replace the part if they appear.
Style matters too. A matte black rack, a rustic rack and a brushed metal rack all give different looks. Pick one that suits your kitchen, but weigh looks after strength, fit and installation. A rack that matches your other hardware, such as cabinet pulls or light fixtures, tends to blend in, while a contrasting finish can become a focal point. Neither choice affects how much weight the rack can safely hold, so decide on strength first and style second.
Inspection, Maintenance and Replacement Signs
A pot rack carries weight over your head or at your side, so inspect it on a schedule. Every few months, check that all screws and anchors are snug, that the rack still hangs level, and that no hook is bending. Look at chains, links and hooks for stretching, cracks or rust. If you notice the rack sagging, or hear creaking, take the load off and investigate.
Signs of trouble include screws that have pulled out or spun loose, cracks in the wall or ceiling around the mounting plate, bent hooks, a shelf that bows, or welds that look cracked. Remove the cookware, then fix or replace parts. Do not rely on a damaged rack, and do not keep adding weight to see how much it holds.
Compare budget levels by looking at gauge of metal, hardware included, finish, and whether the listing gives a clear load figure. Simpler, lighter racks cost less and suit lighter cookware, while sturdier racks with higher stated limits and better hardware cost more. Where a listing lacks a load figure, ask the seller before relying on it for heavy items. Check the warranty and return policy, and keep the hardware bag until you are certain you will not need to reinstall.
A Checklist Before You Hang a Pot Rack
A pot rack frees up cabinet space and puts cookware within easy reach, but it carries real weight and needs thoughtful placement. Go through these points first.
- Measure the area. Check the width and depth of the rack, and the height from the floor to the lowest hanging item.
- Know your ceiling or wall. Joists, studs and masonry call for different fixings, and what you hang from matters a great deal.
- Add up your cookware weight. Heavy cast iron and large stockpots weigh far more than light aluminum.
- Read the load limit. The maker states the capacity. Stay well below it.
- Count the hooks. Make sure there are enough for the pans you want within reach and that hooks suit your handle shapes.
- Check clearance. Leave space so people can walk without bumping their heads.
- Look at the finish. Matte black, brass, stainless and wood each give a different look.
Ceiling-Mounted, Wall-Mounted and Freestanding Racks Compared
| Type | Strength | Consider |
|---|---|---|
| Ceiling-mounted | Makes use of overhead space, holds many pieces | Needs strong fixing points and enough ceiling height |
| Wall-mounted | Good for narrow kitchens, easy to reach | Fixings must suit the wall type |
| Freestanding | No drilling, can be moved | Takes floor space and holds less |
| Over-the-door or cabinet | Light loads, rental friendly | Limited capacity |
Installation: When to Follow the Manual and When to Hire Help
Hanging heavy items overhead is a job to take seriously. Follow the maker’s instructions for the exact hardware and spacing. The screws or bolts included may not suit your ceiling or wall, so confirm what is behind the surface before drilling.
Call a professional if
You are unsure about joists, you have plaster or masonry that needs special anchors, or the rack will carry a heavy collection. A qualified handyperson or contractor can locate structure safely and fit appropriate fixings.
Renting?
Ask your landlord before drilling. A freestanding or cabinet-mounted option may be a better fit.
Arranging Pots So They Stay Easy to Reach
Hang heavier pans low and near the center, and lighter pieces at the ends. Group items by use so the skillet you grab every day is closest to the stove. Keep lids on a separate hook or rail so they do not swing into pans. Leave a little space between pieces so they do not clang.
Wipe cookware before hanging, because grease in the air collects dust on hanging pans. Check the hooks and fixings every few months, and tighten anything that has worked loose. If you notice sagging or cracks, take the pans down and fix the problem before reloading the rack.
Keeping a hanging collection tidy
Display only what you use. A rack crowded with rarely used pieces becomes clutter, and the items you reach for often are harder to find. Store seldom-used pans in a cabinet and rotate them as the seasons change.
A Short Glossary of Pot Rack Terms
- Load capacity: the total weight the maker says the rack can carry when installed as directed.
- S-hook: a curved metal hook that holds a pan by its handle loop.
- Joist: a structural beam in a ceiling that can support hanging loads when fixings are done properly.
- Toggle or anchor: a fixing designed for hollow walls or masonry. Use only what the maker and a qualified installer advise.
- Drop length: the distance a rack hangs below the ceiling, which affects headroom.
- Lid rail: a bar or hooks used to hold lids separately.
Knowing these terms helps you compare listings and talk with an installer about what your ceiling or wall can accept.
Pot Rack FAQ
Wall or ceiling rack?
Wall racks suit a free wall. Ceiling racks suit an island or open space and need joists.
Are load figures reliable?
They are the makers’ figures and often assume solid wood or concrete. Treat them as a ceiling, not a target.
How do I find studs for a wall rack?
Use a stud finder and confirm by checking for consistent signals across the area. Mark the stud centers and use a level before drilling.
Can I install a ceiling rack without hitting a joist?
Not safely with standard hardware. Ceiling racks need solid anchoring, so locate joists first, or ask a professional if the ceiling is unusual.
Should I hang cast iron on a pot rack?
Only if the rack and mounting suit the total weight and you keep a wide safety margin. Many people store heavy cast iron elsewhere.
How high should a pot rack hang?
Hang it so people can walk beneath it comfortably and you can reach the hooks without strain. Check ceiling height and clearance before choosing.
Do I need to clean pans that hang over the stove?
Often yes, because grease and dust collect on them. Wash them before use and wipe the rack regularly.
What if the load figure is missing from the listing?
Ask the seller or maker, or treat the rack as suitable only for light items. Avoid guessing with heavy cookware.
Can I use a pot rack in a rental?
Only with your landlord's permission, since mounting requires drilling. Otherwise consider freestanding storage.
The Short Version
For a stud-mounted wall shelf, the KES 30 inch. For a big ceiling rack, the KES 34 inch. For a wood shelf on top, the 32 inch. For heavy cookware, the KES 150 lb. For an adjustable width, the expandable rack. For a rustic look, the CHOEZON.
Choosing a Pot rack: The Criteria That Matter Most
Mounting matched to your kitchen’s structure
Wall and ceiling racks ask different things of the building, as the reviews above describe. A ceiling rack needs solid fixing points above; a wall rack needs a wall that can take the load of rack plus cookware. Decide the mounting honestly first, because the best-looking rack in the wrong structure is a hazard, not storage.
Total load, not just the rack
Pots and pans are heavier together than people estimate, especially cast iron and large stockpots. Add up what you honestly plan to hang, include the rack itself, and compare that with what the listing and fixings support. Hanging slightly less than the maximum keeps everything calmer and quieter.
Reach and headroom
Hung cookware must clear heads, not swing at face height, and be reachable without stretching over a hot hob or a worktop edge. Picture your tallest household member walking beneath a ceiling rack and your shortest reaching the most-used pan. Both pictures should be comfortable.
Hook layout and flexibility
Movable hooks let the arrangement evolve with your cookware; fixed positions are tidier but less forgiving. Consider also how pans hang: nested handles save space but slow access. The reviews above note the layouts on offer, so match them to the pans you reach for daily, not the ones stored for holidays.
Pot rack in Real Life: Common Situations
Freeing a deep cupboard
Hanging the everyday pans empties the worst cupboard in most kitchens, the deep one where pans nest and lids vanish. Move daily cookware to the rack and give the cupboard to rarely used items. The kitchen feels larger because the things you touch daily are visible and reachable.
A small kitchen with no spare cupboards
In a small kitchen, a wall rack over a worktop or beside the hob converts dead wall into the primary pan store. Keep the arrangement tight and limited to what you truly use, because a small rack overloaded becomes visual clutter at eye level.
A keen cook’s working wall
For cooks with many pans, a rack is a workstation: pans in order of size or frequency, lids managed separately, utensils on the same system. Arranged well, you cook without opening a cupboard mid-recipe, which changes the feel of the whole kitchen.
How the Picks Above Compare With Each Other
The six options reviewed above are not six versions of the same pot rack; they are six answers to slightly different versions of the question. Reading them as a shortlist works best when you compare them in a deliberate order. Start by removing any pick whose basic format does not suit your space or routine, using the descriptions in its review. A pot rack that cannot fit, mount, hang or be stored the way your home requires will not become suitable because other features appeal to you. What remains after that first pass is usually two or three genuine contenders, and the detailed comparison only needs to happen between those.
Between the contenders, compare the details the reviews actually give you: what is included, how the pot rack is used day to day, and any honest limitation the review notes. Limitations are the most useful sentences in any review, because they tell you who should walk past that pick. For example, the list above runs from KES 30-Inch Wall Mounted 2-Tier Pot Rack through to CHOEZON Vintage Ceiling Pot Rack, and the right choice between the first and the last is rarely about which is ‘best’ in the abstract. It is about which set of strengths matches the job in your home and which set of compromises you will never notice.
A practical way to finish the comparison is to write down your top three requirements, in order, and score each contender against them using only what the reviews state. The first requirement should be the one tied to your most frequent use, not your most impressive use. A pot rack bought for a weekly job and judged on a yearly job will disappoint fifty weeks a year. If two contenders still tie, choose the one whose day-to-day routine, refilling, cleaning, moving or storing, sounds easiest in its review, because convenience is what survives after novelty fades.
Finally, picture the pick in place for a full ordinary week. Where does it live, who else uses it, what happens on the busiest day, and what happens when you are tired? The reviews above give you the facts; this mental rehearsal applies them. Most regretted purchases in this category were not badly made. They were well made answers to a slightly different household’s question, bought without that final rehearsal.
Care, Cleaning and Keeping Your Pot rack Working Well
Check fixings on a schedule
Racks carry real weight over people’s heads and worktops. Check screws, hooks and brackets periodically for movement, tighten what needs it, and investigate any new creak or shift promptly. Cookware itself benefits from being hung dry, which also keeps drips off the wall and floor below.
Clean pans before they go up
Hung pans are on display and above food preparation areas, so they should go up clean and dry. Grease mist from cooking settles on hung cookware over time; a regular wipe keeps the display from becoming the kitchen’s dustiest corner.
As a general routine, give any new pot rack a proper first setup rather than a rushed one: read the maker’s instructions fully before first use, keep any tools, spares or paperwork supplied with it in one labelled place, and note anything that needs periodic attention, such as filters, seals, fixings or moving parts, on whatever calendar or reminder system your household actually uses. Products in this category rarely fail suddenly; they decline gradually through small neglected maintenance jobs, and the owners who schedule those jobs are the ones still pleased with their purchase years later. If anything about the product’s behaviour changes, a new noise, a looseness, a smell, a drop in performance, deal with it while it is a cleaning or tightening job rather than after it becomes a replacement.
Mistakes to Avoid
Hanging everything you own
A rack loaded with every pan, including the ones used twice a year, is crowded and heavy. Hang the regulars; store the specialists elsewhere.
Fixing into plasterboard or weak points alone
The fixing must reach structure appropriate to the load. If you are unsure what is behind the surface, find out before drilling, not after the first heavy pan goes up.
Placing the rack where pans swing into traffic
Pans get knocked when racks overhang walkways or door swings. Position the rack where people work, not where they pass.
Ignoring lid storage
Lids are half the storage problem and do not hang like pans. Plan where lids live, on a door rack, a rail or a dedicated holder, or the cupboard problem simply changes shape.
Getting the Most From Your Purchase in the First Month
The first month with a new pot rack is when habits form, and habits decide whether it becomes a daily tool or a cupboard resident. In the first week, use it deliberately for its main job several times, following the maker’s guidance closely even if it feels slower than your improvised method. This is how you learn what the product actually does well, rather than what you assumed it would do. Note anything that surprises you, good or bad, while the purchase is recent enough to act on.
In weeks two and three, test the edges of its routine: the bigger job, the awkward job, the job with children or guests involved. Every pot rack has a comfort zone, and finding yours now means no surprises on the day it matters. If accessories, refills or storage are part of its life, set those systems up during this period too, while your motivation is high. A product whose supporting system is organised gets used completely; one whose extras live in a lost box gets used at half strength.
By the end of the first month, do an honest review. Is it stored where you planned? Is it clean, complete and ready? Has everyone in the household who should use it learned how? If the answer to any of these is no, fix the system, not your expectations: move it, label it, simplify its routine. The difference between households that love their pot rack and households that replace it yearly is almost never the product. It is whether this first-month setup work was done once, properly.
More Questions, Answered
Will a pot rack damage my pans?
Hanging by the handle hole or rail is how most pans are designed to be stored, and it avoids the scratches that come from stacking. Non-stick and enamelled pans benefit most, since nothing rubs their surfaces. Keep heavy cast iron hanging only where the rack and fixings clearly support it.
How high should a ceiling rack hang?
High enough that the longest pan clears the tallest person’s head with room to spare, and low enough that the shortest regular user can lift pans on and off without tiptoeing over the hob. If those two needs conflict, a wall rack or a lower-traffic position solves it better.
Can renters use pot racks?
Wall racks need permission for fixings in most rentals, but some kitchens allow a rack into existing solid points, and freestanding alternatives exist for pans. Check your agreement, and consider a rack over a unit where a few fixings are easier to make good later.
What pans should not be hung?
Very heavy pieces that strain the fixing, pans with damaged handles, and anything you would not want falling. Also keep rarely used pans stored elsewhere so the rack stays a working tool rather than a display of everything.
How do I stop pans knocking together?
Space hooks so pans hang clear of each other, group similar sizes, and avoid overloading one section. Felt or silicone handle covers can quiet a rack that still knocks when the kitchen is busy.
One Last Check Before You Decide
Before you finalise any decision in this category, run one last check against the way your household really behaves, not the way you behave on a motivated Saturday. Where will this live on a tired weekday evening? Who will use it when you are not there to demonstrate? What happens to it during the busiest week of your year? Answers to those questions, given honestly, predict satisfaction far better than any feature list. The products and plans that succeed long term are the ones that fit ordinary life at its least organised, because that is the life they will mostly be used in.
It also helps to decide in advance what would make you change your mind. If you are choosing between two close options, name the one fact that would settle it, then go and find that fact in the product information or by measuring your space. Deciding by a chosen criterion ends the comparison cleanly. Deciding by accumulating more and more general impressions rarely does, and it is how a simple purchase turns into a week of open tabs and no decision. One clear criterion, checked properly, beats twenty vague ones.
When the new item or arrangement is in place, resist the urge to judge it in the first hour. Almost everything in the home feels different before it feels normal. Give it a fair trial across the situations it was chosen for, adjust the small things, positioning, storage, routine, and only then decide whether the choice itself was wrong. Most of the time the choice was right and the setup needed one correction. Knowing the difference saves money, returns and a great deal of low-level dissatisfaction with things that were nearly right.
Finally, keep the paperwork and the lesson. File the instructions and any guarantee information where you can find them, and keep your measurements and notes with them. The next related decision, a replacement, an addition, a gift for someone whose space you know, then starts from knowledge instead of from memory. Homes run well on these small archives. They are unglamorous, and they are the reason some households seem to buy the right thing first time, every time, while others buy everything twice.
Measuring deserves a final word of its own, because so many disappointments in this category are measuring errors wearing the disguise of product faults. Measure the space, the item and the route between them, write the figures down, and measure the critical one twice in different ways if you can. Allow a margin for the realities numbers cannot capture: skirting boards, uneven floors, handles, hinges, lids and the human hands that need to grip things. A plan that works on exact measurements fails in real rooms. A plan with honest margins survives them, and the margin is almost always cheaper than the return, the replacement or the workaround.
Consider also who else has a stake in the decision. Partners notice different things, children use things differently, guests are politer than family about discomforts they will not mention. Asking one question of each regular user, what would make this work better for you, surfaces requirements no amount of solo research finds. Their answers occasionally conflict, and that is useful too, because a conflict found before buying can be designed around, while a conflict found after buying becomes the reason the thing is quietly disliked by half the household.
Think about the end of the story as well as the beginning. How will this be cleaned in year two, repaired if a part wears, passed on or disposed of when it is done? Products and arrangements with a sensible answer to those questions age gracefully. Those without them become problems slowly, then suddenly. A few minutes spent picturing the whole life of the purchase, delivery, setup, daily use, maintenance, storage and eventual replacement, is the closest thing there is to a guarantee that you will still be pleased with the decision long after the novelty has gone.
If you are replacing something that failed, let the failure teach the choice. What exactly went wrong: size, material, mechanism, capacity, or simply that it was bought for a different home and a different routine? Replacements bought on the same basis as the original tend to repeat the story. Replacements bought against a named failure usually end it. The same applies to arrangements that did not work: the layout or system that collapsed did so for a specific reason, and naming that reason precisely is the most valuable step in designing the next one.
Budget your effort, not just your money. Some options demand regular attention and repay it; others ask almost nothing and give slightly less. Neither is wrong, but the match between the effort a thing needs and the effort you will genuinely give it decides its fate. Be as honest about your future diligence as you are about your measurements. The keen household and the busy household should often buy differently, and recognising which household you are, this year rather than in principle, is a buying skill in itself.
And when everything checks out, commit. Endless comparison has its own cost: the job stays undone, the old problem stays in daily life, and the difference between the final two contenders is usually smaller than the difference between deciding and not deciding. Choose the option that meets your written criteria, set it up properly, give it its fair trial, and turn your attention to enjoying the improvement. That, after all, was the point of the whole exercise, and it is surprisingly easy to lose sight of it in the comparing.
Before you finalise any decision in this category, run one last check against the way your household really behaves, not the way you behave on a motivated Saturday. Where will this live on a tired weekday evening? Who will use it when you are not there to demonstrate? What happens to it during the busiest week of your year? Answers to those questions, given honestly, predict satisfaction far better than any feature list. The products and plans that succeed long term are the ones that fit ordinary life at its least organised, because that is the life they will mostly be used in.
It also helps to decide in advance what would make you change your mind. If you are choosing between two close options, name the one fact that would settle it, then go and find that fact in the product information or by measuring your space. Deciding by a chosen criterion ends the comparison cleanly. Deciding by accumulating more and more general impressions rarely does, and it is how a simple purchase turns into a week of open tabs and no decision. One clear criterion, checked properly, beats twenty vague ones.
When the new item or arrangement is in place, resist the urge to judge it in the first hour. Almost everything in the home feels different before it feels normal. Give it a fair trial across the situations it was chosen for, adjust the small things, positioning, storage, routine, and only then decide whether the choice itself was wrong. Most of the time the choice was right and the setup needed one correction. Knowing the difference saves money, returns and a great deal of low-level dissatisfaction with things that were nearly right.
Finally, keep the paperwork and the lesson. File the instructions and any guarantee information where you can find them, and keep your measurements and notes with them. The next related decision, a replacement, an addition, a gift for someone whose space you know, then starts from knowledge instead of from memory. Homes run well on these small archives. They are unglamorous, and they are the reason some households seem to buy the right thing first time, every time, while others buy everything twice.
Measuring deserves a final word of its own, because so many disappointments in this category are measuring errors wearing the disguise of product faults. Measure the space, the item and the route between them, write the figures down, and measure the critical one twice in different ways if you can. Allow a margin for the realities numbers cannot capture: skirting boards, uneven floors, handles, hinges, lids and the human hands that need to grip things. A plan that works on exact measurements fails in real rooms. A plan with honest margins survives them, and the margin is almost always cheaper than the return, the replacement or the workaround.
Consider also who else has a stake in the decision. Partners notice different things, children use things differently, guests are politer than family about discomforts they will not mention. Asking one question of each regular user, what would make this work better for you, surfaces requirements no amount of solo research finds. Their answers occasionally conflict, and that is useful too, because a conflict found before buying can be designed around, while a conflict found after buying becomes the reason the thing is quietly disliked by half the household.
Think about the end of the story as well as the beginning. How will this be cleaned in year two, repaired if a part wears, passed on or disposed of when it is done? Products and arrangements with a sensible answer to those questions age gracefully. Those without them become problems slowly, then suddenly. A few minutes spent picturing the whole life of the purchase, delivery, setup, daily use, maintenance, storage and eventual replacement, is the closest thing there is to a guarantee that you will still be pleased with the decision long after the novelty has gone.
If you are replacing something that failed, let the failure teach the choice. What exactly went wrong: size, material, mechanism, capacity, or simply that it was bought for a different home and a different routine? Replacements bought on the same basis as the original tend to repeat the story. Replacements bought against a named failure usually end it. The same applies to arrangements that did not work: the layout or system that collapsed did so for a specific reason, and naming that reason precisely is the most valuable step in designing the next one.
Budget your effort, not just your money. Some options demand regular attention and repay it; others ask almost nothing and give slightly less. Neither is wrong, but the match between the effort a thing needs and the effort you will genuinely give it decides its fate. Be as honest about your future diligence as you are about your measurements. The keen household and the busy household should often buy differently, and recognising which household you are, this year rather than in principle, is a buying skill in itself.
And when everything checks out, commit. Endless comparison has its own cost: the job stays undone, the old problem stays in daily life, and the difference between the final two contenders is usually smaller than the difference between deciding and not deciding. Choose the option that meets your written criteria, set it up properly, give it its fair trial, and turn your attention to enjoying the improvement. That, after all, was the point of the whole exercise, and it is surprisingly easy to lose sight of it in the comparing.